Tuesday, November 29, 2022

Gnome Bee Project Bag with Clear Front Window

One of my friend's and I both have birthdays in November, so we like to get together and celebrate sometime during the month of November. This year we each worked on our our projects together. Tara cut fabric for new projects, while I was sewing. It was a nice peaceful way to enjoy our birthdays together and do something sewing related too.

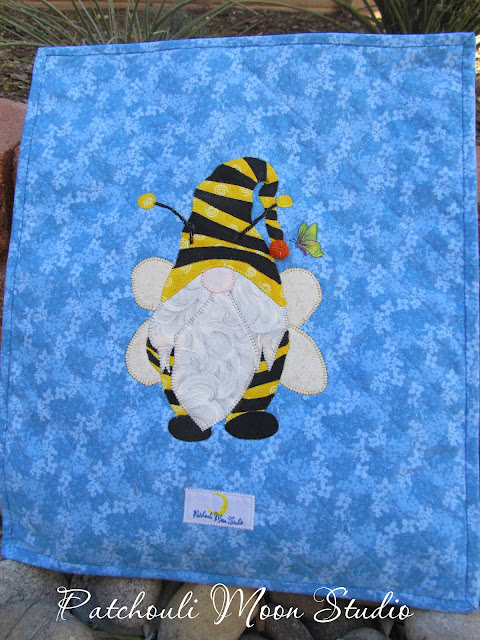
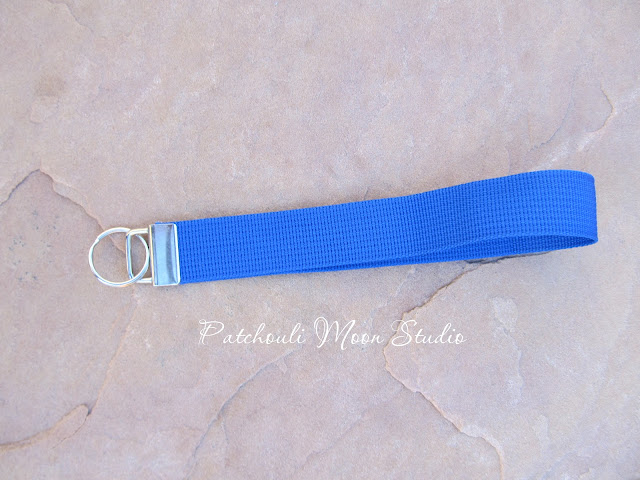
Afterwards, we had lunch together and exchanged gifts. I made Tara a project bag with a clear window to see inside and added an appliqué on the back. Tara and I both love gnomes and since she is a beekeeper now, I found a gnome bee somewhere online and created an appliqué that I stitched on the back of the bag. I also "made" a couple of scarf pins (I say made, but I only glued the little stick-pin part on it) and I also "made" a key fob wristlet, using poly webbing. 

Here is the Project Bag with the clear vinyl window I made for Tara. One of my favorite color combinations is blue & yellow. I think because when I was young I had a bedspread of daisies with yellow centers and blue background. My sister had the same bedspread in a different colorway of pink and green or was it just pink and the green were the leaves? Hmm...it was something like that. My sister has always loved pink and green together. Anyhow, on with the photos, lol!

Project bag with clear vinyl window. The yellow fabric is seen through the clear window.

Back of project bag with the gnome bee appliqué
I fused a butterfly from a piece of fabric I had (I didn't have a bee fabric
 to fuse and the gnome is a bee already). The end tip of his hat is a felt wool ball I hand stitched in place much like you would stitch a pincushion (in an asterisk shape) and added a few French knots in the center.


Closeup of the gnome bee
You can see the wool ball better here with the stitching.

Key Fob Wristlet I also gave Tara
Key fob made with blue webbing.


2 shawl pins I created that I gave to Tara too
I made" these 2 shawl/scarf pins out of glass and glued the metal stick part of the pin on the back. I also added a silicone back closure thingee (so technical I am!) to keep the pin in place. I prefer the silicone closure thing to the metal ones, as they grip better and I don't like pinching the metal parts to put the pin on. I bought heart shaped closures with glitter in them. I thought it best to get clear so the color wouldn't show from the front side (if it could show through). (Scroll to end to see photos).

I was having issues with various other shawl/scarf pins falling out of my knit shawls and scarves, so that is what got me thinking about making some of my own. I made 5 different glass ones and I had to buy them in packs of 10, so I have extras made. Only one is a tad larger than the others. These work best in finer knitting (lace, fingering, sport weight yarns). I will use those other stick type shawl pins (made from wood or metal) for heavier weight yarns that the stick won't slip out so easily. Plus those other stick pins if they are too thick, they won't fit through the knitting without damaging the knitting or creating a hole that might not close back up after the stick is removed. I guess I am opinionated about such things, lol!

After nearly losing a shawl pin in the past (I retraced my steps and found it lying on the ground), I knew I needed to make my own pins as no one was that I could find. And not many were making practical shawl pins out of other materials either. I guess those people aren't knitters or do crochet? Perhaps there isn't a market for shawl pins and that is why I couldn't find any practical ones? But I solved my problem by making these myself and they can also be used in other materials like on a coat, blouse, etc. However, they could make a hole in a blouse that is made with fine material. Okay I blabbed on enough!

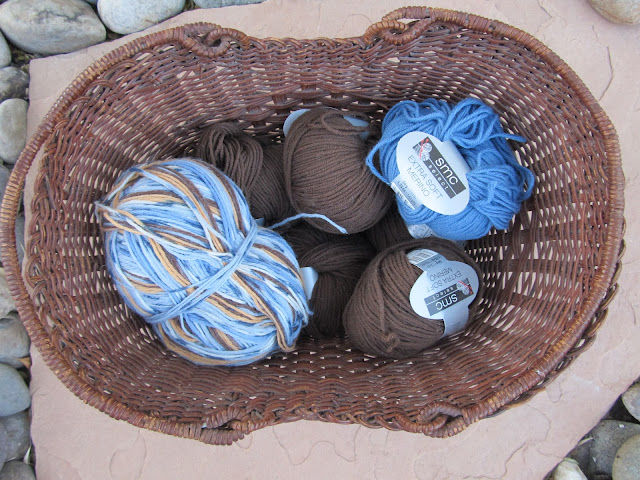
I received some nice gifts from Tara too. Tara gave me some lovely soft Merino wool yarn and a sock yarn in a variegated color, which she put into a basket and gave me the basket too. Plus, she loves paper crafting and upcycling paper stuff (like cards, calendars, etc.), so there were a lot of little cards and such that were placed into a larger cone shaped open envelope-like thing (sorry, I don't know what to call that, but it was so cute) and that created a really nice presentation.

The basket of yarn Tara gave to me.

Basket of yarn
Basket of soft Merino yarn.

Paper crafted cards
This is the envelope thingee that Tara placed all the cards that she made to give to me. It looks so pretty and festive!

Paper crafted cards all spread out to see them all
The upcycled cards and envelope that Tara made and gave to me.

Here are the 5 different shawl/scarf pins that I made.

This is the clear silicone heart-shaped pin back with glitter.

Can you believe December starts tomorrow? Geesh, the world is spinning by so fast!
Pin It Now!

Saturday, November 26, 2022

Happy Tails Quilt Block #1

Hello all you Dog Lovers! I am making the Happy Tails Block of the Month from Suzy's Artsy-Crafty Sitcom, design by Susan Meyers. The blocks are free for the one month that they are released. This block was released last month and so it's no longer free, but you can buy this single pattern. The 2nd block just came out, so you can get it free and the rest of them free if you download the pdf patterns before they expire in December.

I decided I would try to make these blocks doing Quilt-as-you-go (QAYG) and I hopefully will keep up each month. I usually never keep up each month and start off making only the first block, (if that) as I have so much going on, but I can make them later when the mood strikes. 

I think this Block #1 is so cute! The second block (#2) I printed out is a Dachshund. I need to get those pieces cut out soon if I am to keep up. I am using scraps of batiks and other fabrics too. I have plenty of the text dog wording, but the rest I will make scrappy, trying to use up whatever is in the scraps bags before I need to cut into yardage. I still need to hand embroider the butterfly antennae's on this block #1 too.


Hopefully I will have block #2 to share next month. Woof!
Pin It Now!

Friday, November 25, 2022

Sew Powerful Purses #217-231 (for 2022)

Hello beautiful people, I just mailed a box of 91 purses to Sew Powerful. Most of these purses were from the Sew-a-thon where I sewed 116 purses in the month of September. I had also mailed off a box to them in late September that was a mix of purses I had made prior to the Sew-a-thon, but needed some more purses to fill the box, so that box I added some purses from the Sew-a-thon in order to have a full box to send. I needed to make 15 more purses in order to fill the latest box and get it mailed off. 

231 purses made by me and sent this year feels great! I can still sew more purses in December, but I won't send them until I have a full box to send, so it won't get mailed until next year.  So while I will count any purses that I make through the end of this year as my total, Sew Powerful counts the total of what they received in 2022. 

These are the 15 purses I made to fill the box that I recently sent. All have the same red/purple floral print fabric on the front and back and I used scraps of that print along with other scraps I had to create the flaps of the purses. I get more purses cut out of each fabric that I use if I make the flaps scrappy. The flap is the largest piece to cut (in height), so if I cut the flap out of a print, I may or may not have enough fabric to cut the other exterior pieces.  It would be faster to sew if I cut the flap from one fabric, but not as creative or fun.

All the purse flaps are scrappy pieced with added button embellishments. These 3 have brown webbing straps.

These 2 have red webbing straps.

These 3 purses have a maroon color webbing strap.

These 3 purses have lilac webbing straps.

3 more purses with red webbing straps.

This purse has a dark purple webbing strap (even though dark purple tends to photograph more blue on my camera).

Side view of purse showing the rivet
On all of the purses, I add a rivet to each upper side to secure the webbing straps.

Back of purse showing the red/purple floral print
This is the red/purple floral print on the back of the purse. This is how all the backs look in this print (except for the small portion of the pieced flap, the backs are the same).

I hope you all have a safe and Happy Black Friday shopping day. Please check out my PayHip Shop for 25% off all items through December 12th. Use discount code: Y3XZ5929SD to receive your 25% off. Shop handmade, shop small. I appreciate you taking the time to browse my shop. Hurry for the best selection! All are one of a kind items, so when it's gone it's gone.
Pin It Now!

Sunday, November 20, 2022

Holiday Sale 2022!!!

Hello lovely Holiday Shoppers. I am having a Holiday Sale on EVERYTHING in my PayHip Shop: bags, wall quilts, table runners, knit items &pdf patterns too. Spend $100 or more and the shipping is FREE! 

You must add the following code in order to get the 25% off discount off your total order: Y3XZ5929SD. Sale is good through December 12th, so hurry for best selection.

Thank you so much for your support and Shopping Small in my store. I really do appreciate it!

My sewing goal for next year is to sew more purses for the Sew Powerful Purse Project charity and make as many Project Linus quilts for the local PL chapter too. So I would LOVE it if I could sell all of the items listed in my shop before the end of this year. That way I could help to support these 2 charities that are so near and dear to my heart! 

I also would love to do custom work only, such as making a bag in colors of your choice and style, etc. So please contact me through my shop or my blog to discuss having something custom made. I love custom work as you get what you want and I can make it knowing I don't have to list it for sale and wait for the one buyer who will love it enough to want to buy it. Custom jobs is a win-win for us both!


I will probably still list a few items each year in my shop to sell, but hope to just do custom orders, so if you are thinking of something you would like me to make for you, drop me a line so we can discuss it. Thanks!

I hope you have a joyful holiday season and a wonderful New Year!
Hugs,
Pin It Now!

Wednesday, November 9, 2022

Happy Birthday to Me Sale!!!!


My birthday is in a few days, so I am having a Happy Birthday Sale in my PayHip Shop. I will have a different sale each day in my shop and each sale will be good for 24 hours only, so grab a great deal while you can. 

In order to get the sale price you must enter the coupon code at my PayHip Shop. This first sale is for my blog readers only. Enter the code: JCPY75QLBK to receive 35% off any item in the Bags & Purses Handmade Collection. This sale will be good for 24 hours only! Sale starts 1pm Mountain Time 11/9/22 and ends on 11/10/22.

I will be having a different sales each day until my birthday (13th), so check back each day to find out what the next sale is. Thank you for your support.

Pin It Now!

Tuesday, November 8, 2022

Quilt Keeper on Sale!

Hello lovelies. The Quilt Keeper is having a sale on their 3-pack and you get another $10 off with the code WINTERSHIP  These make great gifts! So pop over and check out the Quilt Keeper. I love mine!

Here is my Quilt Keeper with my lap quilt on it~
It's so super easy to hang on the door and easy to remove too. No tools required!
Pin It Now!

Sunday, November 6, 2022

Paisley Splash Elephant Quilt

Hello scrappy quilt lovers and appliqué lovers. I made this quilt using scraps, scraps and more scraps. I started off piecing yellow fabric scraps for the background of the quilt. It sure feels good to use up even the tiniest of fabric scraps, however the reduction of scraps used is small as I end up with even more scraps after cutting the backing and the binding. Ugh! Such is the nature of sewing with scraps I suppose. But still, I do love to use scraps, especially as background as it not only looks great and adds more interest than using a plain piece of fabric, but it does feel more creative and more artsy looking too.

After I made the background, I found this free pattern, Paisley Splash, from Windham Fabrics (designed by Myiesha & Katie) that featured an appliqué elephant with his trunk held high and paisley shaped water (and circles) falling down. A purple elephant seemed to look the best on the yellow background, since yellow and purple are complimentary colors. I added touches of pink and blue for the paisley and circles, using whatever scraps I had on hand. 

I am donating this quilt to Project Linus. I belong to a PL group that meets twice a month and I prefer to do my own thing with my own fabrics. They do have kits available to sew at the group for simple quilts like strips to make rag quilts or squares to sew together. I would be bored to tears if I couldn't create what I wanted to make and choose my own colors/fabric. But it is great that others in the groups do sew those kits when we meet. It is especially great they have quilts for beginners who join us as they are easy to sew. I tried one the first time I went and completed one flannel rag quilt during that time. 

But a few of us just need to do our own thing and so it's nice I am not the only one who wants sew what I like. Then the Show & Tell is more inspiring and just might encourage others to try something of their own one day too.  We also meet across town with all the PL groups in the Albuquerque area for just Show & Tell once a month. I will be attending my first meeting for that in a week. I have this quilt and the green triangle quilt (also made with scraps) that I appliquéd a bear in flannel on the quilt to show at the meeting. I hear it's very inspiring to see all the great Show & Tell and I am looking forward to attending that meeting.

This quilt measures 33" x 30.5". I just made the background the size I wanted it to in order to fit within the PL guideline sizes. The actual pattern for this quilt measures 22.5" x 33.5". I needed this quilt to be a bit larger. Since it's appliqué, you can make the background any size you want to.


Closer look at the crumb piecing and quilting.


I have lots of PL ideas and using up all the scraps that never seem to end. A lot of those scraps come from me making the Sew Powerful Purses that I donate also, so I need some place to use up scraps! Happy piecing, appliqué & quilting my friends!
Pin It Now!

Friday, November 4, 2022

Mini Iron Storage Case for Mini Oliso Iron (or other small travel irons)

Hello all you ironing buffs. I tested this Mini Iron Storage Case for Around the Bobbin patterns not long ago and now the pattern has been released to purchase as a pdf or paper pattern and it's on sale for a very short time too. Scroll to the end of this post for the discount code of 30% off! ( On sale for a limited time.)

This iron case was designed to fit the Mini Oliso iron, but it will work for any travel sized iron too. I do have the Mini Oliso iron and another travel iron, so I took photos of both irons so you can see how each fits into this case.

The instructions are great, as usual and pretty easy to make too. I chose to use a batik fabric and a purple grunge fabric for my storage case. Now you can store your travel iron in style when you go to a class or retreat or to sew with a friend.

Be sure to check out the other tester's versions too, here.

Here shows my Mini Oliso iron with the silicone resting mat inside the Mini Iron Storage Case.

And here it is with the drawstring cinched closed.

The side and the bottom of the case looks like a boot.

I used batik fabric and a purple grunge fabric to make my case.


A side view of the iron in the case.


I also have a Dritz travel size iron and it is smaller than the Mini Oliso iron, so it doesn't take up as much room inside; but this case does work well for this Dritz or any travel sized iron.

The Dritz travel iron inside the cinched iron storage case.

The coupon code is MINI30 and will be on sale from Friday through Sunday (CDT) for 30% off the pattern (PDF or Paper). Buy the pattern here.
Pin It Now!

Tuesday, November 1, 2022

Chevron Quilt in Scrappy Greens with Flannel Bear Appliqué

Hello Scrappy Quilt Lovers! I made this quilt by first digging through my green scraps, Next I pressed the scraps and got out my Crossover II Die Cut Machine by Crafter's Edge and cut 1/2 Square Triangles. I arranged the triangles to be sewn in a light & dark Chevron pattern. I quilted it down the center of each triangle, so the backing looks like a zigzag (but forgot to photograph that). 

While I liked the all green quilt, it needed something else, so I cut out a bear with a scarf all in flannel fabric and appliquéd the bear onto the quilt. This quilt will be donated to Project Linus this month.


I did add button eyes to the bear, so this will be given to a child over the age of 3 years, since under 3 years old the buttons could be a chocking hazard. I did stitch the buttons on well and even added glue over the thread to be more secure.

This is my November project for Crafter's Edge.


Pin It Now!
Related Posts Plugin for WordPress, Blogger...