Thursday, January 31, 2019

Nine-Patch Pincushions

I made all of these pincushions last year. I wanted to use up scraps, buttons, poly stuffing and give a few to friends in my applique group and the rest I gave to our large quilt group who in turn will give them to the charity fundraiser at this year's Fiber Arts Fiesta in Albuquerque. The Fiesta asks all fiber guilds to make some kind of "do-lollies" (as one member calls these little handmade items) and the items are sold for $5 each to raise money for the chosen charity that year. You can find some really nice things and it goes to a good cause too. So along with a bunch of other items I had already made and donated to the group, I gave them some of these 9-patch pincushions.

I made more than the 13 pincushions I show here because some of them were made in the exact same fabrics. I think I made 20 total.


Oh that lint! Why does it show up when I take photos?


This was the first pincushion I made and it is tiny. Here is a visual to show you the scale of the tiny one. I decided to increase the size and made the rest in the larger size.

To show you the difference in size between the two, you can see how small the one on the left is. The one on the left is 2.25" square and the one on the right is 4.25" square. I decided 4.25" square was a nicer size and easier to make and used up more scraps too!


I had some strips that I found that were already sewn together, so I made these in stripes instead of  9-patches. Good way to use up some already sewn pieces.


Pin It Now!

Tuesday, January 29, 2019

Coiled Fabric Bowls

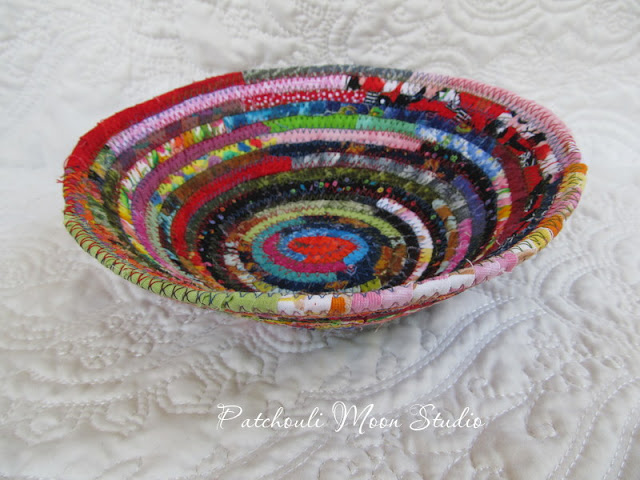
I made a lot of these coiled fabric bowls last year. Some were sold in a gift shop, others are on consignment in another shop. Most were made using scraps of batik fabrics. Bowls 2 and 3 used commercial fabrics.

Bowl 1

Inside of bowl 2

Bowl 2

Bowl 3

Inside of bowl 3

Inside of bowl 4

Bowl 4

Inside of bowl 5

Bowl 5

Bowl 6

Inside of bowl 6

This is the inside of  bowl l. Somehow got out of order, oops.

Pin It Now!

Monday, January 28, 2019

Barbados Bag

I got the Barbados Bag pattern (by Pink Sands Beach) at a destash sale in August. The pattern came with fabric and zippers, (so I guess it was more of a kit) but while I liked the fabrics it came with, I wanted to use my own fabric first and see if I liked this bag and pattern enough before making any more. Plus I do make changes in nearly everything I make and wanted to make mostly according to the pattern to see what I might change if I do make again.

For a small cross body bag I thought the amount of pockets in this bag was overkill. (Mine had 8 pockets in all, if you count the little pen pockets I added by dividing the interior slip pocket). I think the pattern suggests dividing the inside pocket into 3rds, which would yield a total of 7 pockets). While I like pockets, in small bags having too many pockets and filling them up with stuff leaves little space left for any larger items as the bulging pockets encroach into the larger space. Plus it makes it difficult to find things when the pockets are so full and the main space is crowded too. If you want this many pockets, then go for it in a larger bag where the pockets will be more balanced to the bag size and won't crowd other spaces too much. Unless you are only placing flat items inside the pockets such as your shopping list and coupons, which wouldn't impede into the main space, then that's fine, but do you really need so many pockets in a small bag? I suppose you do not have to put things in most of the pockets.

After making this bag, I found the basic size and shape of it similar to a few other bags I have made before, and I prefer those other bags much better to this one. So bottom line, even if I make changes to this bag, I would rather make the other bags instead of this one again. But I know this is a popular style bag and has been around a long time. If you do make one of these bags, you can make your own changes to suit your needs. I will sell this one at one of the shows I do this year to someone who loves it. I am not knocking this bag or pattern at all, just pointing out things that I would personally change to make it more user friendly. It is a great looking bag and functional. I think it would be better with fewer pockets is all.


I do love the floral print and the stripe fabric is a coordinating fabric in the same line. I added the solid brown to accent it. The strap is adjustable to fit any size woman across the body or on the shoulder.

The front has a zippered pocket and behind the stripe fabric is a slip pocket, which would be great for keeping your phone, unless you want your phone more secured in the zippered pocket or the back slip pocket. So many choices of where to put your phone and other items.

The back has a divided slip pocket, giving you 2 pockets, which in my opinion are rather too long, since you would have to really reach your hand deep down in there if you had something small in these pockets. If I did this bag over, I would either not divide this pocket at all, making one large pocket or I would make it shorter in height and divide it, or not include this pocket at all. With so many pockets, the thickness adds up to sew it.

The bag closes with a zipper, which is nice.

Inside the bag is a divided slip pocket, which you can divide as you wish. I think having a pen pocket is always handy, so I made more than one pen pocket and the remaining larger pocket I kept large instead of dividing it too small, as you wouldn't be able to get your hand inside anything too small. This slip pocket could have been divided into thirds without a pen pocket or in half.

Pin It Now!

Wednesday, January 23, 2019

(2) Blue Arabesque Bags @ 90% Size

 I have made several Arabesque Bags (by Sew Sweetness) in the original size and at 80% and I wanted to try making one at 90%. It's just slightly smaller than the original size, but enough to notice a difference if seen side-by-side (Sorry I don't have all 3 to show the size difference right now). This is the middle size I have made, so it's also slightly larger than the 80% size. I think I like this one at 90% the best. Like Goldilocks said, "It's just right", not too big and not too small. Well being a middle child myself, I do tend to like things in the middle like not too large or too small, not too hot or too cold, not too mild or too spicy. You get the point.

Before Christmas a knitting friend needed a gift to buy for a friend and asked me to bring some bags in blue to show her at our knitting meeting in December. She had purchased the Arabesque bag in the original size from me in purples for herself. I had a few styles of bags to show her in blue, but one of the ones I thought she might like the best, it had sold on Etsy before we were to meet. I am glad it sold, but that got me thinking that I should make another blue bag and why not try making this Arabesque at 90%. I did and then showed her a few bags in blue and of course she liked this Arabesque one best and bought it.

Another knitting friend saw the bags I brought in at our meeting and said she would like this blue bag if it doesn't get purchased. Since it did, I offered to make her one in whatever colors she liked and she also liked blues. So I made another Arabesque at 90% for her. Those photos are past these and called Arabesque @ 90% too.

Arabesque Bag @ 90%:

Inside has a slip pocket with a pen pocket divided on the left side.
Fanny looks rather stylish modeling this Arabesque Bag @ 90%.

Fanny (the Manny-quin) is modeling this bag to give you an idea of size. I finally decided I needed a mannequin to show the scale of my bags. The only problem with Fanny is that she is awkward to move and her limbs fall off way too easily! Just adjusting her slightly her arms and one leg will fall off.!


Zipper closure with a handmade charm.

The back I added a zippered pocket. I started adding zippered pockets to the last several Arabesque Bags that I have made because it's so nice to have an outside pocket for keys or a phone.

Inside the lining is a Morning Glory fabric.

Arabesque @ 90% too:

Arabesque @90% too I used a different variety of fabrics that had some blue in them.

I decided to keep my dress form because it's much easier to move around and doesn't fall apart. Well having no limbs helps, lol!


The back side of Arabesque Bag @ 90% too, with the zippered pocket.


Blue inside fabric with a slip pocket and pen pocket.

Pin It Now!

Monday, January 21, 2019

Kisslock Metal Frame Purse

I bought a kit to make this purse I don't know how many years ago. I had sewn the pieces together, but it sat for years until a month or so ago I finally sewed the bag to the frame. It takes time to sew the frame on, and things do tend to shift around no matter how I basted it around the frame to hold it in place. Since this is a larger frame than I have used before and has an "M" shape to it, it was more time consuming to sew on. I know how it is to sew one of these frames on, so I have always been too nervous to try the glue on kind of frame. I just know I would have glue on the purse and me and ruin it all, so even though the sew on kind is a pain, I would rather sew (and rip out if I need to) than to glue it on.

It actually came out nice and I am glad it's finally finished. I never had a frame like this with the metal handle (see photos lower down), so it's nice to be able to try one. I think I will stick to making other bags instead of using metal frames like this; however I do have other metal frames I bought years ago and need to make some bags to use up those frames too. They are a little different than this frame. Maybe if I can get myself to make one bag a month using a metal frame this year, I might use most of them up. But then you know how making plans go, so I won't make any promises. We'll see...

I did like this pretty floral print. 

The other side of the bag to see the rest of the floral print.

I had to hold up the metal handle because it won't stay up on it's own.

The handle fall down like this if you don't hold it up.

The inside of the bag. I love how the bag opens up so wide.  See those little metal thingees on the lower right and left side? You can clip on a chain strap so this can be worn on your shoulder too. The metal handle can be removed or just let it flop down like in the photo above.

I added a slip pocket inside too.

Pin It Now!
Related Posts Plugin for WordPress, Blogger...