Friday, December 30, 2022

Save Me From the Dumpster Sale!!! All Inventory is 40% off (limited time only)

Hello adorable people. HAPPY NEW YEAR too! I am having a sale on all of the inventory in stock at a whopping 40% off everything in my PayHip Shop. I need to sell my inventory, so before it ends up in the dumpster (or donated), I am offering 40% off to all of you. Spend $100 and shipping is free. Sale is good through January 8, 2023, Mountain Time. This offer is good in the USA only (sorry but postage is just was too high to ship to other countries).

I am calling it my Save ME From the Dumpster Sale, because apparently I am rubbish at online selling. (Get it? Rubbish, Dumpster, lol!) I don't really understand all the algorithm stuff or what key words to use and hashtag, or how to attract people to look (or buy) at my shop, blog, Facebook or Instagram, so I don't want to make stuff in the hopes that someone (it only takes one person) will like it enough to buy something. I will continue to do some custom orders, but making stuff in the hopes that I can sell it is just not working for me and the bags and quilts are piling up in my house, so I have to sell it, donate it or dump it in the dumpster.

You need a CODE in order to get the 40% off, which is: V15XOOH5WW
Copy the code go to my PayHip Shop and start adding items to your cart. Use the coupon code at checkout.

Please share this code with your family and friends or share this blog post, or share my Facebook and Instagram pages that I post about my sale. Thank you!!! I know most people are reading other social media now and not blogs and there seems to be new social media platforms popping up all the time and I cannot keep up with all of that, nor do I want to. In fact, I would prefer to be on social media less and less.

My 2023 goal is to sew purses to donate to Sew Powerful, and for Project Linus making and donating quilts and a bit of personal sewing for myself or friends. There are so many people out there selling handmade items now, that unless they are really good online and know how to attract followers and buyers, they might not make many sales. I am not interested in learning how to do all of that as it sucks the joy of sewing and creating right out of me! I am getting too old to want to learn it and even if I did do everything perfectly in order to attract followers and buyers, I don't want to create just to sell it. I need JOY and purpose and that is why the charities I sew for fulfills me  so much more than the money I receive from selling does. In fact, I will make a charitable donation to Sew Powerful for 2023 if I make enough sales from my PayHip Shop. How much the donation will be will depend on how much I sell. It might be a percentage or a flat amount, depending on sales. PayHip & PayPal take out their percentages too and there are shipping costs as well. So I won't be making much if any profit at all from the sale. 

Thank you all of my followers, friends and customers. I hope you all have the best New Year ever in 2023. Hugs!


Pin It Now!

Monday, December 26, 2022

Simply Charming Twister Tote

Hello Bag Lovers & Twister Quilt aficionados. Now that Christmas is over I can share a custom bag order that I made using the Lil' Twister Tool from Around the Bobbin and the Simply Charming Twister Tote pattern that is also from Around the Bobbin too.

A good repeat customer who loves my work (it's so nice to hear that from people who buy bags from me, especially when they buy more than once) asked me to make this tote for her daughter for Christmas and told me to choose any color. I love to choose fabric colors and I chose to use a variety of batik fabrics to make this bag. 

I added the hardware D-rings and rivets and purse feet too that were not part of the pattern. I also quilted the entire bag instead of just the Twister part. I think it looks better that way. I love how it turned out!

Front of the bag.

The back of the bag has a few different batik colors of the Twister Pinwheels.

Variegated colored thread for the quilting.

Has to have a Handmade label. Limited Edition is right! It is limited to just this one bag as I won't repeat it in the same fabrics ever again. One of a kind bag for sure!

Side view to show the depth of the bag.

The bottom of the bag with 6 purse feet.

Interior of tote
The tote closes with a magnetic snap closure and the tote can open really wide.

Interior of tote showing zipper pocket
I added a zipper pocket inside too.

Interior of tote showing the slip pockets
I added a large slip pocket that I divided in half with a narrow pen pocket at each end.

I love Twister blocks! They make for great bags and quilts. Linda, I hope your daughter loved this tote!


Pin It Now!

Monday, December 19, 2022

Scrappy Dogs Quilt

Hello Dog Lovers everywhere. I made this quilt after seeing a photo of it at the Sisters Outdoor Quilt Show. My friend who lives in the area took lots of photos of the quilt show to share and I loved how cute the dog quilt looked. I wasn't sure if there was a pattern for this, so I just drew a dog on paper and used scraps of my fabrics to create the dogs, background and borders. It just looked like a great scrap buster quilt to me. 

Later I did several searches online and I finally found there is a pattern called, Mod Dogs by Linda Sullivan. So if you want to make a Mod Dog quilt, you can search for it online. 

This quilt I made is approximately 21" wide x 59.5" long. Don't ask me why I made it so long and narrow. I guess I just kept going without thinking about what I was going to do with this quilt. It would look good on a narrow wall, I suppose.

Mod Dog Quilt
I tend to make changes in quilts I make, even if I do follow a pattern.
 I used squares for the background and scraps in the border on the sides only as the quilt was rather long already. 

I used a variety of scrap widths in each color family that I chose to make the dogs out of. I think the pattern is one width only. I prefer a variety of widths to add more interest and use up more scraps!

I machine blanket stitched around the dogs and used buttons for the eyes, (or eye of each dog).


This was a fun quilt to make and I might add a dog or 2 on top of other quilts that I make to donate to Project Linus. This quilt is too narrow to donate to PL. I wasn't thinking about the final size I wanted the quilt to be, I just wanted to try making it and using up my never-ending pile of scraps, which of course you can never ever use them all up no matter how large a quilt you make, lol!

Pin It Now!

Saturday, December 17, 2022

Table Top Ironing Board & Cover

My daughter had a full size ironing board and iron that I bought for her at a garage sale years ago. I noticed it was gone from her closet and thought maybe she donated it? I didn't see it in her usual giveaway spot. Then one day she mentioned someone had borrowed it and never returned it. She told me the reason she never asked for it back and I totally understood. 

I have seen ironing boards all the time at the thrift shops and thought if I find a good one, I will make a new cover for it and give her one of my small travel irons as she doesn't use an iron that often. The day I went to the thrift shop I saw 3 full sized boards and one table top board. I grabbed the table top board and put it in my shopping cart while I looked at the other ones. I tried opening and closing the full sized boards and I will tell you trying to close them was a pain in the you know what! Easy to open up, but on all the boards it wasn't clear where you pushed to close them! So that was enough to convince me the table top one was the best one to get. It's smaller, opens up and folds down so easily and can be placed on a table or the counter to use it.

It had a stained muslin cover that was very thin and a piece of thin foam under that. The board is wood. So I traced around the cover that came with the board onto the fabric I wanted to use to create a pattern. I also added Insul-Bright on top of the wood base instead of the foam and added the cover. I made it with a drawstring and drawstring plastic lock to keep it taught and in place. 

I took it over to my daughter's house with the iron and left it there. She asked if that was to replace the other one and I said yes. I told her about the difficulty closing the full sized boards and she liked the smaller board much better anyhow, which I thought she might.

So here is her new board and iron:
Looking through my fabrics to decide on what fabric to use that was large enough, I decided on this gingham in red & white. I thought it would look the best for an ironing board cover and I was right!

I got the travel irons years ago from someone that didn't want it. It is a Clover Brand iron. I have used it a few times and it is a nice iron. No steam either. That part on the front is actually a sprayer. There are no steam holes on the iron bottom, since it doesn't steam. I only use a spray/mist bottle and an iron myself, because irons just won't last if you put water in them for steam. They start to leak and they eventually start spitting out brown gunk that stains and ruins your clothing or fabric too! So I learned to never add water to an iron again! 


Pin It Now!

Tuesday, December 13, 2022

Project Bag with Clear Vinyl Window (Extra Large)

I made an extra large Project Bag with a clear vinyl window for a friend. She makes a lot of Project Linus Quilts to donate and I thought she could use an extra large bag to carry her latest project in and be able to see what's inside by having a clear window on the front. I also used 3 UFO blocks that I made a very long time ago. The 2 blocks on the back of the bag were from a Mystery BOM & Swap from Dream Worthy Quilts, called Quilter's Garden. It was a sewing garden theme. We swapped one block each month w someone assigned to us. So I have those blocks to use as well (just might make myself an extra large bag like this too). The bag measures approximately 20" W x 22" H.

I combined ideas from other project bags I have made in the past to create this one. I had to add a couple of strips at the top as I guess I didn't calculate the height exactly, but I had to sew strips and blocks anyhow to create the back quilted piece.

I added her name on the bottom using Crafter's Edge Alphabet die cuts. I also added a couple of butterflies using Crafter's Edge Butterfly die cuts too. The quilt block on the inside is something I painted years and years ago. I had made small quilts to give as gifts as I painted several of those. The image was from a copyright-free book I had.

On the back of the bag, I used a Rotaries in Bloom block , which is a Dresden Flower with a rotary cutter "stem" and an iron block. These blocks were so fun to make and I have used them in making a sewing machine cover too. As you can see, I quilted the back in a grid.

Rotary in Bloom Dresden Flower block.

I used Crafter's Edge Alphabet die cuts for create the name and the butterflies too.

The iron block.

A zipper pull I made.


Julie said she loved the bag, so that made me happy. I am sure she will load it up with her Project Linus quilts when she comes to our PL group to sew.
Pin It Now!

Tuesday, December 6, 2022

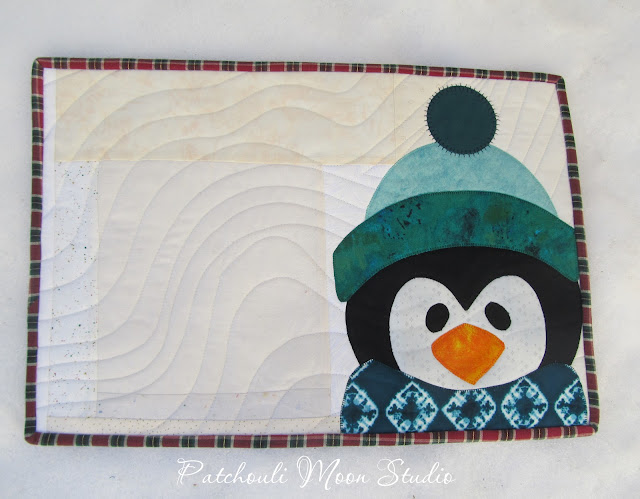
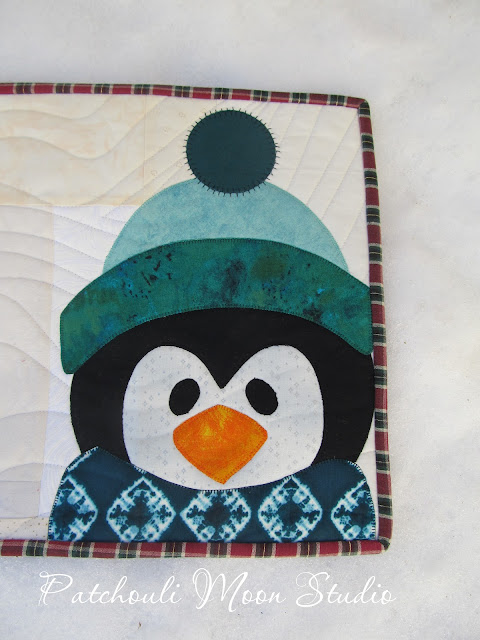
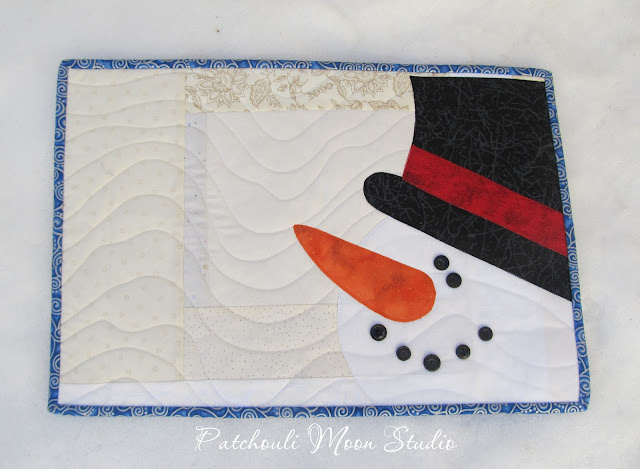
2 Penguins & 2 Snowmen Quilted Placemats


I usually don't participate in this hop because I don't bake cookies anymore (for various reasons, mainly I cannot eat them anymore), but I asked Carol if it was okay I didn't post any cookies and just a project and being the sweet Carol she is, she said of course you don't have to post about cookies. So thank you Carol of Just Let Me Quilt for hosting this blog hop. So while I don't have any cookies to share,  I do have some other quilted delights!

I found these in a magazine and thought they were so cute that I had to make a set. They are a set of placemats, but could just as easily be used as wall quilts or a small table topper. Since all that white snow would become stained too quickly as a placemat. I used scraps of white and off white to create the backgrounds for the Penguins & Snowmen appliqué quilts.

This Penguin is sporting a pair of earmuffs. That is real snow this quilt is lying on too. I took these photos early in 2022 when it had snowed and never shared these little quilts before until now.


This cute Penguin has on a hat and scarf. I love the pompom on the hat!


Both Penguins together on the snow.

This fun snowman is wearing a tall hat that flops over and also has a pompom on the hat.


This snowy guy is wearing a stovepipe hat and has button eyes and button smile instead of charcoal.


Both snowmen together in the snow.

Here is the full schedule for the blog hop:

Pin It Now!

Saturday, December 3, 2022

Blog Hop Coming December 5-8: Virtual Christmas Cookie Exchange & More!

It's that time of year again for Carol (of Just Let Me Quilt) to host the Virtual Cookie Exchange Blog Hop. Thanks Carol!

It's not just about cookies. There could be projects too or just projects to share. It is always fun to hop along and take a peek at what others do for the holiday season, so be sure to come back December 5-8. See you then.

Pin It Now!

Tuesday, November 29, 2022

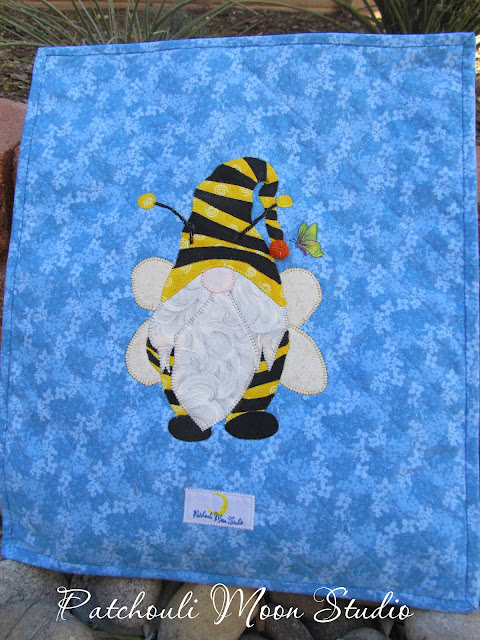
Gnome Bee Project Bag with Clear Front Window

One of my friend's and I both have birthdays in November, so we like to get together and celebrate sometime during the month of November. This year we each worked on our our projects together. Tara cut fabric for new projects, while I was sewing. It was a nice peaceful way to enjoy our birthdays together and do something sewing related too.

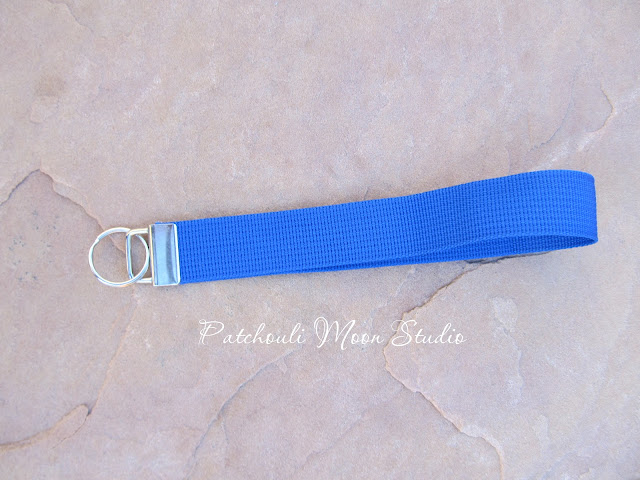
Afterwards, we had lunch together and exchanged gifts. I made Tara a project bag with a clear window to see inside and added an appliqué on the back. Tara and I both love gnomes and since she is a beekeeper now, I found a gnome bee somewhere online and created an appliqué that I stitched on the back of the bag. I also "made" a couple of scarf pins (I say made, but I only glued the little stick-pin part on it) and I also "made" a key fob wristlet, using poly webbing. 

Here is the Project Bag with the clear vinyl window I made for Tara. One of my favorite color combinations is blue & yellow. I think because when I was young I had a bedspread of daisies with yellow centers and blue background. My sister had the same bedspread in a different colorway of pink and green or was it just pink and the green were the leaves? Hmm...it was something like that. My sister has always loved pink and green together. Anyhow, on with the photos, lol!

Project bag with clear vinyl window. The yellow fabric is seen through the clear window.

Back of project bag with the gnome bee appliqué
I fused a butterfly from a piece of fabric I had (I didn't have a bee fabric
 to fuse and the gnome is a bee already). The end tip of his hat is a felt wool ball I hand stitched in place much like you would stitch a pincushion (in an asterisk shape) and added a few French knots in the center.


Closeup of the gnome bee
You can see the wool ball better here with the stitching.

Key Fob Wristlet I also gave Tara
Key fob made with blue webbing.


2 shawl pins I created that I gave to Tara too
I made" these 2 shawl/scarf pins out of glass and glued the metal stick part of the pin on the back. I also added a silicone back closure thingee (so technical I am!) to keep the pin in place. I prefer the silicone closure thing to the metal ones, as they grip better and I don't like pinching the metal parts to put the pin on. I bought heart shaped closures with glitter in them. I thought it best to get clear so the color wouldn't show from the front side (if it could show through). (Scroll to end to see photos).

I was having issues with various other shawl/scarf pins falling out of my knit shawls and scarves, so that is what got me thinking about making some of my own. I made 5 different glass ones and I had to buy them in packs of 10, so I have extras made. Only one is a tad larger than the others. These work best in finer knitting (lace, fingering, sport weight yarns). I will use those other stick type shawl pins (made from wood or metal) for heavier weight yarns that the stick won't slip out so easily. Plus those other stick pins if they are too thick, they won't fit through the knitting without damaging the knitting or creating a hole that might not close back up after the stick is removed. I guess I am opinionated about such things, lol!

After nearly losing a shawl pin in the past (I retraced my steps and found it lying on the ground), I knew I needed to make my own pins as no one was that I could find. And not many were making practical shawl pins out of other materials either. I guess those people aren't knitters or do crochet? Perhaps there isn't a market for shawl pins and that is why I couldn't find any practical ones? But I solved my problem by making these myself and they can also be used in other materials like on a coat, blouse, etc. However, they could make a hole in a blouse that is made with fine material. Okay I blabbed on enough!

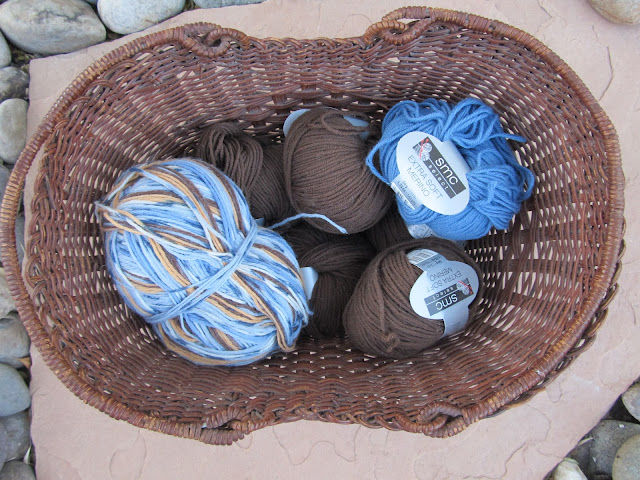
I received some nice gifts from Tara too. Tara gave me some lovely soft Merino wool yarn and a sock yarn in a variegated color, which she put into a basket and gave me the basket too. Plus, she loves paper crafting and upcycling paper stuff (like cards, calendars, etc.), so there were a lot of little cards and such that were placed into a larger cone shaped open envelope-like thing (sorry, I don't know what to call that, but it was so cute) and that created a really nice presentation.

The basket of yarn Tara gave to me.

Basket of yarn
Basket of soft Merino yarn.

Paper crafted cards
This is the envelope thingee that Tara placed all the cards that she made to give to me. It looks so pretty and festive!

Paper crafted cards all spread out to see them all
The upcycled cards and envelope that Tara made and gave to me.

Here are the 5 different shawl/scarf pins that I made.

This is the clear silicone heart-shaped pin back with glitter.

Can you believe December starts tomorrow? Geesh, the world is spinning by so fast!
Pin It Now!
Related Posts Plugin for WordPress, Blogger...