Wednesday, May 27, 2020

Twisty Zip Pouches & Hot Stuff Extra Large Silicone Trivet

I tested these 3 Twisty Zips pouches from Around the Bobbin and they are so cute and fun to make! The pattern includes 2 sizes. I made 3 total (1 small and 2 large). I started with the small size because it was so small and it uses the Itty Bitty Twister Ruler/Template. I wasn't quite sure how small these would turn out, so I photographed a quarter in a few of the photos showing the small size bag.
FYI: Discount code for pattern at end of this posting. Discount good only Thursday-Sunday (May 28-31st)

The Twister part of these Twisty Zips is great for using up scraps or coordinating fabrics of light and dark. You can use mini charm packs for the small Twisty Zip Pouch, using the Itty Bitty Twister ruler. You can use regular charm packs for the large Twisty Zip pouch that uses the Tiny ruler if you cut the charms smaller first.

Here is the small size Twisty Zip I made with batik scraps and a wrist strap. Uses the Itty Bitty Twister template/ruler.

The other side.

2 slip pockets inside the pouch.

See the size of the quarter in comparison to the Twister pinwheel? These are small! But oh so cute and not that hard to make, really.

Adorable little pouch to hold just a few smallish items or would be great to hold your phone, ID and keys.
 The next 2 Twisty Zip bags are made using the Tiny Twister template/ruler. I know that sounds odd making the large bag with the Tiny ruler, but as you saw above the small was made with the Itty Bitty ruler.

This one is a good sized zippered pouch like most sizes you see around. I added the wrist strap on this first one and forgot to sew on the tab with the ring on the second bag. I had it all sewn and the strap too and just forgot to sew it. That's okay because when I make some more Twisty Zips, I will have a strap ready to go. You can add the strap or not as you like. This way you can see one without the strap. But since the strap is removable with the hook on the strap, you can leave it on or take it off as you wish.

Made this one with more batik scraps and a cork-look cotton fabric.

The other side of the bag.

These Twisty Zips open nice and wide. More batik fabric inside. I added a zippered pocket on one side and the slip on the other side, instead of 2 slip pockets.


Large and small bags together for comparison.

Oops, I forgot to add the quarter in the last photo, so here it is for scale.

No wrist strap on this one. I used a charm pack I had in Christmas fabric and again a cork-look cotton fabric.

Back side.

Inside I added a zippered pocket and and slip pocket as I did with the other large bag. The fabric here photographed very light! That gray look is really a medium blue with gold stars.
Now before you leave, you can get a 30% discount on the Twisty Zips pattern from Around the Bobbin or Twister Sisters Just enter the code: New30 at either place.
Don't forget to buy your Itty Bitty and/or Tiny Ruler/template tool(s) too so you can make these cute pouches (although only the pattern is on sale at Around the Bobbin).

However, if you go to Twister Sisters, you can use the code May20 and receive 20% off everything (Twister, except the Twisty Zips pattern), which you can use the New30 for 30% off the Twisty Zips pattern only.  You will love making these pouches and you can also use the Twister Templates for making cute little Twister projects such as place mats, mug rugs, doll quilts and so much more!
Discount good only Thursday-Sunday (May 28-31st), so get the pattern now while it's on sale.

Happy Twister Sewing!

Oh and if the Twisty Zips don't float your boat, you can make this super easy Hot Stuff Trivet. Pattern comes with the silicone.It's extra large size is perfect for placing a casserole dish at the table. Silicone refills available separately.
On sale at Around the Bobbin also at 30% off with the code New30. Discount only good through May 31, 2020.


This is super easy to make and easy to sew through the silicone.

Back side is quilted.

Close up.

Pin It Now!

Tuesday, May 26, 2020

Zippered Bag in Wool Look Applique Print

I bought this beautiful fabric print several years ago after seeing Liz make her Lombard Street Bag with it when we both were testing that bag for ChrisW Designs. I fell in love with it. Liz lives in Germany and I knew I hadn't seen anything like that here. So I did a search online and found it and emailed back and forth to see if I could buy metre of of it. I got the fabric and because with the cost of postage from Germany, it was rather expensive fabric, so I was afraid to cut into it for years. I wanted to make sure I made a bag that I knew was a good design first as well, because I didn't want to waste any of it. I only used a small amount of that fabric to make this bag, so I have enough left to make some more bags too.

I used the floral section of the bag only. There are birds and some dots too that I didn't cut into, so when I use that part of the fabric, it will look totally different. I also needed to use this fabric so that I was featuring the fabric to it's best. I didn't want half a bird showing just to use it. So I decided to make the small size retreat bag (Emmaline Bags), but without a frame in the bag and I made the bag taller and added strap tabs and straps too. The dark base of the bag is real wool material. I love how this one looks and yes I am keeping this one for myself.

I decided to take my bag on a location shoot around my yard, lol!


I sewed some flower buttons on both zipper tab ends.

The back of the bag showing other faux wool flowers.

I made the inside fun by using 2 fabrics for the lining. A zippered pocket and a slip pocket too.


Pin It Now!

Thursday, May 21, 2020

Simply Charming Twister Tote

It's Cool to Be Square Blog Hop
Thanks to Carol of Just Let Me Quilt, for hosting this blog hop.

Here is my Cool little story about Squares. I had wanted to make this tote bag for a while and this blog hop was the perfect reason to make it. I had purchased a charm pack in 2016 as we drove through Boise, Idaho on our way to Washington state for my Mom's 90th birthday celebration. We stopped at a few quilt shops along the way in a few states. I had no idea what I was going to use the charm pack for because I don't normally buy pre-cuts.

I figured I may as well use this charm pack for making the Simply Charming Tote (Around the Bobbin pattern). To make a Twister quilt or bag, you must first sew together squares (It's Cool to be Square). Well I forgot to take a photo of the squares all sewn together, but I did square up the scraps leftover after cutting the Twister blocks out and sewed those back together in the correct order, so here is essentially the same thing only in smaller squares:
This is a Moda Charm Pack with sewing related wording on the printed text fabrics and dots, stripes, plaid flower prints on the rest. In black, red, gray and white.

Here is my finished Simply Charming Tote:
If you know me then you know I like to make changes in bags I make by adding or subtracting things or both. Here I added strap tabs with rings and rivets to both the straps tabs and straps.


The back of the bag has different fabrics from the front. All from the same fabric charm pack.

I did add purse feet to the bag. (Not part of the pattern instructions).


Inside I added one slip pocket and a zippered pocket too. The bag closes with a magnetic snap and you can see the bag opens up nice and wide.

This fabric is printed with houses and trees and the text is all addresses.

I divided a pen pocket and the rest of the pocket is divided into smaller sections.

So boys and girls, the moral of this story is that Squares really are COOL, because they can grow up to become other cool things too like Twister quilts or bags, lol! That's my Cool to Be Square project. I hope you enjoyed it. Now be sure and check out the rest of today's blogs to see what project each of them came up with and if you missed any day, you can visit those other blogs that you missed too. Thanks for stopping by to visit.

In case you missed any of the other days, check them out:

Pin It Now!

Monday, May 18, 2020

It's Cool to Be Square Blog Hop

It's Cool to Be Square. A blog hop proving that starts today, so go and check out what cool and square projects these bloggers have made. 


My day to share is the last day, so please come back to visit.
Pin It Now!

Sunday, May 17, 2020

ETA Pouches

I joined a Facebook Group called, Bags by Bags of Style, and Christine the designer had a free pdf in the files called ETA Pouch. So I downloaded the pdf and in the pdf is a link for a video showing Christine making the bag step-by-step.

The pattern piece itself looked different and odd, so I thought I better watch the video first and see how she makes this bag. I did watch the video and I made my first ETA Pouch in a Chile Pepper print. It really turned out well and was so different from other pouches I had sewn. Christine surely must have the kind of brain that likes puzzles.

The second ETA Pouch I made using 2 print fabrics. That's the fun part about making this bag is that you can make it all in one fabric or mix and match fabrics. Especially great when you have a large scrap of fabric, but not enough for a front and a back.

You can see a seam down the center front, but the way this bag is constructed is different that you would think. There are no side seams on the ETA.


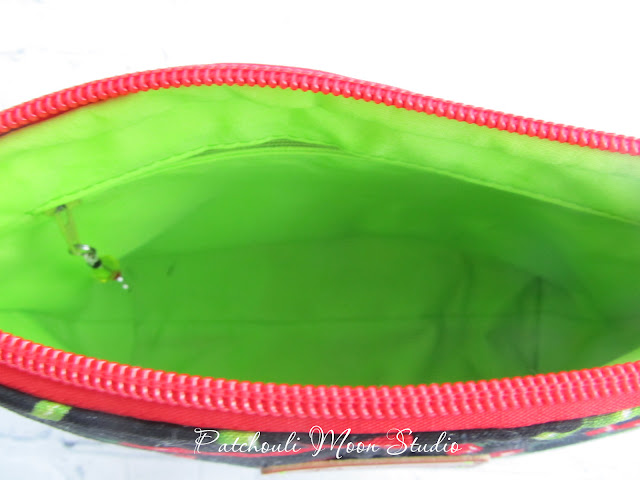
Don't you love a pop of bright color inside? This lime green looks great. There is a zippered pocket inside.


The top zipper tabs are longer (and they are not separate tabs either) as you will soon find out if you want to attempt to make one of these bags.

I used 2 fabrics to make the exterior of this ETA Pouch.

Another thing is the lining fits nice and snug too. Better than other bags I have made.

So after making the two ETA Pouches, I wanted to try and make one with 2 fabrics, but make it more the traditional zipper pouch way that I am used to and see which I prefer, not just in making but how they look. Using about the same measurements, I was surprised that this one came out taller than the ETA.

On this pouch I added both a zippered pocket and a slip pocket with a pen division.


I like the easy way of making a regular zippered pouch, mainly because I am used to making them, but on mine above the zipper tabs are not as clean and sleek looking as the ETA. Because the ETA has longer tabs the bag doesn't open up quite as wide as the regular pouch, but it's a large enough pouch that I don't know if it matters all that much?

The looks are similar from the exterior and the interior and both are a medium-ish size pouch. I sure love the results from the ETA and by making more I will get more used to her way of making this bag. It's also fun to use more than one fabric outside.
Pin It Now!
Related Posts Plugin for WordPress, Blogger...