Friday, September 27, 2013

Embroidered Bag and Pincushion

I was a guest poster over at Jane's Fabrics and Quilts on September 16 where I showed these items that I hand embroidered and I wanted to also post this on my blog in case some of you missed that posting at Jane's blog. I found this design that I had wanted to embroider and I colored it first using crayons and then did the embroidery. Then I made the embroidery into a zippered bag.

Some things that I do when I embroider by hand is to iron a fusible interfacing to the wrong side of the fabric before I start the embroidery. Whisper Weft is a good one to use, but if I don't have any on hand I will use any light weight fusible interfacing. This helps to both stabilize the fabric while stitching and helps to hide the threads. I personally do not use an embroidery hoop.

Here is my embroidered zippered bag~
I actually chose the border and backing fabric for this bag after I did the embroidery. I found a small piece of this fabric in my pile of pink fabrics and it was just the perfect choice not only because of the colors, but the flowers in the embroidery look a lot like the flowers in the print fabric. 
I quilted the bag too.
Back of the bag. I love how this fabric goes so well with the embroidery.
Closer look.
I had leftover Presencia thread, so I decided to embroider the stacking teacups design. Instead of coloring with crayons, this time I used watercolor pencils to color the teacups before I did the embroidery. I used a little water on a paintbrush and then dabbed the paintbrush on the pencil and painted it on the fabric. I added a fabric border and then decided to turn this into a large pincushion. I filled the pincushion with crushed walnut shells to weigh it down and keep it in place. 
  Pin It Now!

Lombard Street Bag

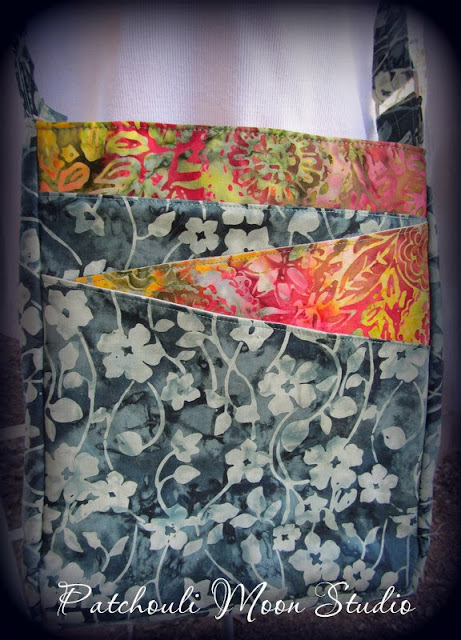
I was one of the bags testers for Christine of Chris W. Designs. This was my first time testing a bag for Christine too. This bag goes across your body with an adjustable strap and has a zippered pocket to hold an iPad or similar device, which is padded with By-Annie's Soft and Stable (or headliner foam which is what I used). Plus there loads of outside and inside pockets to hold other goodies too. I made mine in 2 batik fabrics. Please check out the other bag testers and see how different their bags look because we all chose different fabrics of course, especially that super beautiful fabric that Liz chose. Wow that is a great fabric!

Christine had a bag naming contest too and the chosen name was Lombard Street, which is a street in San Francisco that is a very steep zigzagging road. Perfect name choice for this bag because of the slanted zigzag-looking pockets on the front. I wanted my zigzag pockets to stand out more so I alternated my fabrics so you could really see the pockets better. I have a lot of photos of this bag because well I am pretty darn proud of myself for making it! Lol! I learned a few new things too. Thank you Christine for letting me test your bag. If you'd like to make this bag or one of Christine's other beautiful bags designs, please check out her website at Chris W. Designs.

Lombard Street Bag front view.
Zigzag pockets.
My daughter's iPad I borrowed for the photo shoot, lol.
iPad fits nicely inside the pocket, which has the padded headliner foam (or By-Annie's Soft and Stable) to keep it cushioned.
Top of the bag has a recessed zipper.
I added a beaded zipper pull that I made to each of the 3 zippers (iPad pocket, hidden zipper pocket, and recessed zipper) 
Can you see the hidden zippered pocket?
As seen from the back view.

Back view.
The hidden zippered pocket unzipped.
The inside pockets. I sewed a narrow pocket for a pen in-between 2 of the pockets.
iPad in pocket.
iPad pocket.


  Pin It Now!

Tuesday, September 24, 2013

Let's Twist to the 60's Blog Hop

I grew up in the '60's, so I knew I had to join in on this blog hop; not to mention that I love batik fabrics. 
So when I think of the '60's what do I think of?...
...Love, baby and....
...Peace...
..."All we are saying is give peace a chance".
...Hippie VW Buses...
...Hippies...
...Love Bugs...
...Peace Bugs...
...which are so cool...
...ya dig?
Isn't that neat?
Or far-out?
Yeah baby it's groovy....
...and outta sight man!
Flower Power is where it's at.
Well you know I really dig the scent of patchouli, being the hippie chick that I am.
Speaking of hippie chicks, can you dig her? Look at those love beads and headband.  She's a fox!
She's a real flower child.
Yeah baby Flower Power!!!
My Groovin' Batik '60's quilt, can you dig it?
Are you diggin' this far-out blog hop? Well there is more to see on this groovy blog hop, just check out these chicks and see what they have created. Make sure you spread some love baby and leave them all an outta sight comment. Thanks to our blog hop top cool chick Madame Samm and her far-out cheerleader Mary.

September 25~


September 26~


September 27~


September 30~


October 1~


October 2~


October 3~

.
October 4~

Pin It Now!

Sunday, September 22, 2013

Wool Lovers Blog Hop

Denise of Pieced Brain asked if I wanted to be part of the Wool Lover's Blog Hop I knew I wanted to join in, but I wasn't sure what I would make. I do love wool and working with wool like wool felt and wool yarn, but I also knew I might not have time to knit something and get it finished in time for the hop. But then it came to me what I would make.
My grandson had 2 bottom front teeth that were loose, so I knew I had to make him a tooth fairy pillow. When my children were little and had loose teeth I always pulled them out. They didn't like it when their teeth were that loose and were afraid to yank them out themselves, so I pulled them out when they got loose enough. I was worried they might swallow them or crunch down on them, so out they came. Anyhow, back to my grandson. He came over and showed me his loose teeth and I pulled out the really loose one. The other one wasn't quite loose enough to pull. He was thrilled that I pulled it out and kept looking at his new smile in the mirror and feeling the space with his tongue. My daughter actually asked me to pull his tooth out. So then I said, "Hey I have something for you." I gave him the tooth fairy pillow I had just finished the day before, so it was perfect timing. I had searched around online to see various tooth fairy pillows and saw a similar one like this, so I drew my own and made it. Here is it...
Monster tooth fairy pillow. I made this out of wool felt that I hand dyed with Kool-Aid. My grandson loves green so it had to be green. His eyes aren't blue, but blue showed better, so I used the blue Kool-Aid dyed felt for his eyes.
I used a piece of an old wool felted sweater I had for the pocket on the back. I don't know what the going rate for a lost tooth is these days, but the dollar bill worked for the photo. Rumor has it the actually Tooth Fairy tucked a five dollar bill in that pocket! Wow, maybe it's because he is 5 years old and it's his first tooth? I guess with inflation these days a tooth is worth a whole lot more, huh?

I had wanted to make this Voodoo pincushion for the Pin-it Blog Hop, but there wasn't enough time. Then I thought I would post this on the Wicked Blog Hop, but thought no this is made out of wool, so I will post it on the Wool Lovers Blog Hop here instead.
I made this out of a felted sweater I had. I blanket stitched around the outside and stuffed her with poly stuffing. A few embroidery stitches for the mouth, added mismatched button eyes and a heart of course!
Oops, I forgot I wanted to add some hair to my Voodoo Doll, so here she is with hair. What do you think? Do you like her with or without hair better? 
Here she is lying on a bed of Moss Roses.
Monday, September 23~
Patchouli Moon Studio {this is me}


Pin It Now!

Saturday, September 21, 2013

Winners from the Pin-it Blog Hop are...

#43: Amy De Cesare (Amy Made That!...by eamylove)
#97: Liz (Moments........)
#201: Bente (I Like to QuiltBlog)

Congratulations ladies! I have emailed you all and attached my Needle Book with Pincushion and Pocket pdf to your emails. Enjoy making your needle books. This pdf is sold in my Craftsy store here for anyone who would like to purchase a pdf to make this needle case too.
Felt version.
Fabric version.

Pin It Now!
Related Posts Plugin for WordPress, Blogger...