Sunday, May 30, 2021

Sew Powerful Purses #46-52

Seven more purses are finished for the Sew Powerful Purse Project. That huge pile of cut out purses that have been stacked around my sewing room are slowly but surely shrinking as they are transformed into purses by the magic of sewing. Although, I still have a grocery sack full of flaps that are already made waiting for the other fabrics to get cut out so they can be sewn into purses too. This is an ongoing and never ending endeavor, so they will be finished when they are finished.

Meanwhile, here are the 7 latest purses that I finished:

These flaps all started as small quilt blocks.


4 more purses. The top left was a Twister pinwheel block I made in black and green. Then I added strips of fabric around it to create the flap. The lower left in purse and green is another Bear's Paw block I made years ago, leftover from a quilt I made my daughter when she was in high school. I made quite a few purses using those Bear Paw blocks, since I had made several extra blocks. I think this is the last one.

The purse on the lower right, I used up the last of the Paris print fabric I had. I made a tote and a cross body bag with that Paris print and now it's gone, except maybe for a couple of small scraps. It feels good to use up a lot of my fabric for something so worthwhile.

I might have enough purses made that I can see about getting them into a large game box to mail them off to Renton, Washington. I will take note to see how many fit into the game box, so I will know for the next box when I should start packing them into the box. FYI: you can order the game size boxes from the USPS website for free. They deliver the boxes to you. You receive 25 boxes in a package, so I have plenty of boxes on hand for mailing whenever I have enough purses to mail. And it ships for the same rate as the large flat rate box.

P.S. I just finished sewing together 3 more purses yesterday, so need photos of those and whatever I sew up today. I hope you are enjoying seeing these purses :0)

Pin It Now!

Thursday, May 27, 2021

Sew Powerful Purses 43-45 for 2021

Another 3 purses finished for the Sew Powerful Purse Project


The large butterfly I appliqued from fabric; the 2 smaller butterflies were cut out from a butterfly fabric and then appliqued to the flap.

Pin It Now!

Monday, May 24, 2021

Sew Powerful Purses #40-42 for 2021

3 more purses finished. I really love creating the flaps, my favorite part. 


I had a few yards of the Lorelai fabric (the bottom purse), so I am using it up for the lining of several purses. There are several ladies doing gardening and flowers over the fabric print. I thought it made a cherry lining.

Close up of the custom label I had made that I am now adding to all the purses and bags that I make.

Okay, back to finishing up some more purses. I have a huge pile of them that need to be sewn into purses. And a grocery sack full of flaps that I made that need the other pieces cut out and then sewn. Next shipment to Zambia is sometime in the Fall, so I hope to get all the flaps I made sewn into complete purses and mailed off to Renton, WA before the next ship sails. Guess what I will be working on all Summer? Happy sewing everyone.
Pin It Now!

Sunday, May 23, 2021

Emma Cross Body Bag with Pieced & Applique Flap

I wrote another tutorial that you can find over on ChrisW Designs blog. I show you how to make a pieced flap (or bag) and a pieced flap with applique and embellishments. I made the Emma bag, which is a fun, quick sew that is perfect for little girls, teens or for someone that doesn't need to carry a ton of stuff with them.

I actually made 2 Emma Bags, but the first one here is what I use in the tutorial. The second Emma I pieced the entire bag and quilted it and added an applique on the flap. The tutorial is just a guide to get you going so you can do your own thing.

I pieced the background, added an applique heart, quilting and crystals on the flap for bling. I also made Kumihimo strap (Japanese Braiding).

On this Emma, I pieced the entire bag and added a heart applique on the flap. (I Donated this bag to raise funds for Alzheimer's Disease 2022)

I made a Kumihimo strap for this bag too.
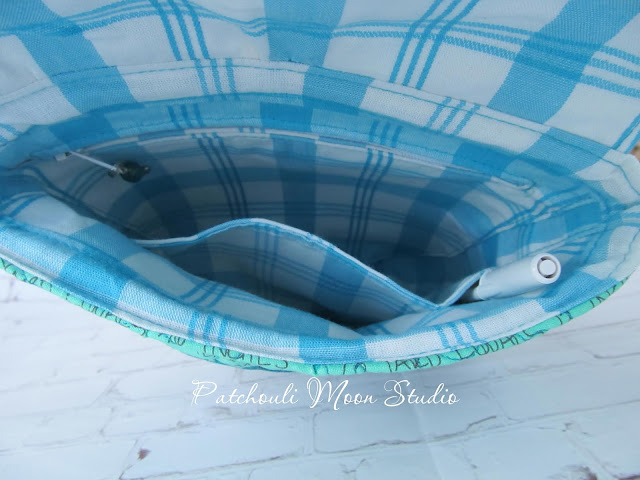
Inside Emma is a slip pocket and a zipper pocket.

Check out my tutorial over at ChrisW Designs blog. 

Pin It Now!

Friday, May 21, 2021

Footloose Tote in Doctor Who Fabric

The Footloose Tote came out as a video course earlier this year, but it now is also being offered as a pdf pattern on ChrisW Designs site. So if you want to make this tote and don't need video instructions you can buy the pdf only. And if you are a subscriber to ChrisW Designs newsletter you can get 20% off new releases for a limited time; so sign up to get Christine's newsletter and be alerted to the new releases and get a discount code.

I just finished testing this tote yesterday and following the pdf was just as easy for me as the video course (I tested the Footloose video course too). This time I chose a Dr. Who fabric. (The other two totes I made was in a sailboat fabric and a Southwest fabric). 

I really love this style tote and it is perfect for showcasing a nice fabric. I opted not to add the add on adjustable strap, but if you want to add it, the instructions tell you how. The front features a vertical zipper pocket that you can add to the right or left side of the tote, which is a handy place for a phone or keys. Inside is a zippered pocket and a divided slip pocket. The bottom has purse feet to keep the bottom clean. You need minimum hardware to make this bag. I added strap ends and rivets to my strap, but you can also just sew the straps as per the instructions.

This bag measures 15” W X 13” H X 5” D

Dr. Who fabric with the swirling Tardis kind of looks like Van Gogh's Starry Night painting, doesn't it?

A divided slip pocket inside.

A zippered pocket and a special label.

I did add a magnetic snap, which is optional. As Dr. Who fans would say, "It's bigger on the inside".

Front zipper pocket.

Photographing it on different backgrounds for fun. Do you have a favorite background?


Bottom has purse feet (hard to see because they are antique brass. Also stabilizer is on the bottom and stitched. (You can stitch the bottom any way you desire. My first Footloose totes I stitched in wavy lines).

To purchase this Footloose Tote in Exploding's Tardis fabric go to my PayHip Shop. Price includes FREE SHIPPING to USA only.
Pin It Now!

Close to You Handknit Scarf (or Shawl) in 100% Pink Alpaca Yarn

I knit this scarf (shawl) in a pink Fingering weight 100% alpaca yarn. It is so soft to the touch. This is the second Close to You Scarf I have knit (the first one was in a variegated blue). Measures about 65" x 15".


Click here to purchase this shawl/scarf. It's one of the kind.

Pin It Now!

Tuesday, May 18, 2021

Born to be Wild Blog Hop: Sew Powerful Purses

Thanks Carol for another wild & fun blog hop! 

Born to be Wild is this blog hop and I knew right away what I wanted to make. I sew purses for the wonderful organization, Sew Powerful and I send them purses that I make to donate to the girls in Zambia, which helps to keep them in school. You can read all about the Sew Powerful Purse Project here. I hope you will consider making some purses too and you can also join their Facebook group for inspiration and sharing too.

I am also on the design team at Crafter's Edge , so I wanted to be able to incorporate using some die cuts into what I made as well. I chose the 1 1/2" strip die cut and using the Crafter's Edge Crossover II die cutting machine to make quick work of cutting up some strips using up some of my light colored batik scraps. I sewed the strips together in a scrappy way to create a background for one of my purses. Then I appliqued an elephant onto that purse flap. The girls in Zambia tend to love the colors purple and orange over most colors, so I chose those colors for the elephant applique. 

Then, I just had to make this adorable owl for one of my purse flaps. So much fun to use up scraps for this wild cutie.

I wanted to use another couple of die cuts to use on another purse flap, so I created a Moon over the Mountain flap using the largest Equilateral Triangle die cut and a circle die cut that I appliqued to the flap. I echo quilted around this flap. Do you think this fits the wild theme? Maybe it's Mount Kilimanjaro, the highest mountain in Africa; although my mountain has a pointed peak.  Mount Kilimanjaro is the highest single free-standing mountain in the world. Standing at 19,308 feet above sea level, so that makes Mount Kilimanjaro pretty wild in my book. At any rate, I hope you enjoy seeing the purses that I made and I know 3 girls in Zambia will love receiving and using these purses too.


I started with a 5 sided shape in the center and then I used Crafter's Edge 1 1/2" die cut strip cutter to quickly cut out the strips and sew them around the center shape to create the background for the flap. I added the elephant and used a crystal for the eye. There is a butterfly that apparently got placed a bit too high (lesson learned) which you can see better in a photo down below a ways.

Side of the purse I like to add a rivet for making the strap a bit more secure.

The back of the purse showing the fabric better.


I just got my custom labels and can now add these on the underside of the flaps that I make.

Underside of the flap with my new label.

Flap open up to see the butterfly.

I couldn't resist making this owl for one of the purse flaps.


I did the same thing here with the butterfly a bit too high.


Label on the underside of the flap of this purse.

Moon Over Mountain purse flap. I used Crafter Edge largest equilateral triangle for the moon and a circle die cut for the moon. Like I mentioned earlier, this could be Mount Kilimanjaro (although my mountain is a bit too pointy on top). Being the largest free standing mountain in the world makes this pretty wild to me!

Echo quilting.

The front of the purse under the flap I used a blue Bargello-look fabric.

The back of the purse is a Bargello-look print.


That's my wild contribution to this wild blog hop. 

Please stop by the other blogs and see what wild things they each created.

Pin It Now!
Related Posts Plugin for WordPress, Blogger...