Monday, July 23, 2018

Nestling Baskets Updated

I tested all 3 sizes of  these Nestling Baskets from Around the Bobbin. This is an updated slightly different version of her original Nesting Baskets, which I had also tested a while ago. The main difference is the added binding at the top of the baskets. It gives it a nicer look to have the binding and you can add a pop of color by the binding fabric your choose to use. The pattern does suggest to sew the binding on as you would by machine and then hand sew the second step. I do usually sew my quilt binding on like this and I did sew the binding on this first medium size basket like that, but then I got in a hurry and sewed the other baskets by machine and I am not as happy with the binding, so I will be redoing those by hand later. There is another part of the construction of this basket version (as opposed to the first Nesting Baskets) that makes these sew up easier and faster, so it's not just the added binding that makes these different to the first version.

Here are all my test baskets:

I used a movie theme for this medium Nestling. Popcorn inside and movie film strips outside. Doesn't that popcorn look real?

A striped in the fabric will give you a mitered corner look.


You can see my binding on this and the rest was done all by machine and not as neatly as I would have liked it so they will be redone later.

This is the small size Nestling. Oranges outside this time. I must have been hungry when I was testing these, lol!


This one is the large Nestling size and done in a Southwest print. I like how the corner mitered on this one.


Here is another medium Nestling size.


one small, 2 medium and one large Nestling Baskets.


Pin It Now!

Thursday, July 19, 2018

Autumn Reflections Lap Quilt

I won a set of fat 1/8's last year when I entered a lot of my bags in the Bag It 2017 linky from Elm Street Quilts. The fabric line was called Autumn Reflections and I thought that was a good name for this quilt. I made this quilt in a square version in bright colors several months ago. I gave this lap quilt to Mr. P. It is backed with soft flannel.
The quilt pattern is called Native Rainbow and is from the book, Batik Beauties. I used all the fat 1/8's except the ones that read as a solid. I used fabric I already had for the triangles, 2 borders and binding.


I just quilted it with straight line quilting.

Sage green flannel backing.

Pin It Now!

Tuesday, July 17, 2018

Twister Fabric Tray

I tested this Twister Fabric Tray, which is a new pattern from Around the Bobbin. In making this tray I got to try out a new heat moldable product from Bosal. It is fusible and an interesting product to work with and  it does take a bit of time and trial and error to get it to mold as you want it to. The good thing is that you can play with it and redo it as much as you like. I really enjoyed making the Twister part of the tray using the Mini Twister template. I have made Twister quilts before and I just love the look of the Twister quilt, plus it's fun to make too. 

The tray is a useful and fun thing to have, if only I was able to get it to mold how I wanted it to. Maybe this stuff molds easier on a small project? I do love how my Twister looks though.


This is the Mini Twister that is quilted to the fusible moldable product before shaping it into the tray.

I molded the 4 corners up into a tray. The Bosal product is very hard and stiff.
As a comparison, this was my first attempt at molding the tray and as you can see it wasn't very good! The corners were too pinched.

This is the back of the tray on my first attempt. I definitely prefer the softer rounded corners of my second attempt.
The good thing is, you can heat and play with this until you are satisfied with the result.
Pin It Now!

Tuesday, July 10, 2018

Running With Scissors Tool Case

This is the Running with Scissors Tool Organizer Case I tested for Annie of byAnnie Patterns. You can use it alone or make the Stand Up Tote and open this tool case and lay to over the tote to access your tools when sewing.

There is a zippered pocket on the front.
I added a decorative stitches accent on this case just like I did on the Stand Up Tote. 


This is the back of the case and it has a zippered pocket too.


I added a couple of rivets too on the handle.

Tons of pockets inside to hold all your tools. Both fabric pockets and clear vinyl slip pockets and a  full zippered pocket and a divided zipper pocket too. While I was testing this, I must have skipped ahead and forgot to sew the yellow binding on the bottom of the zippered pocket, so I had to add something else and I sewed on a rickrack there to cover the raw mesh. 

This is a little ironing pad that you place inside the tool case that will also protect your tools, since it is padded with Soft and Stable foam.


I filled this with lots of my tools and still didn't use all the pockets! There are a lot of pockets and you can divide how you like them. I wasn't sure how I wanted to divide mine, so I made fewer divisions than the pattern suggests. This was designed to hold Tula Pink's tools and I do not have any of her tools.


The center section has fold over elastic to hold spools of thread. I mostly use large spools or thread on cones, but I found a few different sizes of threads I had to demonstrate how this holds the thread. 

Pin It Now!

Monday, July 9, 2018

Take a Stand, Stand Up Tote

I tested a few patterns for Annie Unrein recently (byAnnie creator of Soft and Stable and designer of dozens of patterns). This Stand Up Tote was one of them. It was designed to go with the Running With Scissors Organizer (that I also tested and will post later this week). The pattern for testing had both all in one pattern, but Annie decided to separate them into 2 separate patterns so that it wasn't such a long pattern. I told her I thought it would better in 2 patterns. By making 2 separate patterns, she added a larger tote to the pattern, so that you have 2 sizes of this tote in one pattern. This one I made is now the smaller size and there is also a larger version in the pattern.

I really love this and have been using it lately as a handbag and it works out really well. I am right handed and the only thing I would change is to make the zipper open on the opposite side it is now. I will do that with the next bag I make. I have an order to make one already for a friend, so I will make that change when I start the bag.

I did make my accent strip on the front of the bag with decorative stitches and rickrack (the pattern does have a fabric only accent strip, but not with decorative stitches, which is my own artsy addition). That's the change I made, but the rest I did follow the pattern instructions.

The front of the bag has the fabric accent strip and a zippered pocket. On the back of the bag there is another zippered pocket (but no fabric accent strip). The strap is adjustable and it clips to the bag on each side, so you can remove the strap if you want to remove it.

Rickrack and decorative stitches to enhance the fabric accent strip. I added some crystals and French knots too. I quilted it in wavy lines.

The side of the bag has a loop to tuck the excess zipper into when carrying the bag. You need a long zipper because this bag opens up nice and wide.

See inside how wide it opens up and there are 2 divided mesh slip pockets with fold over elastic binding the top of the mesh. 

The mesh allows you to see what is inside the pockets.
I really love this bag and will make the large one too, but first I need to make the custom order for this size.

I will post the Running with Scissors Organizer Tool Case in a day or 2. When the tool case is unzipped and fully open it will lay over this tote, so that you can access your sewing tools from either side. But both of these items work nicely on their own too.
Pin It Now!

Thursday, July 5, 2018

Prickly Pear Quilt

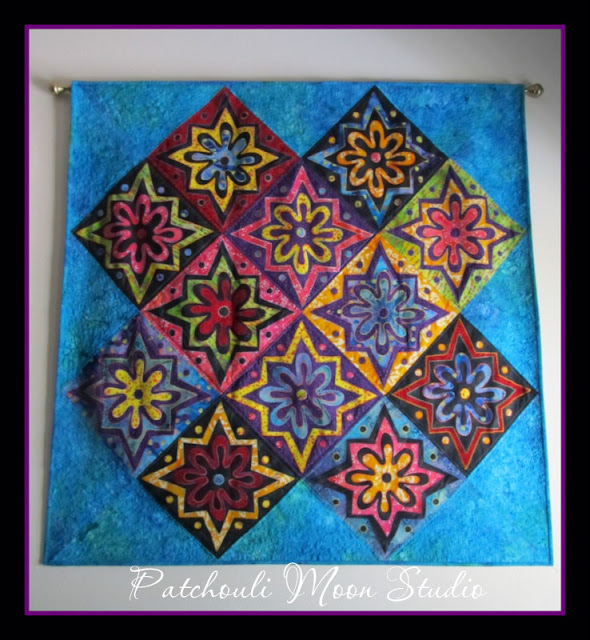
I made the blocks for this Prickly Pear quilt (pattern by Karen Stone) at least 12 years ago I think. Then they sat for years. A couple years ago I sewed the blocks together with the aqua triangles and it sat again. Well finally a couple of months ago I quilted it and now it is hanging in our bedroom. I don't know why it took me so long to finish.

These are positive, negative like blocks where you fuse the applique shapes and cut out each color and then mix up the colors onto the background squares . The background squares are black and purple. All the applique is batik fabric and the aqua triangles too.


The applique pieces here and below are different cut out shapes to give the same pattern in a positive and negative. It was a fun pattern, but a lot of blanket stitching!


I quilted free form flowers and swirls in the aqua sections.
I could only find a website for Karen Stone that is coming soon it says, but her email is there if you want to contact her and a link to buy her books too.
Pin It Now!
Related Posts Plugin for WordPress, Blogger...