Showing posts with label Sew Sweetness pattern. Show all posts

Sunday, February 14, 2021

Hyacinth Cross Body Bag in Paris Print

Happy Valentine's Day!

I made this Hyacinth Cross Body Bag in a Paris canvas-type material. This is a pattern from Sew Sweetness, but I made several modifications to this one.

I reduced the size of the overall bag to 85%, but increased the size of the gusset, I added a zipper and slip pocket under the flap instead of adding a zippered coin pocket and credit card pockets, I added some rickrack to the top of the flap, a smaller slip pocket inside the bag, made the exterior water resistant by applying wax to the fabric, and added some touches like an Eiffel Tower charm to the zipper pull, a button to the zipper tab, a beaded zipper pull and charm to the front zipper pocket under the flap, a snap to the slip pocket under the flap and labels.

This bag measures 12" wide x 10 1/2" high x 3 1/2" deep at the widest part.

The bag has a flap, but above the flap is a zippered closure to the main section of the bag.

Handmade label.

Lift the flap up and under it you will gain easy access to a zippered pocket as well as a large slip pocket that closes with a snap. Perfect place for keys or phone or your shopping list.

The beaded zipper pull with Eiffel Tower charm is perfect for bags that have Paris theme fabric. The pink rickrack adds a bit of bling too.

The back of the bag has another zipper pocket. 


Inside the bag is a slip pocket with a divided pen pocket. Since I made the gusset wider, there is more room inside the bag too. This closes with a zipper to keep contents secure.


The zipper tab I added a cute button to.


If you would like to purchase this bag, email me. I invoice through PayPal.
Thanks for looking. This bag has SOLD.

Pin It Now!

Wednesday, November 11, 2020

Arabesque Bag with Modifications

I love the Arabesque Bag (by Sew Sweetness). I usually make this bag by sewing together vertical strips of fabric and quilting it. I love the scrappy patchwork look and it is a great way to use up the scraps that start to pile up. Sometimes I make the bag in only batik fabrics, sometimes I choose a color like purple and only use purple fabric strips to sew together. No matter what the colors I have chosen or the modifications I make to this bag, I love this bag.

This time I decided to not sew together scraps and use one main fabric along with an accent fabric to create the bag. I tend to make this bag in 3 sizes: the original size and reduced to 90% and 80%. For this bag I made it reduced to 90%, which is a perfect size in my opinion. For those that like a slightly larger or smaller bag, then the larger or smaller versions are equally as great.

I chose this Paris, France collage print fabric (which I love) and paired it with a faux black cork fabric. I think this is a great looking combination. What is it about Paris, France fabrics that always look so good and are so appealing? Usually they tend to be in a collage print, which I personally like, but even other non-collage prints are good looking too. Is it the Eiffel Tower? The text or postcard prints that are on this print? The rose and butterfly? I don't know for sure, but the combination of all those items together just looks fabulous! Are you drawn to Paris, France prints? Why do you think you like them?

The bag measures 11 3/4" wide x 9" high x 3 1/2" deep.

Okay, here is the bag and I will note my changes in the caption.


I added a label with rivets and added some rivets at the base of the straps too.


I make my own beaded zipper pulls with charms and I bought some Eiffel Tower charms to use on the Paris, France bags I make.

On the back of the bag I added a zippered pocket, since the pattern has no exterior pockets, but I feel a bag needs at least one exterior pocket. I also added a couple of rivets at the sides of the zipper.


I added a heavyweight interfacing to the bottom of the bag and quilted it in place and added purse feet too. This helps to give more structure to the bag and the purse feet help to keep the bottom of the bag clean.

I changed the way I sewed the main zipper closure too, so that the bag opens nice and wide. Inside I added 2 divided slip pockets.

A matching Little Wallet that I include free with the purchase of the bag too.

This Arabesque Bag is for sale in my Etsy Shop.

Lovingly made in my smoke free, pet free, perfume free home.

Pin It Now!

Saturday, October 24, 2020

Brookfield Cross Body Bag with Faux Cork & Painted Textured Fabric

I wanted to make another Brookfield Bag (the others I made in the past had sold). Last year I was playing around with some Shiva Paintstiks in Metallic and Rubbing Texture Plates and created some small pieces of fabric. I wanted to use those fabric pieces in a bag someday, but wasn't sure what bag and if I would have enough of the painted fabric. So I was looking at my patterns one day and I measured the Brookfield and it would work! Yay! I paired it with cotton-looking cork fabric and made a matching Little Wallet to match. I am quite pleased how this bag turned out.

The bag measures 11" wide x 7" high.


I added a back zippered pocket to the bag.

Inside is a divided pocket that fits a pen on each side and the wallet fits perfectly in the center pocket.


If you would like to purchase this bag, contact me. This bag sold at a craft show 11/21

Pin It Now!

Wednesday, October 14, 2020

Tower Cross Body Bag with My Modifications

I made another Tower Cross Body Bag (Sew Sweetness pattern) and made several modifications. I love playing with patterns and making them different and better (in my opinion). I really like the changes I made to this one.

My changes are:
  • Sewed the strap using 2 fabrics
  • Added a narrower accent red color to the top of the bag
  • Added an accent brown color to the bottom of the bag
  • Used a magnetic snap closure instead of a zipper closure (the bag opens faster, easier and wider with the snap)
  • Boxed the corners instead of sewing darts
  • Eliminated the tabs at the upper sides (which are cute, but didn't work with my changes)
  • Placed the back zipper pocket up higher on the bag
  • Added a divided slip pocket inside 
  • Used fleece rather than foam
  • And I sewed my zipper pockets differently than the instructions
The bag body measures 9" x 9" x 3"
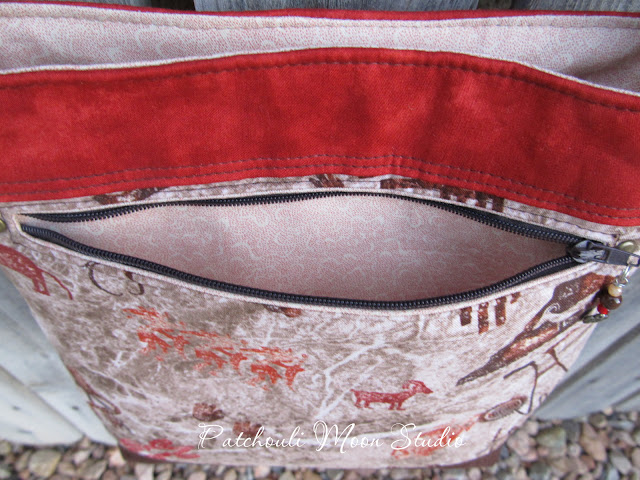
This bag looks great in the Southwest Petroglyph print.
And I include a free matching Little Wallet when you purchase the bag,

Little Wallet with 3 pockets for cards (the last pocket is deeper and can hold cash that is folded).


Back of the bag has a zippered pocket; perfect for holding your phone or keys.


The Little Wallet fits in the pocket and there is a pen pocket and the bag closes with a magnetic snap. Another zipper pocket inside the bag.


This bag is for sale in my Etsy Shop and has had the most views of any of my current listings. This bag has SOLD.

As always, it is a one-of-a-kind bag that can never be duplicated exactly, but can be made custom in your choice of colors. Contact me if you want this bag made for you in different colors.


Pin It Now!

Monday, August 10, 2020

Small Oriole Bag in Cat Print

This is the Oriole Bag in size small, a free pdf from Sew Sweetness. I made the large Oriole a few years ago and had wanted to make the small for a long time. The large was a bit too big, but I really like this small size. It's actually not that small as it measures 12" wide x 8" high x 2" deep.

Sew Sweetness is having a challenge this month on her blog. The challenge is to make any Sew Sweetness bag with an animal theme. So I chose a couple of cat prints. The winner will be randomly chosen, so this is not about making the best looking bag. I made a few changes of course and added a vertical zipper pocket inside the bag, and a strap with 2 fabrics, added rivets, and an accent strip on the center flap too.


I wanted a zipper pocket on the bag, but because of the darts, I had to add the zipper pocket vertically. I sewed the pocket to the dart within the seam allowance on both to keep the pocket in place.

A small slip pocket here and you might be wondering what that brown square is, well I will tell you. It is a piece of Ultra Suede that I glued there to cover up the metal prongs of the magnetic snap. I had added a magnetic snap in the construction of the bag, however I placed it on the front of the bag incorrectly and the flap sat up too high. I needed to do something to make it workable and even if I could rip out the magnetic snap I installed it would leave holes and look a mess. So I decided to add another female snap to the front of the bag in the proper position and I had to cover up the prongs inside the bag, so Ultra Suede and glue the the rescue. It works, but then I had an extra female snap on the front and in order to avoid confusion as to which snap was the correct snap to use, I glued a cat button over the mistake snap. I didn't get a photo of the button though. I did such a good job with the bag, I cannot believe I screwed up the snap. I guess I was reading about where to place the twist lock (that the pattern directions call for, although she did also mention using a magnetic snap, but failed to point out where on the front to place the snap, only the twist lock). Well I won't make that mistake again! I did save this bag to make it functional and all works well with it, so I just need to explain it to whoever might buy the bag what happened and sell it for less because of my goof. I will wait to sell this one whenever I can do craft shows again. I don't want to list this on on Etsy, unless someone see this and contacts me they want to buy it and then I can do a custom listing on Etsy for just them.

Another sweet kitty print on the lining flap. I also used this print a bit on the strap and the slip pocket inside the bag.

Back of the bag.


Back of the bag.


Okay another confession of why I added the accent strip here is because I didn't have enough of the cat fabric to make the flap. I had 2 pieces of this cat fabric instead of one larger piece that need to be placed on the fold. So I thought if I could add a piece of fabric and sew the cat print to either side of a strip of fabric it would be wide enough to then cut out the flap. But you know it was a happy accident and I think it gives the bag a bit more pizzazz! I may just purposely add an accent strip of fabric on other bag that have flaps too. The brown is the same fabric I used for most of the strap, so it coordinates well.
So you see sometimes you need to get creative when things aren't working your way or you make a mistake. All's well that ends well.
Pin It Now!
Related Posts Plugin for WordPress, Blogger...