Wednesday, July 31, 2019

8 Warren Bears in Velour and One in Plaid Flannel

I had some velour that I bought years and years ago and decided to use it. So I made some more Warren Bears. I made 3 velour bears in the original size and one in plaid flannel and then I reduced the size to 75% in order to make 5 more velour bears. I have scraps left in the velour to use for the noses and muzzles, but no more velour. I can make a few more plaid bears though. I used wool for the hearts on the bears.

I love how cute these bears came out in the velour and the plaid. I embroidered their eyes since they might go live with young children under the age of 3 years old and I don't want to worry about a child choking!!! If I knew an older child would receive these, I might add button eyes next time.

This is a free pattern from Shiny Happy World.

Family of 9 bears large and small.


Teal, purple and turquoise bears at 75% size.

Original size turquoise bear. I added a 3-D bee in the photo for fun.

Original size plaid flannel bear.

Original size purple bear.

Original size teal bear.

Blue and green bears made at 75% size.

All 4 original size bears.

All 5 smaller bears at 75% size.

The whole gang of 9 bears.

A few of these bears have sold, but I made more in red and more plaid too. Email me and describe the bear you want and if I still have it, the cost will be $18 for the small size and $23 for the large size. Price includes shipping.
Pin It Now!

Monday, July 29, 2019

My Make a Wish Challenge Postcard got Framed!

I sent in some postcards I made for the Make a Wish Challenge that is part of  the annual Sisters (Oregon) Outdoor Quilt Show. I made a few postcards with the Robert Kaufman challenge fabrics that were sent to me (the 3 prints I used as the background to my postcard here were the challenge fabrics), as well as postcards using my own fabrics, which you can also send in, but they are not part of the challenge, but could get framed.

The postcards using the challenge fabrics were judged and there were some winners of that contest that you can see the winners here. (I was not a winner). But any postcard that was sent in had the possibility to get framed and to be auctioned off in a silent auction. They chose 70 postcards to be framed for the auction. Most of these cards were made by the teachers who teach Mon-Friday before the Saturday quilt show.

I got an email telling me that one of my postcards had been chosen to be framed. I was thrilled!

My Fat Cat here was the chosen card. I asked my friend who lives near Sisters to let me know what the postcard sold for. The bidding stopped at 2:00 on Saturday the day of the show (bidding started Monday). At 12:30 on Saturday she said the card was up to $135 (bidding on the cards starts at $50 with a minimum of $10 bid or a buy it now for $250). So I do not know if it sold for more than $135, but I was thrilled that someone wanted to buy it at any price, lol!!!

Those challenge fabrics was a challenge indeed! They reminded me of men's boxer undershorts, lol!!! 

High Desert Frameworks of Bend, Oregon very generously frames the chosen postcards each year and they do a wonderful job! The first year they starting framing postcards I sent in a postcard I made of Coneflowers (not a challenge fabric) and it got framed and sold for $85!

My postcard with the challenge fabric in the background.

My postcard framed. Sold for at least $135 (Maybe more? Who knows?)
Some of the postcards that were framed using the challenge fabrics from Robert Kaufman. 

My Fat Cat.

My friend took this photo when it was up to $125, so it had at least one more bid after this.

The Kaufman Challenge postcards.


Pin It Now!

Sunday, July 28, 2019

Birdseed Tote Bag

I up-cycled this birdseed bag and made it into a large tote bag. All I used was the bag itself and some thread. I cut off the bottom of the bag and made handles, which I sewed to the top of the bag that I had folded over. I topstitched around the bag to define it and make it stand up better.

My daughter gave me her empty birdseed bag, so I made this into a tote bag. The nice thing about using a birdseed bag s that it doesn't have any odor like a dog or cat food bag has. The material of this bag is really strong too. It is like a plastic tarp material with reinforced threads running through it. It is quite tall too.

It feels good to up-cycle this bag into another kind of bag that can be used instead of going into the landfill. This will be a very useful bag. My daughter will give me another one of these when she uses up all the seed.

If you have similar bags and do not want to up-cycle them yourself into something useful, give them to a friend who sews or a sewing group in your area, as I am sure someone would love to make something out of a great bag like this.

I think the birds on this bag make it look pretty.


Standing here in front of my bench shows how tall it is.


Pin It Now!

Wednesday, July 24, 2019

Boris the Bear & Bee Mug Rug

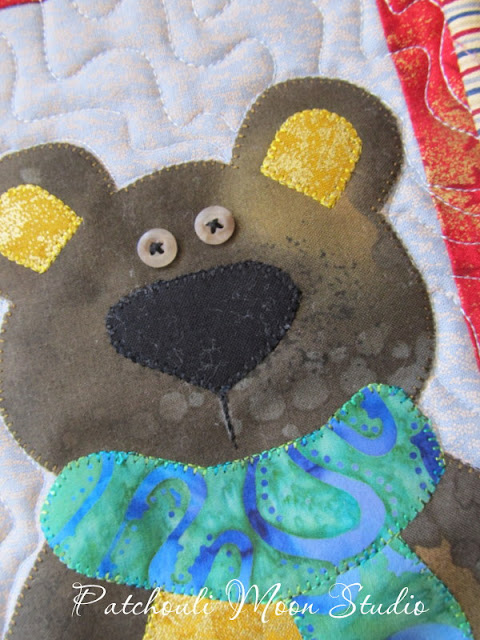
I made this mug rug awhile back and hadn't posted it yet.  This is Boris the Bear by Red Boot Quilt Co. I reduced the size and made it into a mug rug. The original size is for a snack mat that is larger. I also used a different bee. My bee is from Lori Holt's Bee Happy templates that I have. I just love Lori's cute little bee.

I made this all from scraps. This bear is so cute and I seem to be into cute bears lately. I have made table runners and stuffed bears recently too.


I used buttons for the eyes and stitched them into an "X" for a different look.

Lori Holt's cute bee from her Bee Happy templates. This is one of my favorite bee appliques.

Pin It Now!

Sunday, July 21, 2019

Companion Carpet Bag in Blue Batik

I made this Companion Carpet Bag (Mrs. H pattern) in a blue batik fabric with Uncorked gray accent fabric. I really love this style bag. It opens nice and wide with the internal frame and has an outside pocket and pockets inside as well and can hold a lot of stuff too. It's such a great classic bag design.

This dark blue batik has a subtle print and the blue would go so nicely with any outfit.

Nice depth to the bag.

Say ah! Opens so nice and wide and just look at all the room inside! Plus a divided slip pocket and a zippered pocket too. A nice light lining makes it so much easier to see what's in your bag. 

The slip pocket I dived in half with a pen pocket.

A zippered pocket is a great place to put things that you really want to keep safe and separated from other items in your bag. so you can find it easily.

The back side of the bag.

I added stabilizer and purse feet on the bottom of the bag.

The bag is accented with the faux cork fabric as well as brass colored rings and rivets.

Pin It Now!

Tuesday, July 16, 2019

The Allure in Kokopelli Batik Fabric

Here is another reduced size Allure Bag I made. (ChrisW Design bag). This one I made using a batik fabric with a Kokopelli print and Uncorked accent fabric. This one will be popular here in the Southwest for sure!


Back of bag.

Cell phone pocket on upper back of bag for easy access.

Zippered pocket inside.

A divided slip pocket with pen pocket on left inside bag.
This bag has SOLD.

Pin It Now!

Wednesday, July 10, 2019

Large Size Zipper Diamond Pouch

This is the size large Diamond Pouch I made (Moments Designs). All these fabrics I used I had used in other bags and had leftovers that was just enough to make this large one. All 3 sizes are great to make and depending on the scraps available on hand, that would be which size I would choose to make, unless I had a particular size and need in mind first.

As in the small and medium sizes that I made, I also painted this zipper too. I guess I don't have many colors in the zipper sizes needed for these 3 sizes. I have lots of colors in smaller and larger sizes, but I hate to cut a perfectly good large zipper  just to fit a smaller bag. I know if I make more of these Diamonds I will have to buy these zipper sizes in lots of colors, lol! Or pick my zipper first and then choose my fabric to match my zipper! 

I divided the slip pocket in half on this one with a pen pocket in the middle of the the other two pockets.


Here is the lovely Diamond family: Papa, Mama and Baby. If you wanted a matching set you can make all 3 using 2 fat quarters of fabric.

See how nicely they all fit into each other? They could have also been called Matryoshka Pouches after the Russian dolls that fit into each other from tiny to large dolls.
Want to buy the pdf to make your own Diamond Pouches? Find Liz on Moments Designs on Facebook to buy this or any of her bag patterns. If you are not on FB or just don't want to search to find the pdf, then email me and I will forward your email to Liz. If you want the pdf soon, then hop to it. I read that Liz will be on vacation later this week, so you will have to wait until she returns if you don't do it now.
Pin It Now!
Related Posts Plugin for WordPress, Blogger...