Showing posts with label Moments Design Bag. Show all posts

Friday, June 17, 2022

5 The Viewables Zipper Pouches: Tiny to Extra Large

Hello my lovelies. I made The Viewables Pouches (Moments by Liz Design) in all 5 sizes from Tiny-XL. I made the 3 largest for myself. The small I made to giveaway in a zipper pouch swap I joined. I made the tiny in case someone bailed and they needed someone to send a pouch to someone (which I volunteered to do), but I guess for now that hasn't happened.

I love these pouches to use for project bags that I can see what's inside. The sides expand to hold a bit more too. I use them mostly for knitting projects.

This is the Small Size Pouch
This is the Small Size that I sent to my Swap partner.

Back side of the Small Size Viewable pouch
Back view of the Route 66 fabric.

This is the Tiny size Viewable Pouch
Another Route 66 fabric in the Tiny size.

The back side of the Tiny Viewable Pouch
Back side of the Tiny size.

Bothe the Tiny and Small Viewable Pouches together
Both the Tiny & Small sizes together as a comparison.

Medium-XL sizes of Viewable Pouches zipped inside each other
You can zip the smaller sizes inside of the larger sizes. Here I have the Medium-Extra large all zipped into the Extra Large size for storing.

Extra Large size Viewable Pouch
This is the Extra Large size. I like to add a handle to grab from the top for the largest sizes.

Back side of the extra large Viewable Pouch
On the back you can see I both stitched the handle and added a rivet to secure the handle. I LOVE this coneflower with bees fabric!

Large Size Viewable Pouch
This is the Large size.

Medium Size Viewable Pouch
This is the Medium size. For the Tiny-Medium sizes, I make a longer wrist handle to grab the pouch by. I also rivet it in place.

Medium- Extra large size Viewables Pouches together
Medium- Extra Large sizes together to show the size comparison.

All 5 sizes together so you can see the sizes
All 5 sizes of the The Viewables together so you can see the size comparison.

The Tiny filled with pens
The Tiny size filled with pens.

Side view of the Tiny size Viewable filled with pens to see how it can expand
Side view of the Tiny size so you can see how the sides expand to hold items with some dimension to them.

You can find the pattern on Etsy from Moments by Liz. Or email me if you would like any size(s) custom made The Viewables Pouch made for you in fabric and color(s) of your choosing.
Pin It Now!

Tuesday, November 9, 2021

Zip N Go Laptop Bag

My good friend wanted me to make her a bag to hold her new iPad. She wanted to make sure it was well protected too. I thought of the Zip N Go bag (Moments by Liz pattern), which is uses a both foam and fleece in the bag. My friend brought over her iPad to check if it would fit into my Zip N Go that I made for myself years ago, and it fit just fine.

She was concerned about the iPad being protected enough, so I offered to make a sleeve for her iPad so that she could have the extra protection by placing the iPad into the sleeve first. 

My friend loves typewriters and actually uses them to type letters too, so she brought over the typewriter keys fabric and the gray fabric to use for the Zip N Go. She asked for the front to be made using the fabric in this configuration as you can see in the photo below, with the gray on the top.

I really like how it turned out and so did my friend! 

The completed Zip N Go laptop bag. I used black webbing for the handles. My friend didn't want rivets on the handles, so I stitched an X to make them secure.

A silver Handmade Limited Edition tag on the lower corner of the bag, with rivets to secure it.

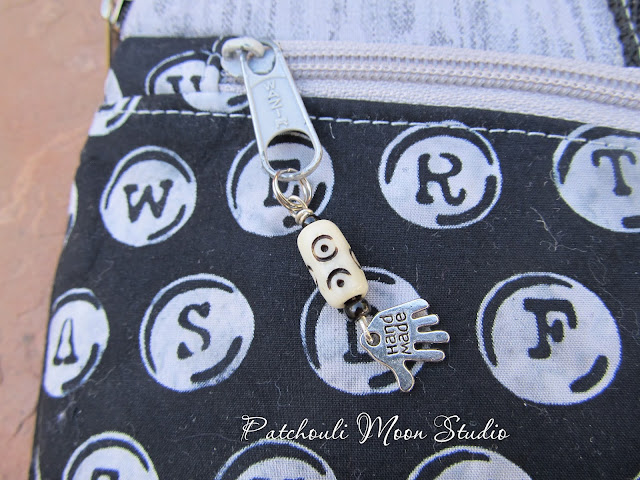
Zipper pull with a handmade charm for the zipper pocket. I made the beaded zipper pull as I always do.

The back side of the bag is all typewriter keys fabric, but with a pop of the gray on the back slip pocket.

The bag open looking into the bag and seeing the quilted lining.

You Look Beautiful label sewn into the bag.

My Patchouli Moon Studio label sewn into the bag.

Zippered pocket on bag opened.

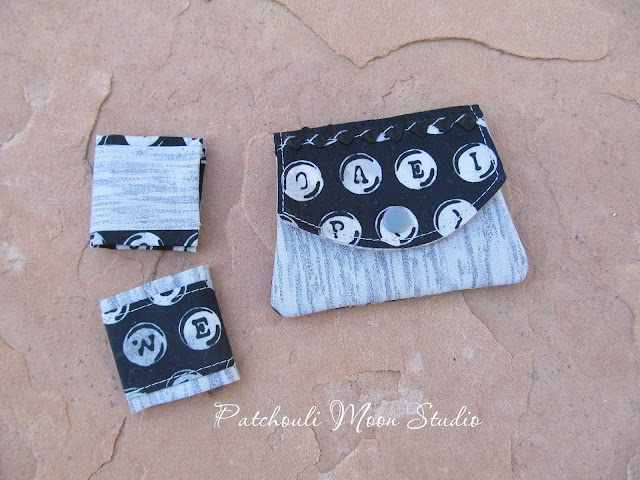
I made a matching card wallet and a couple of cord keepers too. All close with plastic Kam snaps. Because the typewriter key fabric is directional, I had to make sure the flap of the wallet was cut in the opposite direction and sewed to the back of the wallet so that it wasn't upside down when the wallet was closed. I also added a black rickrack over the seam to not only cover the seam, but to add a bit of bling too. I sewed the rickrack down with gray embroidery floss.

The matching wallet and cord keepers opened.

The matching sleeve. I made a tab flap and a used a plastic Kam snap closure.

Inside the sleeve I used a flannel fabric and I quilted it too like I did the lining of the Zip N Go, but I used fleece instead of foam for the sleeve.

The whole matching set. What a cute family, lol!

The sleeve inside the Zip N Go.
Pin It Now!

Tuesday, January 26, 2021

Four Zip-tastic Pouches with Boxed Corners

I wanted to make the small size Zip-tastic Pouch (Moments by Liz Design), but I wanted to box the corners to see how I liked the pouch with boxed corners instead of the rounded flat corners. I love the boxed corners! Now you might be thinking, why is this pouch any different than a 100 others out there? Well it's all in the way it is sewn that makes all the difference. Liz has some different ways of sewing bags that make them look so fabulous, but no one would really know it is sewn differently unless they are a bag maker and really were to examine the bag closely.

The Zip-tastic Pouch pdf comes includes size small and large and Liz has a bonus pdf on her Facebook page (in the files) that show how to box the corners. You have to join her FB group to get access to the files.

I made one with an applique of a Band-Aid to use as an Ouch Pouch. I made one with the front zipper pocket and I made 2 without front zipper pockets. I think I prefer the zipper pocket on the front of the flat version rather than the boxed corners version, because boxing the corners makes the bottom of the bag look shorter and the zipper looks too low. 

I do love how these all look.

I painted this fabric with yellow, orange, blue and a touch of purple. When I cut out the fabric for this bag, the yellow and orange with the purple in the center showed. I used the blue on the back side of the next bag. I appliqued a Band-aid to the front of the bag.

Back side of the bag.


Inside the bag. I used a fusible fleece that didn't show any wrinkles until I turned the bag right-side-out. I just couldn't get the iron in the bag to press it that well. Hopefully in time the wrinkles will relax. If I had fused interfacing first and then the fleece, it wouldn't have wrinkled. But see how nice and snug the lining is? I love that! I used hand dyed fabric for the lining.

See how there are no zipper tabs, no dented in corners at the zipper ends, and no zipper tape hanging off the edge. That is what makes Liz's technique in sewing these so great! Did you notice how wide the bag opens? See photo above.

The next bag has a zippered pocket on the front. The zippered pocket looks too low with the corners boxed. So I will not add the zippered pocket on the outside when boxing corners, but I might add a zip pocket inside if I want a zip pocket.

The back side shows the blue part that I painted. I have one small painted piece left like this with the blue.


I used the same hand dyed fabric for the lining in this bag too.

The next 2 are both made using the Route 66 fabric, but on one I used a blue zipper and one I used a black zipper.


I used this same black and red check fabric for the lining of both bags. I love that snug fit lining!

And did you notice how nice and wide these pouches open up? I love that too!

All of these zip pouches have SOLD.

Pin It Now!

Saturday, December 12, 2020

Cash/Card Wallet

Liz, of Moments by Liz, designed this quick to make Cash/Card Wallet so you could use up small scraps of materials that don't unravel, such as cork, vinyl, leather, Kraftex, etc. But I sew in cotton, so I made some changes and added a seam allowance, interfacing and a lining fabric so I could make one out of cotton. Even with the extra steps I had, it still was a quick project and a great use to using up smaller bits of fabric. I am very happy with the results.

I photographed this on freshly fallen snow.

These are great for business cards, ID card, credit card or folded cash. There is only one pocket to hold just a couple items. 

These would make great gifts to hold some cash or a gift card too. If you want to pdf pattern, you have to join Liz's Facebook group: Moments by Liz. The pdf is in the files.

If you don't sew and would like to order some, I would be happy to make some for you. Shoot me an email and let me know what color(s) you want and how many. Cost is $7.00 each, and I will ship them to you free.
Pin It Now!

Thursday, December 3, 2020

Beryl Pouch

I found another zippered pouch I hadn't blogged about. This is the Beryl Pouch (Moments by Liz Design). The Beryl is one of the zippered pouches included in the pdf called Little Gems. I made this pouch and gave it away as a door prize last year at a craft show I sold at. 


A zipper pocket on the other side.


Pin It Now!
Related Posts Plugin for WordPress, Blogger...