Showing posts with label tote bag. Show all posts

Friday, April 26, 2024

That Patchwork Tote from Around the Bobbin

That Patchwork Tote was a fun one to test for Around the Bobbin, because it was both patchwork and a bag, which are my 2 favorite things to make! Plus, you can use up your larger scrap pieces as well.

That Patchwork Tote is a great pattern for a quilter that is a new bag maker or a seasoned bag maker, but new to patchwork and quilting, because it is an easy to make tote and you can't go wrong with Lisa's great instructions! Rated for a confident beginner.

There are 2 versions of this tote you can choose to create. Version A has the patchwork pieces sewn more symmetrical with the fabrics even on each side and the seams running evenly down the center of the bag or Version B (the one I made) with the patchwork asymmetrical and the seams are offset. Being an asymmetrical kind of gal myself, this one was the one I had to make!😉😆

The pattern is on sale for just a few days only, so hurry. The coupon code is PATCHWORK for 25% off all day Friday through Sunday (4/26 - 4/28/24 midnight CST).

The tote measures 12" H x 11" W x 3 1/2" D.

Looking inside the tote
Tote closes with a magnetic snap. Two divided slip pockets inside. If you are wondering what those spots of blue are in the lining, well I dyed this fabric pink and some of the dye must not have thoroughly dissolved and so it left spots of blue.🙄I don't mind it at all and it's in the lining, so it isn't a big deal to me.

The slip pocket inside the tote showing the pen pocket
I divided this slip pocket so I had a pen pocket and since the rest of the pocket would be too small to divide again, I added a plastic Kam snap to keep the pocket from flopping and to keep larger items inside. I also quilted the bottom base of the lining to hold the firm interfacing in place.

The divided in half slip pocket inside the tote
This slip pocket is divided in half to create 2 pockets.

Both inside pockets
Both pockets inside.

I quilted this bag in a grid using a Serpentine stitch.


side view of tote
Side view.

This was a fun tote to make and I love the patchwork look! For you people with embroidery machines, it would be fun to add some embroidery to some of the patchwork spaces, wouldn't it?

Oh, and be sure to check out the other tester's versions here. There are lots of various fabrics used and both versions of the tote sewn too.

Happy Patchwork Tote Sewing!

Note: I am selling this Patchwork Tote in my PayHip Shop too.  It would make an excellent Mother's Day gift 😉. Grab it now if you need a gift for any occasion. Thanks for looking!


Pin It Now!

Monday, August 29, 2022

Little Tulip Bag in Size Large

Hello lovely people. I tested this bag recently, called the Little Tulip Bag for Little Mint Designs. It is a cute drawstring bag with handles and slip pockets both inside and out. There are 3 sizes included in the pdf and I chose to make the large size, which isn't too large, but to me more of a medium size. It's a nice size for a medium size knitting project. The smaller sizes would be the right size for a child or to use as a lunch bag. Check out the link above to see all 3 sizes together than Jean made.

I chose to use my favorite Echinacea Glow fabric designed by Anna Marie Horner. I have this beautiful coneflower fabric in 3 colorways (I think it comes in 4 colorways). This fabric was out of print for years and has been printed again probably because it is such a popular print! Coneflowers and sunflowers are my favorite flowers so that's why I love this fabric!

I tried to fussy cut the pockets on the outside so they would blend better into the print, but I just couldn't get it right and wasted some of my precious fabric, so I just did the best I could. There are 3 choices for making the handles included in the pattern. I chose to use webbing and fabric both for a 2-color handle. I love how that looks!

I added 3 other colors to make this a bright bag: yellow, orange and dark pink. I love how the colors look on this bag. I also added lots of rivets on my handles.

The lining is a gray polka dot fabric and my current knitting project is inside.

Inside there is a slip pocket on each side. I don't know why my lining looks so wrinkled on the bottom? Maybe because the lining wasn't interfaced? I made as per pattern, so no interfacing on lining fabric; but I think I will add interfacing on the next bag I make to see if that works better?

The gnome statue measures 17" tall x 9" at it's widest, just to give you an idea how the large size Little Tulip Bag compares in size. 
Pin It Now!

Friday, June 4, 2021

The Tango Tote from Around the Bobbin

I loved testing this Tango Tote from Around the Bobbin. I added a bit of hardware to this tote (the rivets, strap ends and the purse feet), which weren't in the pattern, but easy enough to add if you want to add it.

If you would like to purchase the Tango tote pattern from Around the Bobbin and save 25%, then hurry and get it now while it's one sale. Use the code: TANGO Friday 6/4 through Monday 6/7 for 25% off.

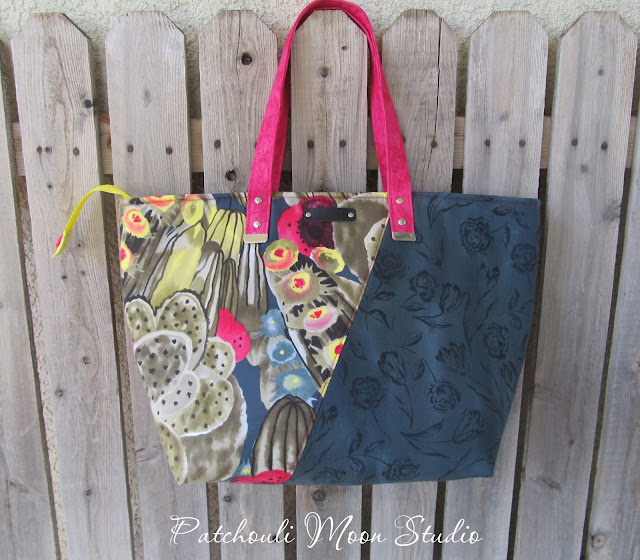
This tote features a nice diagonal separation of the fabrics on both the front and the back of the tote.  The back side also sports a nice large pocket, perfect for a phone or sunglasses. Inside there are 3 slip pockets and a zippered pocket to hold other items and a key leash to hook your keys to for quick and easy access. And it all closes with a zipper closure to keep everything inside the tote. This tote finishes at 12″ H x 18″ W (top) x 7″ D.

Tote bag in cactus print
I chose a cactus print for one side and a darker print for the other side of this tote. I wanted to pick up a third color so chose to make the handles pink.

Large tote bag in cactus print and dark fabric sewn on an angle

Large tote bag in cactus print and dark fabric sewn on an angle with yellow zipper

Large tote bag in cactus print and dark fabric sewn on an angle with yellow zipper hanging off side
I kept the zipper longer and added a pink button on the zipper tab.

Large tote bag in cactus print and dark fabric sewn on an angle

Back side of Large tote bag in cactus print and dark fabric sewn on an angle with a back slip pocket
The back side has a large slip pocket on the right in the cactus print.

Closeup of the slip pocket on the back of Large tote bag in cactus print and dark fabric sewn on an angle
Back slip pocket.

Looking down at the recessed zipper in yellow on the Large tote bag in cactus print and dark fabric sewn on an angle
Slightly recessed zipper so the bag contents stays secure and the longer zipper allows for the tote to open really wide to access what's inside the tote as well as see what's inside better too.

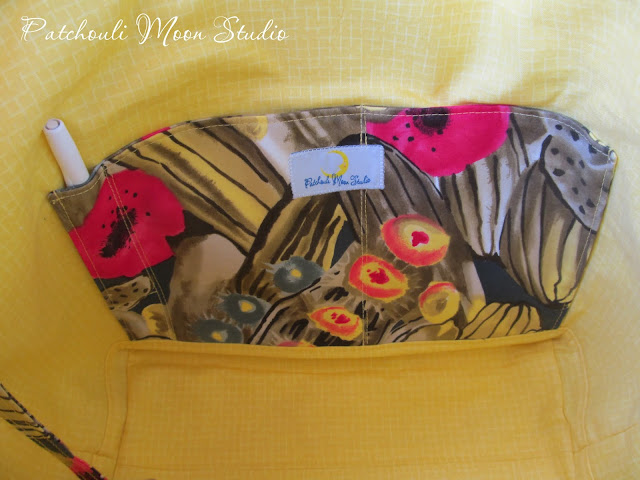
Lining of tote bag is bright yellow with cactus print slip pocket
A bright yellow lining inside with a divided slip pocket plus I divided it again for a pen pocket as well.

Lining of tote is bright yellow fabric with a zipper pocket in cactus print and a slip pocket behind the zipper pocket
On the other side of the lining is a zippered pocket and behind the zipper pocket is a slip pocket too.

Inside view of Large tote bag has yellow lining and cactus print pockets
As well as all the pockets, there is a key leash with a swivel hook so you can hook your ring full of keys to the leash and be able to find your keys faster and easier.

Bottom of tote bag is quilted with added purse feet
while not part of the instructions, I added some Peltex stabilizer and quilted it and then added purse feet to the bottom of the tote.

Large tote bag in cactus print and dark fabric sewn on an angle
My fat little birdie approves of this tote, lol!

This tote is now for sale in my PayHip Shop. Click here to see and purchase this tote. Thanks for looking. This bag has SOLD.
Happy toting.
Pin It Now!

Sunday, July 28, 2019

Birdseed Tote Bag

I up-cycled this birdseed bag and made it into a large tote bag. All I used was the bag itself and some thread. I cut off the bottom of the bag and made handles, which I sewed to the top of the bag that I had folded over. I topstitched around the bag to define it and make it stand up better.

My daughter gave me her empty birdseed bag, so I made this into a tote bag. The nice thing about using a birdseed bag s that it doesn't have any odor like a dog or cat food bag has. The material of this bag is really strong too. It is like a plastic tarp material with reinforced threads running through it. It is quite tall too.

It feels good to up-cycle this bag into another kind of bag that can be used instead of going into the landfill. This will be a very useful bag. My daughter will give me another one of these when she uses up all the seed.

If you have similar bags and do not want to up-cycle them yourself into something useful, give them to a friend who sews or a sewing group in your area, as I am sure someone would love to make something out of a great bag like this.

I think the birds on this bag make it look pretty.


Standing here in front of my bench shows how tall it is.


Pin It Now!

Friday, June 28, 2019

B.E.S.T Easy Shopping Tote

This B.E.S.T Shopping Tote is a free pdf from Moments Designs. It is a fast and easy sew and you have a useful tote when you are done. You can make it in vinyl, oil cloth, home dec fabric, canvas or whatever is sturdy. It's not lined, so it's quick to sew. All you need is your choice of fabric and some thread.

I had a piece of plain vinyl that I was about to donate because I am not a big fan of sewing with vinyl. In fact I had it ready to take to a thrift shop that day when Liz had posted this pdf on her Facebook page! So I grabbed the vinyl and decided to make this tote.  Vinyl sews easily enough, but it also stretches which I don't like and I cannot press it. I am a cotton fabric sewing kind of gal. But this was a perfect use for the vinyl. It's a rather plain looking bag, but probably suitable for a man who shops.


The other side of this vinyl is a flannel material. So it looks lined,  but it's not lined.


I was given this large piece of oil cloth and was waiting to find the right bag to make. Along came BEST Shopping Tote, which was the perfect use of this oil cloth, so I made this one too. I liked the oil cloth much better for sewing and it's prettier too! I have a large scrap left from making this bag, so I will make a smaller version to use it all up.


I had to piece the bottom piece to make it large enough, but that was easy to do.


The vinyl bag was Donated to raise funds for Alzheimer's Disease 2022.
The floral bag SOLD.

Pin It Now!

Thursday, December 3, 2015

Abby's Alley Tote Bag

Christine, of ChrisW Designs, has come out with a new line of patterns called Easy Street where the patterns are fast and easy to sew. If you sell bags or just need some gifts to make, then you will love that these patterns are much faster to sew than some of her other patterns that take a bit longer to create. As with all of Christine's patterns, the patterns are well written with lots of photos too. Christine plans to create a few more for her Easy Street line and was going to release them all at once, but she decided to release the first 2 now, in case you want make these for gifts. Oh yes and these Easy Street patterns cost a few dollars less too.

The first is called Abby's Alley and it's a tote bag. I will post the second one, Brandt's Blvd. (wallet) in a separate posting.

I tested the Abby's Alley and since I wanted to use some faux leather I had for a long time, and thought since this was an easy to make bag, I would try it here. Well it was a big mistake (for me anyway) to use faux leather! It sewed just fine while it was flat, but it was a pain in the you-know-what to sew the seams with so much thickness and since you cannot press the faux leather, it made matters worse. Another bag tester, Liz, uses leather and faux leather beautifully in her bags. But for me I will stick with quilting cottons from now on, and leave the leathers to Liz! So please go and see the other testers to see how pretty this bag can be in better fabrics. Using faux leather is not a good choice to show for a fast and easy bag to make, so stick with cotton fabrics if you are new to bag making. Please look at the design of the bag and not the fact that I used faux leather here.
I even quilted fleece to the faux leather, making it even thicker!!!  
I braided yarn in the colors I used in the bag for the handles and knotted in on the inside, rather than the outside of the bag.
Three extra large skeins of yarn fit easily in the center of the bag.
Lots of inside pockets. I sewed my pockets straight across here. The pattern instruction have you sew them with the curve like the front, but I felt it was even easier to sew them straight for the lining.
  Pin It Now!

Friday, June 20, 2014

The Stow it All Tote

I recently tested a tote bag designed by Christine of Chris W. Designs. She has just released her pdf pattern for the Stow it All tote bag, so now I can finally show you my version of the bag here. To get a 20% discount in this pattern, scroll to the bottom to find out how.
I used batik fabrics for my tote. The black is a Southwest print of Kokopelli, lizards, turtles and sunbursts. I scanned the fabric and enlarged one of the sunbursts and created the applique on the flap. I machine stitched around the applique using 2 different decorative stitches. I used a magnetic snap because I didn't have the twist lock closure that was called for. I chose to leave the front pocket large and didn't divide it as the pattern calls for. 
This is the back of the tote. Again I left this back pocket large and didn't divide the pocket. I wanted to be able to carry a theme notebook or folder.
The pattern calls for a lining that will create an accent on the front of the bag. I didn't want to use this bright batik as the entire lining or I would need to wear my sunglasses to see inside!. So I instead sewed the accent fabric on. I wanted a softer lining fabric, which is the light coral pink fabric. I did add my usual zipper pull, but after I took this photo.
This lining is softer on the eyes, yet I still have the accent fabric I wanted. I did it the hard way though, lol. It would be much easier to sew according to the directions using a lining fabric that will also be your accent on the front and the pockets inside here.
I always love to have a pen pocket.
My large front pocket.
I love how this tote turned out. 
To see all the other bags that were tested go to Christine's Blog. There is a lot of fabric variety to feast your eyes upon there.

  Grab Your Discount! To get your pattern at 20% off, simply visit Christine's shop here and use the discount code: stowit in your shoping cart! (Sorry - only valid at Chris W. Design's website, not Etsy or elsewhere!) Note: Code is valid until Midnight Tuesday 24th June EST! 

If you are looking for my Weekend Link Party, it's the posting before this one.
Pin It Now!
Related Posts Plugin for WordPress, Blogger...