Tuesday, February 12, 2019

Primitive Funky Cats Table Runner

I had started making some cat applique blocks (Alley Cat Tales Primitives Never Enough Cats pattern) with the idea I would make it into a table runner. I had stitched around most of the applique parts, when I got an email from a blog friend & customer of mine who wanted a Spring table runner. She was thinking of stars. I mentioned to her I was in the process of making a cat runner (she is a lover of cats) and I would send her some photos in progress. Well that was it, she said forget the stars she wanted the cats! LOL!!!

I then asked her about the other colors and made some fabric suggestions to the triangle color and the 4-patch colors. I made one 4-patch and selected some fabrics I thought would look good. One was a pink print, but she didn't want the pink. Anyhow, she did like the stripe fabric and the 4-patch and so I took it from there and put it together and quilted it. I knew if this runner made me smile, she would be beaming with delight when she got it. I did enjoy making this, especially the cats. I might just have to make another one some day, but in different colors. It always feels good when something I make goes to a good home.

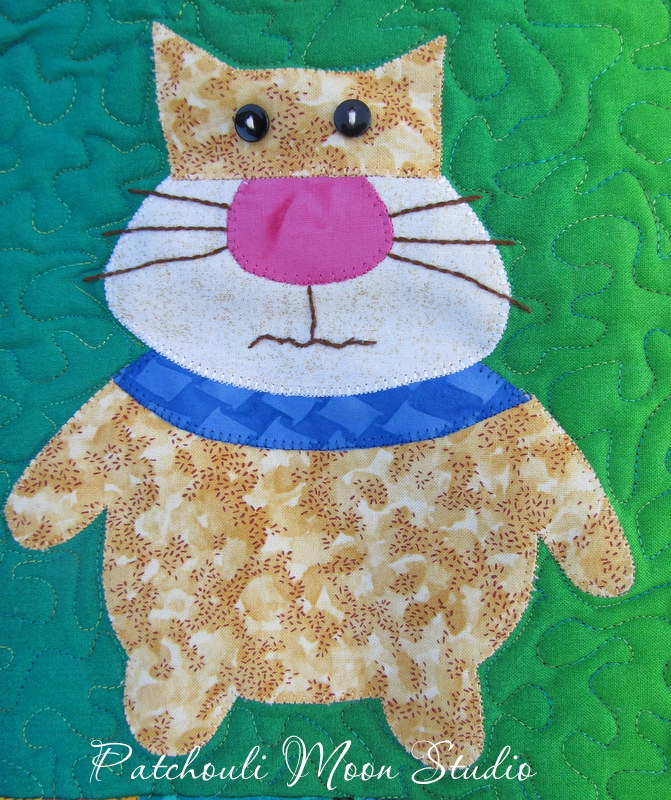
To give the cats a bit of individual purrsonality, I placed their eyes each a bit differently and gave them each a different mouth too. I also wanted to place the cats each heading in a different direction to add more to the wonky, funky feeling as well.

Primitive Funky Cats Table Runner.

Since the cat blocks were not square, I had to add a strip on one side to make them square so the setting would fit correctly. I like how it looks, so it turned out to be a happy accident. 

I saw a setting similar to this online on a different table runner and liked it, so I decided to give it a try. 

Straight quilting in the triangle areas and free motion quilting on the rest.


Each cat's eyes are a bit different in placement. This one is horizontal.

This cat has diagonal eyes, angling in.

This one has vertical eyes. I didn't quilt on the cats, just around them. I wanted the cats to puff out a bit.

This cat has diagonal eyes angling out like a Siamese. As careful as I am when I photograph black or dark fabric, those dang littl lint monsters come out and just throw themselves onto my dark fabric!!! I can never see them in my camera or my naked eye because they are so sneaky and fast! But there they are once I load my photos. One day I will defeat you little lint monsters!

I took this photo to show how it might look with the pink fabric for the triangles. The pink fabric picked up the pink in the cat noses and the pink in the floral print of the 4-patches too. But it would have been a lot of pink, so I think the blue-green stripe that was chosen was the right choice.
I borrowed my daughter's oval table to photograph the runner on a real table.

Fits just right on my daughter's oval table. Now I can see how it looks on a table.

Pin It Now!

Monday, February 11, 2019

(MIY) Make it Yours Bag & Cat Fabric Folder

I finally got around to making the Make it Yours Bag (MIY), designed by my blog friend, Rochelle of eSheep Designs. I had liked this bag for a long time. It is a free pattern on Bluprint (formally Craftsy). As I was making it, I truly did make it my own! I make a lot of changes as I usually do anyhow. I will explain them under each photo.

Fanny Is here modeling the MIY Bag and to show the size of the bag.

I had this cute black cat fabric and thought it would look great as a bag. I paired it with some large polka dots and a lime green for the straps. I quilted it in wavy lines. I used a foam stabilizer so the bag stand up nicely. I added straps tabs and rivets too both the tabs and the straps.

On the back of the bag I added a zippered pocket. Rochelle does tell you to add whatever pockets you want to inside or out. I thought about adding this zippered pocket on an angle and then decided to just make it as I normally do. You might also notice the shape of my bag is a bit different too. Well I will explain. I started out making the non-pleated version and adding a gusset. But when I added the gusset, I didn't really care for how it looked. Maybe it would have looked better had I gone for the pleated version? So I ripped the gusset off the bag and boxed the corners instead. Since this bag shape was slightly curved, it was a bit different to box the corners on a curve. Well it didn't stop me, lol! So the bag has a bit of a curve that goes into a square boxed bottom. Well Rochelle, you did say to Make it Yours!

Handmade zipper pull I made.

Inside I added another zippered pocket. Apparently I didn't see that little black thread at the top!

On the other side I added a small slip pocket and divided a pen pocket in it. The bag closes with a magnetic snap.

On to the Folder~
I wanted to make an applique pocket for the inside of the MIY bag above, but it ended up being too large of a pocket, especially after the changes I made to the bag. So I decided to make one of my fabric folders (my own pattern) and put this applique cat pocket onto the front of the folder. So I just added another thing you can add to my folder pattern: a pocket outside! See I even make changes on my own patterns, lol!!! You can find the pattern to make a Patchwork or Applique fabric Folder on Makerist, as well as all my patterns there (some are free).

Applique Cat from Alley Tales Primitives: Never Enough Cats pattern. As you can see I used the same fabrics as the MIY Bag above.

Not enough fabric to make the diagonal pocket, so I pieced it together first.

The back of the folder also has a pieced strip. I quilted the folder as well.
Note: Remember this applique cat as you will be seeing more of them in a different project that I made recently too.
Pin It Now!

Friday, February 8, 2019

Fabric Basket Tote Bag in Southwest Print

I have been wanting to try making the Fabric Basket Tote Bag (by Caroline of Sew Can She) for a long time and I made it a few months ago. I made changes (of course!). I used foam stabilizer in it so it would stand up nicely. I chose a Southwest fabric print of pottery for the center and a nice rust color for the sides of the bag. Accented the bag with a chocolate brown for the handles (I made my handles differently than the tutorial) and top the binding. I also added D-rings and rivets to the handles and strap tabs too. I did not add any piping on the bag. I think it looks great with the changes I made.


Nice and wide at the sides. The only thing about using a fusible foam is it wrinkles a bit and won't press out. I decided it makes the rust fabric look more like leather with a bit of a wrinkle in it, lol!!! No more fusible foam for me! I quilted the center section of the bag and it didn't wrinkle there, so as long as I quilt the fusible foam I may be okay using fusible foam. Still learning.

Closes with a magnetic snap, but can be made with a zippered closure too. Two interior slip pockets. One I divided in half with a pen pocket in the center. This bag opens up nice and wide!

I accented the pocket with the chocolate brown fabric.


Pin It Now!

Thursday, February 7, 2019

Arabesque Bag in Purples-Pinks-Aqua

I made this Arabesque Bag (from Sew Sweetness) in Purples-Pinks-Aqua batik fabric a while ago and it sold at the last craft show I did in November. I do love making these bags as I can add all my own touches and changes.
This is the original size (I have made some at 80% and 90% too).


I quilted this in wavy lines. I added rivets to the strap too.

A charm for the zipper closure.

The back of the bag I am now adding a zippered pocket to all my Arabesque bags in all 3 sizes I make them in. This bag really needed an exterior pocket, but I hated to cover up all that beautiful batik patchwork and quilting on the front or the back of the bag, so decided a zippered pocket works best as it only shows a bit without covering anything. If I ever get around to making this bag in one fabric, I can add slip pockets outside too, but I am having too much fun making this bag in patchwork strips, lol!

Side depth.

Isn't this interior fabric so fun? Purses, shoes, sunglasses, lipsticks, hats and more...all the things a woman needs.

Other side of bag.
I will continue to make Arabesque bags in all 3 sizes and all kind of colors and sell them at craft shows and in my Etsy shop too. I love choosing the fabric colors for these bags and putting them together. It satisfies the quilter as well as the bag maker in me, lol!!!
Pin It Now!

Monday, February 4, 2019

Toddler Size Backpack

Before Christmas, a quilting friend of mine asked me if I could make a backpack for her granddaughter, who is a toddler. I was up for a challenge and so said yes I could make that. I hadn't made a backpack before, but knew it wouldn't be too difficult, especially a small size like this. I had a few backpack patterns for larger children or adults and a tutorial for a cute child backpack, but that was written in Chinese. Still I liked the look of that backpack and so I took the best of it along with ideas from others and created my own toddler size backpack.

I decided to make a prototype one first to make sure it came out well before making the custom one. The fabric that my friend had liked of the fabrics I showed her, I only had enough to make one, so I better get it right. She or rather her daughter wanted something vintage looking and this blue fabric with birds and flowers was chosen. She requested her nickname on the front, so I made an applique and before sewing on a double-stacked button for the "i", I asked if her granddaughter would try to pull it off and put it in her mouth, because I wouldn't add it unless she thought she wouldn't do that. She thought it would be fine and I stitched in place really well!

I lined the backpack with a yellow gingham and made the pocket on the front in the same fabric too. I love blue and yellow together.

But before I show you the blue and yellow toddler backpack, let me get back to the prototype one I made first, so I can point out the few changes I made in final one.

This is the first toddler backpack that I made. I chose a few color that went nicely together. I knew right away that I made the carry handle at the top too wide, so I changed that and made a narrower one in the 2nd backpack I made. The front pocket first of all wouldn't allow me to applique the name on it as well because of the shape of this pocket and because I stitched a diving line down the middle. So I changed the pocket to a rectangle in the next backpack too. The other thing was the straps I had set a bit farther apart on the back of this backpack, so in the next one, I moved them closer together. The rest of the backpack is the same. So now you can get a look at them both:

You can see the snaps at the top of this backpack when this is fully opened. But snap the sides and it cinches the top smaller without a drawstring.

Here the top sides are snapped together

The front pocket was divided in half, which was fine for this backpack, but not enough space to applique a name, so I changed this pocket in the next backpack I made for Kit.


The straps are adjustable to allow some room for growth.

The flap snaps in place and the backpack opens up for a toddler to put all her little treasures inside.
Inside the backpack is a divided slip pocket and a zippered pocket too. I left off my usual beaded zipper pull because I was worried a small child might pull it off and put it into their mouth. Not a good idea to have a child choke!!! I thought is would be good for small hands to work a zipper too. Extra special treasures can be hidden in this pocket.

Next is the custom made backpack for Kit:

I fused on the letters for Kit's name and like I mentioned earlier, I asked if putting a double-stacked button on this would be something Kit would pull off and put into her mouth or not and was told it should be fine to add, so I sewed it on extra secure.

Fully opened. I also quilted the body of the backpack.


With the flap and sides snapped closed to cinch the bag in more securely.


Back view and the adjustable straps are set closer on this backpack. The carry handle I made narrower and folded in half in the center and stitched also.

Unsnapped at top.

Slip pocket inside I added a binding of the blue fabric at the top.

Also a zippered pocket, but no zipper pull, so it can't get pulled off and put into a child's mouth.

My friend showed me a video of Kit opening her gift on Christmas and putting it on. It was the perfect fit! She was happy and that really made me happy it worked.

The first backpack was sold at a craft show in November for her granddaughter too.

I have a different idea if I ever make another child backpack in the future. It will be about the same as this, but a couple of other things I thought to do.

Pin It Now!
Related Posts Plugin for WordPress, Blogger...