Showing posts with label Tip of the Morning Tuesday. Show all posts

Tuesday, October 1, 2024

Glue Applicator Tips for Appliqué & More!

It's Tip of the Morning Tuesday!

When I went to the Vendor Barn at the Garden of Quilts Show in Lehi, Utah in mid September, a vendor (Pen & Paper Pattens) was selling these glue applicator tips. She showed me her method of doing reversible appliqué, which she used school glue with one of these glue tips. I mentioned to her that I had bought appliqué glue with a metal tip of another brand in the past and the tip got clogged up before I had even used much of the glue and no matter what I did it wouldn't unclog. Then she handed me a package of 2 glue applicator tips and showed me how they will not get clogged because in the cap is a metal piece that inserts into the applicator tip to keep it from getting clogged. Genuis! 

Well needless to say I bought the package. It is the best tool/gadget I have purchased in a very long time! I put one tip on my Elmer's washable white school glue and one on my Jot washable glue (from Dollar Tree). The Jot brand works great! I don't need a super strong glue as it is for a temporary hold. My Jot glue was less thick than the Elmer's glue, but I have had the Elmer's for years so that might have been part of the reason it was thicker? I found it worked better with the Jot glue, since it wasn't as thick. I may add a bit of water to the Elmer's and shake it up so that it isn't as thick. 

Don't do appliqué? I use glue for other sewing too. I was using a washable glue-stick glue to hold pressed under fabric pieces (like in making straps or zipper ends) when making bags. I loved the glue-sticks, but the metal tip of the white glue is easier to apply and doesn't get smeared over places it shouldn't like the glue-stick can. Both are washable glues, but now that I have this applicator tip, the white glue is by far more economical than the glue-stick is, so I won't be buying glue-stick anymore (although I bought a ton of them at the back to school sale, so I have a good supply for quite a long time). See photos below:

Photo from Pen & Paper Patterns.

Photo from Pen & Paper Patterns.

Here is a quick video from Pen & Paper Patterns, showing you how to use the glue with the applicator tip~

Pin It Now!

Tuesday, March 8, 2022

Make Flowers from Circles

I love using my Circle die cuts from Crafters Edge for using in all kinds of appliqué. Circles by themselves make great looking flowers and you can stack 2 or more circles on top of one another for a different look too. The Circles die cut set includes 11 sizes in 1/2" increments, so you can have a lot of possibilities on hand to create so many things.

I was thinking the other day how it would be so easy to take a circle of fabric and make a few snips to create a flower. So this is what I did.

The finished flower made from a circle.

To make the flower, first cut a circle. I first fused fusible web on the back of the circle and then I cut the circle using a die cut.


Then fold the circle in half.

Fold the circle in half again.

With sharp scissors make a snip at an angle from the raw outer edge and snip into the folded side, snipping a little bit, but making the snip as deep toward the center folds as you want to cut. I was being conservative with this flower and didn't snip too deep towards the center folds.

Open the circle. If you want those cuts deeper towards the center, refold and snip a bit more off. 

Refold the circle, matching where you cut and creating folds in the opposite sides now. Fold once and then fold again like you did in the beginning. Make snips again along the new folds and trying to snip about the same amount of fabric off.

Open up and now you have a flower with a bit of a different look than just a circle. Add a smaller circle to the center and fuse where you want your flower. You can also add a button in the center too.

You can make deeper snips overall or just some of the snips deeper to give it a more wonky look. Add the snipped circle on top of a larger snipped circle or a non-snipped circle to create all kinds of looks.

Note: if your fabric isn't too thick, you could fold it in half and in half again and fold it once more in half and then make your snips as I showed you above. You will be snipping through all the layers at once and when you open it out, the flower will be done. I have been successful doing this on the larger circles, but the smaller ones can be more fiddly to fold it so many times. So try it both ways and see which you prefer. Thicker fabric will be harder to snip through that many layers at once, so this is why I showed you how to make the snips in 2 steps, rather than one step.

You can find this tutorial under my Tip of the Morning Tuesday .

I will be sharing how I used these flowers in my appliqué pieces as I make more of them and stitch them onto projects. I will refer to this tutorial when I make something, so you can easily find this.
Have fun making your flowers.


Pin It Now!

Tuesday, February 26, 2019

Tip of the Morning Tuesday~ Cleaning your Design Wall

I cannot believe it has been soooo long since I shared a Tip of the Morning Tuesday with you. I have a great little tip this morning to share with you all.

If you are a quilter chances are that you have a design board. Whether that design board is as big as your wall or a portable one that you take to your machine to keep your block pieces in the proper order to help you sew; it probably is made with flannel or batting to hold the fabric in place, right? Well if you sew then you know how thread sticks like mad to flannel and batting and your clothing too. For years I used one of those masking tape sticky rollers to roll over my design board, my ironing board and myself too! It picks up the threads well enough, but never seems to get them all and I have to pull off the sticky tape too often and toss it and begin with a new tape. That costs money and you have waste and need to buy refills. But I have a better solution to share with you today.

Behold the silicone dish sponge. These silicone sponges are meant for hand washing dishes. You would think they might be great scrubbers for those dishes with the little bumpy scrubber-like bristles, but they really do not scrub the food off the dishes very well at all. They are great for using as sponges in terms that they do not collect bacteria like a normal type sponge does. You never need to toss this silicone sponge as it doesn't wear out either. It washes dishes okay if  you wash them immediately and nothing dries hard on them. But it just doesn't scrub anything really. I need a tougher scrubber for that job.

Anyhow, back to the tip and design board. What I did discover is that using a silicone sponge on a design board removes all those threads (and excess flannel or batting too) in a couple of easy swipes. Then you can pull off the lint and threads easily from the silicone sponge and toss it or save it to use as stuffing for pillows and pincushions and such. It has a little loop so you can hang it up near your design wall or board too. At least the one I bought has a loop. You can buy them at most stores that sell dish care products (I think). Check your dollar store as they will be the cheapest there. It might even work to remove cat or dog fur off of your pet? They do sell a similar product for that purpose. I do not have any pets now, so I cannot test this idea out, but if you do and it works, that would be another use for this sponge. But I would buy a separate sponge for each job.

My design board isn't too full of thread and lint here. But is has been a lot worse.

A few swipes with the silicone sponge and look at all the lint and thread it picked up. Mostly lint, since my board wasn't as full of thread at the moment.

Easily pulls off the sponge to toss or  save to stuff a pillow with.

Pin It Now!

Tuesday, June 13, 2017

Tip of the Morning Tuesday~ Best & Easiest Way to Clean Your Iron

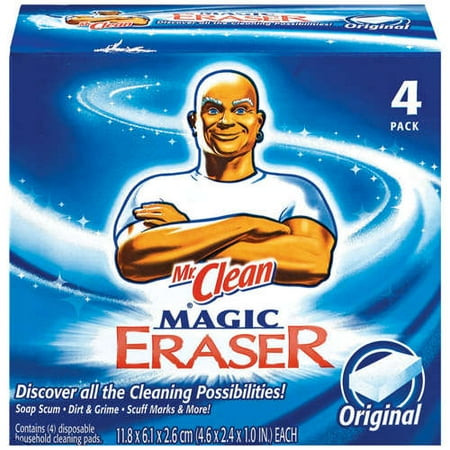
I have a great tip for you about how to clean your iron quick and easily with no mess. Maybe you already know about this, but in case you don't here goes: Purchase a package of Mr. Clean brand Magic Dry Eraser Sponges (no affiliation), and then turn your iron on to get it hot. Meanwhile dampen one of the sponges with a little water and wring out any excess. Once your iron is hot, unplug it and let it cool for a minute, so it's not so hot as to burn you. Then just rub the sponge all over the iron sole plate and especially in the steam holes and you will see your iron getting clean as your sponge gets dirty. It cleans faster and easier than using that iron cleaning paste in the tube and there is no odor! I love this Magic Eraser sponge! It is my new iron cleaning sponge from now on. I will certainly be cleaning my iron more often since it is so much easier and faster to clean.

Sorry I didn't take any before or after photos because I did this last night and wasn't sure what the results would be. I will say the steam vent holes are finally clean as new now. I had never been able to get those vent holes clean no matter what I tried cleaning it with and I tried it all before.

I haven't even used these Magic Erasers for anything else, but I hear they clean other surfaces well too. If you clean other items with these, I would like to know what you clean and well it works for you.


Pin It Now!

Tuesday, May 16, 2017

Tip of the Morning Tuesday~Ironing Board

I have a tip to share with you after recovering my ironing board recently. I have a large rectangle board (29" x 35") that sits on top of a table and my last cover was looking rather scorched, so it needed a pretty new cover. I had used a home dec fabric last time with batting and InsulBright under the fabric and it lasted a few years, but with all the pressing/ironing that I do with making quilts and handbags, all the layers underneath felt rather flat. I really didn't want to add a lot more layers of batting and InsulBright again, ugh!

So I got this idea to use a foam stabilizer under the silver ironing surface that I wanted to use. I had a 36" x 58" package of double-sided fusible foam stabilizer called In-R-Form by Bosal, so I used that underneath. I left all the old stuff on the board and just stapled the foam stabilizer onto the back of the board, then covered it with the silver ironing board fabric and stapled it into place on the back of the board too. Once I started to iron, the fusible part adhered to the silver fabric. I love how the foam is firm bit adds a bit of cushioning to the ironing surface. You really don't need the foam stabilizer to have any fusible on it at all though. I used a fusible foam because I already had it on hand. You can use any brand you like: Soft and Stable byAnnie, In-R-Form by Bosal, Foam Flex by Pellon (although Pellon brand is only 20" wide, so depending on your board size, you may have to whip-stitch pieces together to make it the correct size to fit your board).

I love my new ironing surface now! I hope it stays pretty looking for a long, long time. Time will tell how the foam holds up underneath, but so far after over a month of ironing on it, it looks and feels great!
My ironing surface re-do. 

Pin It Now!

Tuesday, March 7, 2017

Tip of the Morning Tuesday: Using Transparent Tape on Rulers

Hello tipsters! I have a great tip to share with you. I cannot take credit for this tip though. My good friend Bobbie shared this tip with me. I am not sure if she read it on another blog or not, but hey we all don't read the same blogs so this one is certainly worth sharing again!

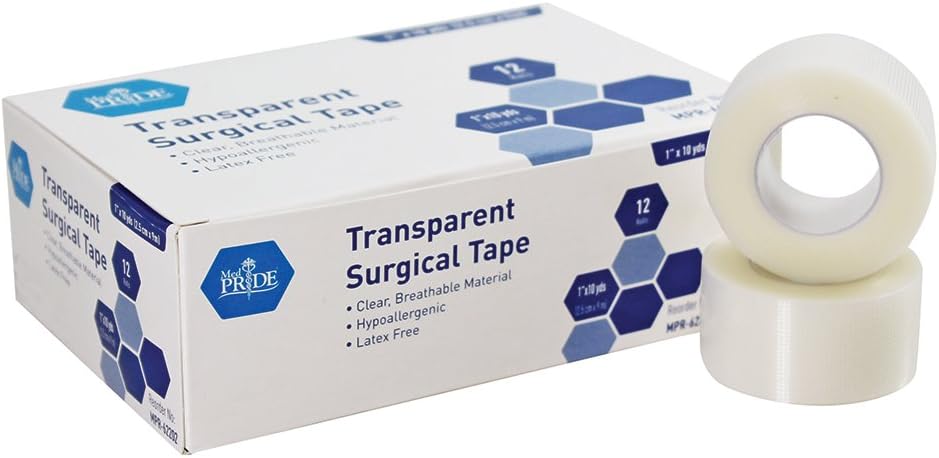
Buy a roll of transparent tape in the bandage isle of your favorite store. Bobbie bought Curad brand and hers cost less than $2. I bought the same thing only at a different store and mine was the store brand and mine cost just over $4 with sales tax. Still this stuff is cheap and will last you a long time.


Okay you are now wondering so what do I do with this tape? Well you tear off a small piece of it (it tears so easily with your fingers) and place it on the back side of your quilt rulers in each corner and you can add some more tape in more places on your rulers if you like. It's clear so you can read the numbers and lines still and it helps to keep your ruler in place and not slip as you cut your fabric. The tape is 1" x 10 yards and one roll should last you a long time even if you have a bazillion rulers! It's easy to remove and add more tape as needed too. Isn't that a great idea? I love it!

Believe me I have tried every type of ruler gripper in the past from sand paper dots, to clear dots (those were thick so the ruler sat up a bit too much), to that clear plastic cling stuff (which eventually would curl and pull away from the corners). All those grippers would only last so long and each package would only have enough to do a few rulers. So this tape is cheap and while I don't know how long it will last on my rulers, it is cheap enough and I have enough yardage to add more tape as needed.

I plan on using this on my plastic templates too, even the templates I make and cut out myself.
Pin It Now!

Tuesday, September 9, 2014

Tip of the Morning Tuesday~Scissors Stand

 It's been a long time since I have posted a tip on Tip-of-the-Morning Tuesday, so I thought I would share this one with you today. I had recently finished using the rest of the thread that was on a cone and I was looking at the empty cone wondering what I could do with it. I use small empty thread spools to wrap my embroidery floss around, but the cones are too large for doing that. Then I sat it down next to my sewing machine and I got an idea to put my little Fiskars scissors in it. They fit perfectly and the top of the cone holds the scissors, while the scissors points are suspended up above the table so I don't have to worry about the points hitting the table. I had some leftover yarn from various projects I had been working on, so I glued some of the yarn around the cone. There are several other ideas you could do like gluing fabric instead of the yarn, or making a little quilted cozy or a knit or crocheted cozy to fit around the cone. Not all cones are the same, nor are all scissors, so before decorating a thread cone to hold your scissors, make sure your scissors tips don't hit the table. If the thread cone needs some weight to keep it from falling over, you could glue a rock or flat marble to a piece of cardboard or foam core board and glue it the the bottom of the cone, but before gluing it in place, put your scissors in the cone with the marble or rock on the bottom and make sure that your scissors will not hit against the marble or rock.

Another idea for using an empty thread cone is to place a bottle of glue in it upside down when your glue is getting low. Of course you would have to have a cone with a large enough opening to the size of your glue bottle. But there are yarn cones, and other cones out there that might be just the right size. Before tossing out those cones, think of what you might be able to use it for first.
Yarn wrapped around an empty thread cone.
Holds my scissors perfectly.
Pin It Now!

Tuesday, January 14, 2014

Tip of the Morning Tuesday~DIY Crafter's Tool Caddy

Welcome to another Tip of the Morning Tuesday. I wanted something to keep some of my sewing, quilting and knitting tools in while watching dvds and doing some handwork. Depending on what I was working on at the time, I thought using a dip/chip/veggie snack tray would be just perfect for holding my tools and such. I didn't have one so I stopped by a dollar store to take a peek and see what they had. I found this one and it was perfect for my needs. One of the pincushions I had made a while back fit just right in the center too, so I didn't need to make a new one.
Here's the chip/dip/veggie snack tray I bought at a dollar store.
My pincushion fit perfectly in the center and a few sewing and knitting tools fit in the sections.
This would also be great to hold beads, stamps and stamp pads, paints, or whatever your hobby is that requires you to have several items on hand while you work. It even looks like a gigantic paint palette, lol! I keep this on a TV tray by the sofa.
Pin It Now!

Tuesday, October 29, 2013

Tip of the Morning Tuesday~Storing Embroidery Floss

There are several ways to store embroidery floss and perle cotton:

  •  You can wrap the floss around those flat cardboard or plastic spools that you can buy at the store or make yourself.
  •  You can use old thread spools to wrap your floss around. I have been wrapping my floss for decades around old thread spools. 
  • You can use clothespins, both the old fashioned style without the springs or the ones with the springs as pictured below. The advantage of the springs is that you have a place to pinch the starting and stopping thread places. 
  • You can use those larger pieces of cardboard or plastic with the large holes that you can loop a bunch of floss through, but I find that those kind of holders where the floss is just hanging, tends to get the floss all tangled up.
Some ways to store embroidery floss.
I then place all of these into a latched box. So how do you store your embroidery floss?

Pin It Now!

Tuesday, August 27, 2013

Tip of the Morning Tuesday: Quilt Basting Small Quilts My Way

I am thrifty (okay I'm really cheap! There I said it, lol) and a saver of things that I can reuse or find a different use for. One of the things that I save that most people would throw away is tiny scraps of fusible web. I do a lot of fusible applique, so I have lots of fusible web scraps on hand.
I save these large plastic salad containers to keep my fusible web scraps in. I also have another container like this that I save my interfacing scraps in too. Plus the containers are great for fabric scraps...but I have way too many fabric scraps to fit in these. Using these containers is just one of my bonus tips for today, the real tip I am sharing today is coming up, so hang in there.
 I use an address label and print out labels for my containers. I add one to the side of the container so that I know what's inside when they are all stacked on the shelf. I also print one label for the top of the lid as you can see if the photo above. No address labels? You can write directly on the box with a permanent marker or use a piece of masking tape and write on the masking tape and stick it to the box instead of an address label.
You can see all the scraps of paper-backed fusible web I save; even tiny pieces. Here's the reason why...
...I take those small pieces of fusible web and iron them onto the wrong side of the fabric that I am using for the back of my small quilt. I fuse them all over the backing fabric spacing them like you would if you are pin-basting a quilt.
Here are several pieces of fusible web scraps that I fused onto the wrong side of the backing fabric. Sometimes it is hard to see those tiny pieces as they might blend into the fabric, so I take a marker and scribble on the paper so that I can see where the fusible pieces are. It's best to scribble as you go of course. I used a red scribble here thinking that red would show up, but not thinking that the cherries and dots are red and I should have used a blue marker instead. If you look closely you will see the fusible scraps with a squiggle of red. Once they are fused on your fabric, then remove the paper. Make sure you look really well and remove all the paper off the fusible pieces. Then once you have removed the paper, you will lay your batting on top of the fabric with the fusible pieces.
Smooth out your batting. Then roll up the fabric and batting together like in the photo.  
After you rolled up your batting and backing pieces together, then turn it over and carefully unroll so that the fabric is on top and the batting is on the bottom like the photo above. Smooth it out with your hands. Now you will press your fabric with the batting underneath so that the fusible scraps stick to the batting. Be extra careful if you use a polyester batting as polyester batting can melt! 
Next, take the top of your quilt and fuse fusible web scraps to the wrong side of the quilt top, just as you did for the backing fabric. Once the quilt top has been fused and you peeled off the papers, lay the quilt top on top of the batting. Smooth it out and press on the quilt top so that the quilt top now is fused to the other side of the batting.
That's it. You just fuse-basted your quilt together and it is now ready to quilt and there's no pins to deal with. You used scraps of fusible web that you would have normally thrown out.

I recommend using my fuse-basted quilt tip for small quilts like wall quilts and it's really great for bag making too when you are quilting a bag and you don't have fusible fleece on hand. For larger quilts you can use safety pins or fusible batting or those basting sprays. I find that the fusible batting and sprays don't stay fused on  large quilt that you handle a lot. They tend to come apart around the edges, plus I find it hard to iron a large quilt and batting together because of the large size. If you have luck with those products then by all means use them. They just don't work well for me.
Pin It Now!

Tuesday, August 20, 2013

Tip of the Morning Tuesday: More Up-cycled Tins

Welcome back my friends to another Tip of the Morning Tuesday. Last Tuesday I showed you what to do with some small containers, and today I would like to show you what to do with some larger cocoa tins. Now they do not have to be cocoa tins, they could be could be tins that once held tea or coffee or something else. You get the idea.

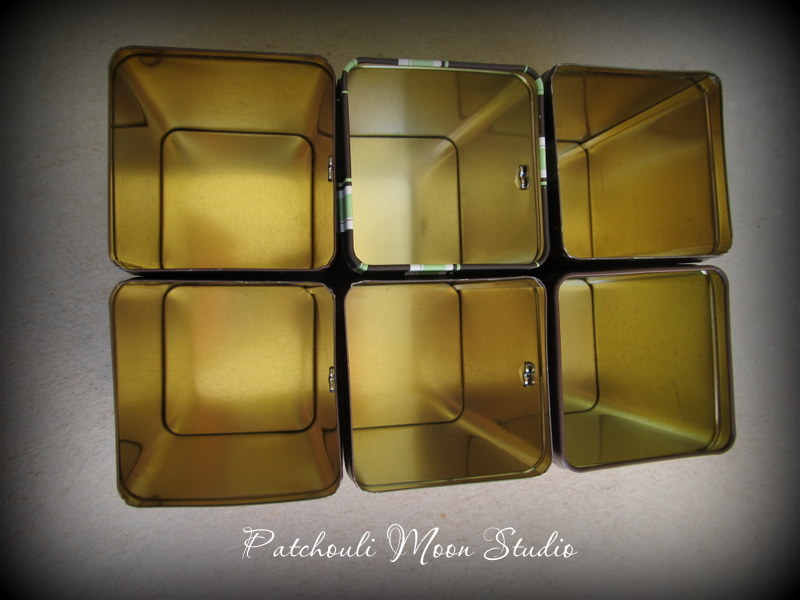
First, I took 6 tins that are all the same size. I got out my Crop-A-Dile tool. Punched holes where I wanted to attach the tins. Put a brad fastener in the hole and opened the back of the brad to attach it. Now I have a place to put all sorts of tools and supplies. Like pencils and pens, rulers, markers, scissors, seam ripper, etc. Whether you place sewing items in the tins or crafting items, they all stay together instead of having separate tins. You can even add a handle if you want to carry it.
Here are some cocoa tins I had.
See where I attached the tins using a brad fastener.
My brad just happened to be in the shape of a heart.
Open up the back of the brad to keep the tins held together.
More heart brads in different colors here. Notice one of my tins is a different brand. You could paint your tins or decoupage them before you attach them with brad fasteners if you desire.
I store all my marking pens in these containers. I have washable markers, permanent markers and metallic markers in these tins.

Here are the lids. Now what did I do with the lids you might ask? I attached them the same way that I attached the tins.
I used round brads on the lids.

I placed small items in these tin lids. Small screwdrivers, sewing machine feet, etc. This sits in a drawer where I have other sewing machine tools and notions. 
You can purchase the Crop-A-Dile tool wherever they sell scrapbooking supplies. If you live where there is a JoAnn Fabrics, Michaels, Hobby Lobby or other stores that offer discount coupons off one item, you can take advantage of the coupon savings. You can find it online too at scrapbooking supply stores, Amazon.com, Overstock.com, too. Just do an online search. We R Memory Keepers is the name of the company who makes the Crop-A-Dile tool and they offer several tutorials on how to use the tool, as well as tutorials for other items too. If you have some other tool that will also punch through tin, then by all means
use it.

Decorate your tins first if you want to with paint, decoupage, trims, buttons, glitter, etc.
  Pin It Now!
Related Posts Plugin for WordPress, Blogger...