Wednesday, August 30, 2023

Snap N Go Wallet by ChrisW Designs

The Snap N Go Wallet pdf (+ free video instructions too) is now available for purchase at ChrisW Designs and for a limited time, it's on SALE for 20% off too! No code is needed, so Snap up your your pdf now (sorry I couldn't resist)!

This is a woman's style wallet made using a raw edge, non fraying material such as cork, leather, vinyl or Kraftex (which is what I used to make my wallet). Kraftex is a paper product that comes in a variety of colors and it looks like leather, (from C&T Publishing). But, you can paint on it, use stamps, stencils, etc. to give the Kraftex a different look all your own. This is my very first Kraftex project and I am really pleased with the result and it was easy to sew through (unless you have built up way too many layers? 

The Snap N Go is a quick sew, compact ladies style wallet featuring a cash pocket, two slip pockets, 3 card pockets, a coin pocket (or you can replace the coin pocket with another bank of 3 card slots instead), and an ID Pocket and a snap closure.

These are super fun and fast to make. Perfect for sewing and selling or a quick gift! It is also suitable for a home sewing machine. There are even SVG & Projector files too, if you use those things (I have no idea as I don't have all that stuff). Plus the free video tutorial.

Finished size (closed and unfilled):
Approx. 11cm (4 3/8”) W X 10cm (4”) H X 2cm (3/4”) D.

I used a sunflower stencil to paint on the flap of my wallet.

This was my test wallet and the first time I used Kraftex, so it's not a perfect wallet, but I will use it to see how the Kraftex holds up. I have heard it is fabulous! I may need to get some other colors to use for other projects, but better see what I want to make with it first, so I get a large enough size. I like the variety pack of colors they sell. Kraftex can be washed like fabric too!


Happy Wallet Sewing! Raw Edge Style! Check out the others tester's versions here. They used cork and vinyl mostly.


Pin It Now!

Saturday, August 26, 2023

Ironing Caddy Pad Jr. Iron Bag & Ironing Surface All-in-One

This Ironing Caddy Jr. (by Sisters Common Thread), is the smaller version of the original Ironing Caddy. Jr. fits a small travel size iron, whereas the original fits most larger regular size irons. I made the original size years ago, but I hadn't made this Jr. size yet. So when a women in one of my groups was asking about an iron bag for her travel iron, I thought I would make this one (it matches a large bag I made) to show her. I expected her to order one in a color she might like, but she said she would buy this one. Well okay, I can make myself one too (which I did and will share soon).

I used a material I had for the inside lining that was very similar in feel to the silver heat resistant (HRM) material. Since I thought she would order one in her colors, I didn't use the HRM that came with the pattern, because I thought it would be better to use for her bag. Well, she was fine with this bag and so I ended up using the HRM in the one I made for myself later. I couldn't find the HRM yardage I had. Did I use it all? Well wouldn't you know it I found it the other day after I had made this one and the one for myself. LOL!

I think I like the Jr. size caddy even better than the larger size. It's so cute and this is the size iron I would take with me when I sew away from home anyhow.


I used a double stacked button and fold-over elastic instead of regular elastic or hair ties. I used hair tie elastic the first time I made one of these larger bags and the elastic rotted rather quickly. I like the stretchy fold-over elastic, so I hope it lasts longer.

This opens to a 15.5" x 20" ironing surface. This is the material I used instead of the HRM. Looks like "pick up sticks" game.

I like this cute little Dritz iron. So lightweight and works great.

Half folded and half unfolded, so you can see how the iron sits inside the bag.

Looking down before I adjusted it closed so you can see the iron inside.

Next time I will share the one I made for myself in beautiful batik fabric. 
Happy pressing!

Pin It Now!

Thursday, August 24, 2023

Hopscotch Quilt (donation for Project Linus)

I made this quilt to donate to Project Linus. This quilt measures 40" x 47.5" (suitable size for an elementary aged child).

Hopscotch Quilt is a free pattern from P&B Textiles, written by Nancy Mahoney. Nancy used Suede Flannel Brights fabric in solids, but I wanted to use up my fabric scraps, so whatever fabrics I had enough of to cut the A & B blocks is what I used, which were mostly prints.

It's an easy quilt to make. Just squares and rectangles. I like the wonky setting of each block. 

I decided to finish the quilt by sewing right sides together to a flannel backing and birth the quilt. I pressed it, and turned it right side out and pressed it again. Topstitched all around the quilt first, which closed the opening, (but I still hand stitched the opening closer too as I wanted to make sure it stayed closed). Then I did a simple serpentine stitch on the diagonal, forming a grid. I used a walking foot to hold the 2 layers together. Yes, I said 2 layers. I just quilted it to the flannel backing and didn't add any batting at all. Batting is expensive and we don't often get free batting from Project Linus, but we do get free fabric donated a lot.

By not adding batting, it is still soft and cuddly with the flannel and has much more drape to it. Not as hot to cuddle in the warmer months. I think this is my new way to finish donated quilts: birthing with flannel backing and not batting, topstitching and simple quilting. It not only is cheaper to make this way, but faster too! I normally do bindings by first sewing by machine to the front of the quilt and then hand stitching the binding to the back side. I learned that way and find it looks the best too, but it takes a lot of time to do the binding, especially when hand sewing half of it. It also takes a bit of fabric to make binding, depending on the quilt size of course.


I had that appliqué heart (above) that was leftover from another project I made, so since it was the right size square, I used it in this quilt. Everything finds a home eventually, lol!

Serpentine stitch with variegated thread for the diagonal quilting.

It is certainly a bright happy quilt for a child. Even has a few "I Spy"
 elements in it, such as fish, ladies baking, teddy bear, heart, monsters, flowers, llamas and circles. 

The Project Linus label that is added to every PL donated quilt. Linus is cuddling his quilt on the label, so cute.

Happy Scrappy quilt making.


Pin It Now!

Sunday, August 13, 2023

Scrappy Fabric Hearts~ Hanging Notecards

I got this idea to sew up fabric scraps and make "notecards" to place into each Sew Powerful purse that I make. We are supposed to include a notecard in each purse anyhow, but I wanted to use up fabric scraps. I have made scrappy fabric postcards in the past (and still have lots of those), but want this to be all fabric. 

So I made the hearts and blanket stitched the hearts to a felt and pinked around the edges. Then I fused fusible web onto white fabric and cut out more hearts. I used my stamps to stamp words on the white fabric and add other stamps. Then I fused it to the back of the heart to cover the stitching. Oh, and I sewed a ribbon with a button on first before fusing the white heart in place. I thought that not only would these be beautiful cards, but the girl could hang the heart up in her home by the ribbon and it could serve as a little mini art wall quilt too.

Well I got way too carried away making hundreds of these and they took a long time too! In fact, I still have over a hundred yet to stamp on the white heart still.

Maybe I will make them in smaller batches in the future or not anymore at all? Time will tell how I feel later. So here are a few examples:


Pin It Now!

Saturday, August 12, 2023

Green String Quilt with Appliqué Owls

When the scrap bags get full, it's time to make some scrappy quilts and my favorite scrappy quilts are String Quilts! Most of my scrap bags are stuffed full, so it is time to make some more strings in other colors and an all color string quilt too.

Since I prefer to make smaller quilts, (less stress on my shoulders when I quilt them) I like to add a little something extra to the quilt and that is an appliqué of some kind. I have done appliqué bears, snowman, dogs, etc. in the past. This time it is my favorite appliqué owls! I even added a bubble with the question, "Who?" by the corner owl. Might take this one to the gift shop next time I need to add some more stock there. If it doesn't sell, I will donate to Project Linus later. At least it is worth a shot to see if I can sell some of the quilts I create as it gives me a few dollars to buy needed batting or thread, fusible web, etc. that I use to create the quilts I make.


I used small die cut letters.

All the owls were made from flannel, except the beak are quilting cotton.


Simple quilting using a Serpentine stitch diagonally.

I added a Conversation Bubble over this owl, who looks like he would be saying, "Who?"

I might reduce the owl above to appliqué onto a purse flap for the purses I make and donate to Sew Powerful. I think any of these owls would look cute on a purse flap, don't you?
Pin It Now!

Friday, August 11, 2023

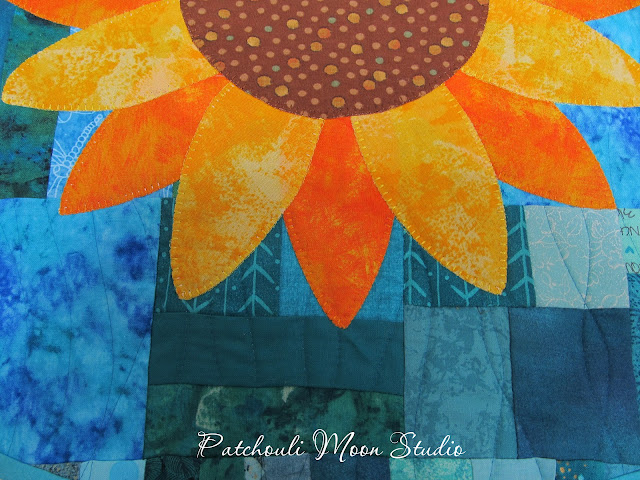
Half Round Quilted Sunflower Table Topper

Gosh, I made this back in May and haven't posted it yet. Better late than never.

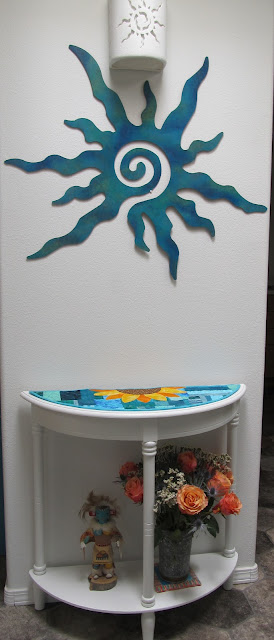
Our neighborhood had a community garage sale for those wanting to partake in May. I always love to walk the neighborhood numerous times to not only look at what is offered for sale, but I get my exercise then too. I didn't really see anything I wanted, but then at one house I saw a black half round table that did catch my eye. I knew I didn't want a black table, so I bought it and had hubby paint it white for me. Later when I got it home, I noticed it was from Ikea. We don't have Ikea here. The closest Ikea stores are in a Denver suburb or in Phoenix. Too far to drive.

I wanted the table for our entry. It had to be the right size and I wanted a half round table so it wouldn't stick out too much. It fit perfectly! Next was to get on to making a table topper for it. I love sunflowers & Echinacea Coneflowers are my 2 favorite flowers, but the sunflower lent itself best for this topper. 

I started sewing teal/turquoise/aqua scraps to create the background for the topper and then made an appliqué sunflower to go on top. I LOVE how it came out ad the colors are so eye popping gorgeous. Now there is fun pop of color as you enter the house.


The flowers aren't down on the shelf now as my daughter gave them to me for Mother's Day in May and I just put them there to take the photo. The top is a catch all for keys and sunglasses as we come and go.


Pin It Now!

Tuesday, August 8, 2023

Sew Powerful Purses #43-46 (2023) for Fundraiser 2023

I made 4 Sew Powerful Purses with Hot Air Balloons on the flaps in appliqué. I put them into a local gift shop to see if they will sell, since Balloon Fiesta will be here the first weekend in October and I hope they will sell. I put a little note in the front pocket explaining that if the purse sells, I will donate the money received to Sew Powerful during their Fundraiser and Sew-a-thon during the month of September. So far nothing is selling at that gift shop. It has been hot here though, so most people are probably not wanting to shop or stroll around Old Town.

If they don't sell, then I will donate them to one or up to four girls in Zambia, depending on how many do sell, or if any sell? Time will tell.

So here are the 4 purses I made~


The body of the purse is denim, upcycled from denim jeans.

I added a pocket inside this one. I usually don't add an inside pocket, but I had some extra fabric.

I also added a jean pocket on the back that I first did an appliqué heart on it. Only smaller women jean pockets will fit on the back of the purse.


Added crystal bling on all of the balloons too.

This one I made with a batik fabric body.

Back has a slip pocket added.


Another denim jean body and pocket with a purple appliqué heart on this one.


Denim jean body and this one I did a flower appliqué on the pocket.


Flap lining I had to piece scrappy as I didn't have enough of either fabric. Kind of like that scrappy lining flap.

Wish me luck in selling these purses so I can donate to the fundraiser. If you would like to donate any amount to Sew Powerful (in my name) during the fundraiser (through September 2023), let me know so I can send you the link and my number  to enter to donate, because there will be prizes for us fundraisers. Not that I need to win anything, but Aurifil thread is one of the prizes and I can always use thread, lol! Sewing machines are donated too from Bernina and Babylock (serger), but those go to the people who raise the most $$. Will find out at the end of September if I am lucky enough to win anything.

Happy purse sewing for me!

Pin It Now!
Related Posts Plugin for WordPress, Blogger...