Thursday, September 27, 2018

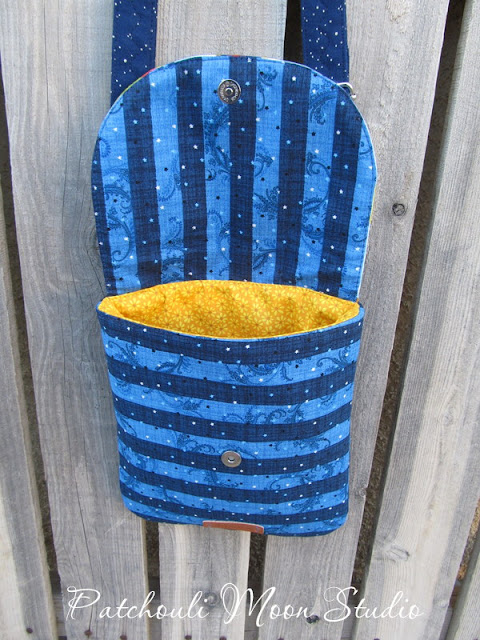
Good to Go Messenger Bag (Hot Air Balloon fabric)

Guess what is coming up? The Albuquerque International Balloon Fiesta! In just over a week and it begins. So I made this Good to Go Messenger Bag from Andrie Designs in the small size. It's a free pattern.

The flap is perfect for all kinds of fun fabric or other artsy stuff.

I used some blue "uncorked" fabric to compliment the hot air balloon fabric. Tell me does it look like real cork? It's 100% cotton fabric. A lot less $ than real cork.

I made the straps adjustable and added some rivets.


I added a zippered pocket to the back of the bag (not part of the pattern). I know I have to have some kind of exterior pocket and I have heard this from others too. You can see the "uncorked" fabric here really well.

Inside is a nice bright fabric with a slip pocket.
This bag has SOLD.
Pin It Now!

Monday, September 24, 2018

Pumpkin & Stars Quilted Table Runner #2

I made another Pumpkin & Stars Table Runner. The first one I made longer with seven pumpkins, but it came out too long, so I took out 2 pumpkins. I gave that one to my sister because she has a long table. Well then I had 2 pumpkins and thought I might as well make one more pumpkin and make another runner. This is how the Pat Sloan pattern is with 3 pumpkins and 2 stars. I really like this runner and if I had a rectangle or oval table I would keep it myself, but I have a round table, so I would have to design a round topper or rounder for my table.


I love how the pumpkins are made with several orange fabrics and then cut into the pumpkin shape applique. I quilted free form leaves around the pumpkins.

The back of the runner. I had to piece a pop of green to make it long enough, but I like how that looks.
It is for sale in my Etsy Shop.
Pin It Now!

Thursday, September 20, 2018

Brightech Magnifying Lamp Review

I was recently contacted by Brightech and asked if I would like to receive a lamp of my choice in exchange for a review on my blog. Yes please! 

I went to Brightech website to look around and I found that they have all kinds of lamps for the table, floor, ceiling and more and for nearly any room in the house. But I knew since I do a lot of sewing and knitting that having a lamp I could direct onto my work was important to me and as I am aging having a magnifier would be a nice addition too. I was thinking a floor lamp would work best for me so I could move it where I wanted it. I found a couple of lamps with magnifiers and not only were they floor lamps, but they were on a rolling base too, which is even better. I settled on choosing the LightView Pro XL Rolling Base lamp with the wider magnifier than the other one I looked at that had a magnifier.
The lamp reminds me a bit of those bright lamps that the dentists use. 

Brightech LightView Pro Xl Rolling Base. (Photo from Brightech)
The box arrived on Wednesday and it was a bit heavy. It was really well packed in a couple of boxes and Styrofoam boxes too. So that right off the bat impressed me. Call me weird, but I find a well packed box says a lot about a business and how they care about their product. (I have received items from several places over the years that were thrown into a shipping box with nothing to protect it.)

Weighted base with 6 rolling feet. (photo from Brightech)
Anyhow, back to the lamp. I recruited Mr. P. to help me put it together. Just put the straight pole into the rolling base with the washer and tighten. Add the lamp with the bending arm and tighten. Put the plug thingamabob into the lamp and plug it in. That was easy! The lamp wheels around on my hard floors with ease and I love how it is weighted so no chance of it tipping over. (Might not wheel as well on a carpeted floor?) The lamp turns on with an on/off button on top of the lamp head. The LED lighting is nice and bright. Flip the lamp lid up and bring the arm down to where you want it and you can see up to 225% magnification. Close the lid when you only want the light and not the magnification. So it's like getting 2 products in one. 

I tried the magnification by hand sewing a binding onto a potholder I was making and it's so nice to be able to see things up close. Can't say much for seeing how much dirt was under my fingernails though, lol!!!

Next, I tilted the magnifier head next and tried it with my knitting and oh my goodness I could see so clearly and my stitches were nice and large visually. It cut down on eye strain. I am loving this lamp!!! 

If you have been reading my blog for awhile, then you know I give my honest opinion about things whether I have been asked to review something or not. Haven't been asked to review things before now, but I do tend to tell you about patterns and products that I do use and the good and bad about them. I can honestly say this is a great lamp! I have purchased other lamps in the past that are another brand and were much more expensive than Brightech lamps are and I can tell you that Brightech is a much better deal for the money and the features they have than that other brand of lamps. The lamp I received is extremely well made. The only thing I find a bit tricky is when you want to tilt the head of the lamp up or down, you need to unscrew the clamp thingy (gosh I am technical!) and make sure you hold on to the head of the lamp well. It feels like it will fall off, but as soon as you tighten the thingy it is fine. Not a big deal, but the first time I did adjust it, I was concerned I broke it, because the weight of the head wants to fall down. Not much information came with the lamp other than the assembly page and I really needed that magnification to be able to read it clearly! There is a bit more information on the Brightech website about each lamp, so you will want to read about the lamps there.

Brightech lamps all seem so reasonably priced and they offer free shipping over $50. They have received a lot of great reviews on their site too. 

Brightech offered for me to become an affiliate too, so that means if you click on the links in this posting or on the bright yellow logo on the sidebar, I will earn a small amount if you buy from them, but it doesn't cost you any more at all. I have never earned money through an affiliate before, so it will be interesting to see if anyone buys a lamp from them sometime through the link on my blog (that's how they know you have been sent to them from me) and if you make a purchase or two, I thank you.
Pin It Now!

Wednesday, September 19, 2018

Polly Bag with Hot Air Balloon Flap

As I mentioned in my last posting, I was going to show other bag I made using hot air balloon fabric. This is the same digitally printed hot air balloon fabric as I used in the Brookfield Bag that I posted a couple of days ago.

This bag is from Andrie Designs, called Polly. It's a small bag with a flap that is perfect to highlight a nice fabric such as this hot air balloon print. You can see a lot of Polly Bags by clicking on the link above and one woman is wearing hers to get the idea of scale.

I have had Polly on my to-make list for quite some time now, so I finally got around to sewing this bag. It's a cross body bag just large enough to hold a few essentials like a wallet, phone and keys. Polly measures 8" wide x 9" high.

I made one change and that was to place the zippered pocket on the back of the bag instead of under the flap. I figured it would be easier to access on the back, rather than having to lift the flap each time you wanted to just get something out of the pocket. Yes you still have to lift the flap to access the contents in the bag itself, but I guess I think differently about such things? LOL!

On to Polly~

This bag is also accented in blue fabric like the Brookfield Bag, but different blue fabrics.


I have seen some of these real balloons flying in the sky here, like the lower left Trip-Around-the-World quilt design (perfect pattern and name for using on a hot air balloon), and that Winking Cat balloon.

The zippered pocket that I added to the back of the back instead of under the flap as the directions instructed to do. I think it breaks up the look on the bag back too. Plus a pop of red zipper looks nice, don't you think?

Looking down inside the bag. No need for pockets inside this one as it is small and there is that outside zipper pocket.

Nice bright lining.

This Polly Bag has SOLD.  I can make a custom bag in any fabric colors you like. Contact me if interested.

Pin It Now!

Monday, September 17, 2018

Brookfield Bag in Hot Air Balloon Fabric

The Albuquerque International Balloon Fiesta is almost here! Always starts the first Saturday in October and runs for 9 days. So to celebrate the annual event here, I made a few bags with hot air balloon fabric. I will post a different bag with hot air balloon fabric on my blog here a few times a week. I am also selling these bags, so contact me ASAP if you are interested in purchasing this or any others that I do post.

The bags will be added to my Etsy shop as time permits. Since it takes quite a bit of time to upload and write a description and answer all the questions Etsy asks, like the categories it should be placed in, the main color, keywords, etc., I would rather sell my bags and things here from my blog. I understand why they need to ask all that so it makes searching easier, but even so type in a few keywords on any subject on Etsy and you get a million or so hits and who has time to even look at all that? And since I post here anyway, I would much rather not have to spend the extra time to sell on Etsy, but it seems that in order to be a real shop, I must cave in and use Etsy to sell, even though this is a hobby, not a real business of mine. Time will tell if Etsy is worth the time or not. I opened Etsy way back in 2009 and didn't do well at all since you have to be known first in order to be found. So after blogging now for over 10 years, I am hoping I will be a bit more known in order to make a few sales. It's not about the money either, it's that I have to sew for my sanity and creativity, so it's my therapy really. And I don't have the room to keep all I make. I do donate quite a bit a year to various places as well. Okay enough about that and on with my bag!

This is the Brookfield Bag, (a free pattern from Sara Lawson of Sew Sweetness).  I made an adjustable strap so it can be worn on the shoulder or across the body. The bag closes with a flap tab and turn or twist lock closure.  Inside the bag is a slip pocket that I divided to include a pen pocket. It is a sweet small-medium size bag that measures 11" wide x 7" high (not including the straps). Made of 100% cotton fabric, woven fusible interfacing and fusible fleece. Metal rings, an adjustable slider, turn lock and rivets all add a nice silver accent to the bag.

The Hot Air balloon fabric is a digitally printed fabric so it really looks realistic.


Twist or turn lock closure.


Back of the Brookfield Bag.

Inside is a slip pocket with a pen pocket. Roomy for a smallish sized bag.
If you would like to purchase this Brookfield Bag before I add it to my Etsy shop, please email me ASAP. This bag has SOLD!
Pin It Now!

Monday, September 10, 2018

House Tote Bag & Fabric Folder

Welcome to My House is a fun blog hop brought to you by Carol of Just Let Me Quilt. Rules are simple Carol says, "Just put a House on it" whatever you make. Okay I can do that because I love houses.

I made a huge sized tote bag that I put a house on or rather more like a little village of houses on, lol! I have seen similar styles of these online and have wanted to make one, so this was the perfect opportunity to give it a go. Most of these little villages are completely round, so I made mine a bit different by adding a hill made of rickrack.
Here is my House tote bag. Well it's more of a Village than just a house! I added a black base to the tote and sewed scrappy batiks on the sides. The village is mostly all batik fabrics too.

A couple of trees and clouds were added as well.


A recessed zipper keeps everything inside this tote from coming out.

Open wide! A zippered pocket plus a slip pocket are inside the tote too.

I divided the slip pocket by sewing 2 pen pockets.

On the back of the tote bag I made a slip pocket using a heart orphan block and I used jumbo rickrack around it.


I used foam stabilizer so the tote stands up on it's own and a zippered top closure too. It is a super roomy tote. Not sure if I will keep or sell this one, since I have so many bags already, but I can't stop making them!!! It's my therapy along with making quilts, so even if it doesn't sell, it's cheaper than paying for therapy, right? LOL!!!

The next project I have been working on is writing a pattern of my own, a Patchwork Fabric Folder, that I am now selling on Craftsy.com The folder instructions show you how to make the folder using an orphan quilt block or sewing scraps to make a patchwork background and adding an applique over it. You could also just make the entire thing in one fabric too. So while I do not include any applique designs in the pattern itself, you could make any small quilt block that you want, pieced or appliqued for the front. I chose to make a small house block for the front of this folder.

My little applique house on the front of the Patchwork Fabric Folder I made.
If you would like to create your own Patchwork Fabric Folder, you can go to my Craftsy store to purchase the pattern. There are 2 pockets inside to hold papers and a pen. The folders make great gifts and you can choose to use an orphan block, add an embroidered block by hand or machine, fussy cut a fabric, or make all out of one fabric. So many possibilities to be creative and use up those fabric scraps in the process!

Psst: I have a free tutorial to show how to Sew a Scrappy Background on Craftsy too.

September 10


September 11


September 12

September 13


September 14


Pin It Now!

Saturday, September 8, 2018

It's almost here! The Welcome to My House Blog Hop. Hosted by Carol of Just Let Me Quilt. It should be a great blog hop!


Just look at the list of Fabulous participants:

September 10


September 11


September 12


September 13


September 14

Pin It Now!
Related Posts Plugin for WordPress, Blogger...