Thursday, March 27, 2014

Flags on Sticks Blog Hop~My Flag Creation

When I heard about the Flags on Sticks Blog Hop, the first idea that came to my mind was something I had wanted to make for the past 2 years. I had been wanting to make a bunting or pennant type of flag, or prayer flags. I was not thinking garden flag at all. This hop was the push that I needed to finally make what I had wanted to make 2 years ago.

I have been doodling a lot and love the look of Zentangle. In fact when I was a young girl I used to doodle like this, but a few years ago someone decided to give this type of doodling a name and called it Zentangle. Mostly it's done on paper, but I knew I wanted to doodle on fabric. So first I painted my fabric with watercolor pencils and pastels and then added some texture by putting something textured under the fabric and rubbing over it with pastels. I let the fabric dry and heat pressed it and then drew my basic outlines with a pigma pen and then filled them in with the doodles (or tangles). I added some punchinella and embroidered the punchinella in place. I am really pleased with the results.
I tied the flags together with some ribbon and tied the ribbon to a tree branch. 
I added a beaded trim to the bottom of this flag. I also added some embellishment of punchinella that I cut into heart shapes, triangles and a square and added embroidery stitches to them.


Simple stitches were added to this punchinella heart.
Circle of punchinella with embroidery.


This heart was actually made from a piece of netting/tulle with silver glitter. You can't see the glitter that well in a photo though.


Let's all wave a flag to Madame Samm for another great blog hop along with our cheerleader Thearica.
Here is the schedule for today as well as the entire hop~

March 28th~

The entire schedule is here~
Pin It Now!

Monday, March 24, 2014

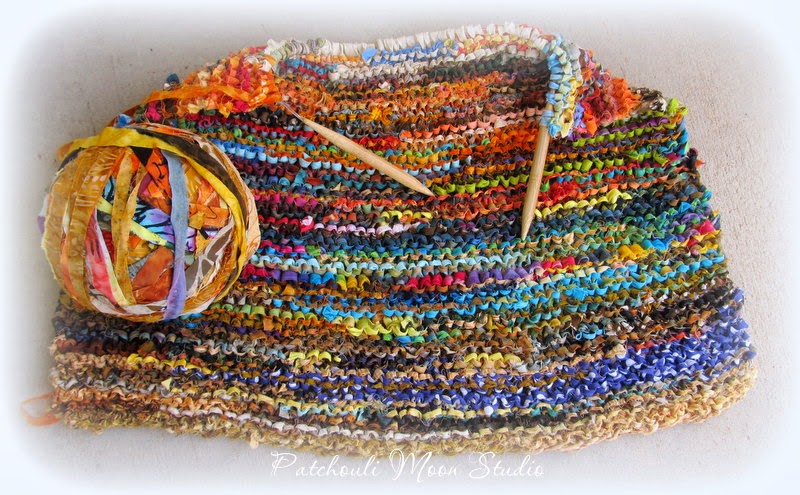
Batik Fabric Knit Rug

I was going to show you what was on my needles and then show you the finished rug later. But I happened to finish knitting the rug before I loaded my photos, so I have photos of it on my needles and the finished rug too.
Here is my rug in progress.
I love the vibrant colors of batik fabrics.
The ball of batik fabric yarn.
The finished rug for our bathroom.

I  made the yarn without any idea how this rug would turn out. I see there is a lot of orange and the blues and greens were mostly on one side of the rug. 

Pretty cool that I could turn a ton of fabric batik 1/2-inch strips into a rug, huh? All of this was created from scraps of batik fabrics. No yardage was harmed in the making of this rug, lol!!!!
  Pin It Now!

Sunday, March 23, 2014

Starting March 25th: Flags on Sticks Blog Hop

This is sure to be a fun hop with tons of creative flags made by a whole lot of talented people. All you little bunnies be sure and hop along for lots of inspiration and a chance to win some nice prizes at Sew We Quilt.


  Pin It Now!

My 6-Year Blog Anniversary Winners are...

Before I announce the winners of my giveaway, I would like to thank all of you who follow my blog. I really appreciate it.

When I announced my giveaway, I asked if you wanted a handmade wallet with a choice of 3 colors (blue, brown or green) or a pdf pattern from my Craftsy Store. It was interesting to see that the brown wallet was the most popular of all, not just of the wallets, but even over the pdf pattern too. The blue wallet came in second in wallet color popularity, while the green wallet wasn't that popular. Was it the green color or print that wasn't liked? Or that most of you just prefer a neutral color in wallets? If you would like to purchase the green wallet, it's now for sale in my Zibbet Store.

I wasn't going to make the wallets until after I chose the 2 winners, after all maybe the winners that were chosen might have wanted a pdf pattern instead of a wallet. But I decided to make the wallets in advance after all. So here are the photos of the wallets that I made, as well as a wallet that I made for a friend as well.
Here are 2 wallets. The one on the left I made for a friend and the one on the right was the green wallet that is now for sale in my Zibbet Store.  I couldn't resist taking a photo in front of these daffodils!
The 2 most popular wallets colors were the brown and the blue wallets here.
The 4 wallets I made.
Wallet for a friend.
The green wallet. For sale in my Zibbet Store.
Inside the green wallet.
The blue wallet.
Inside the blue wallet.
The popular brown wallet.
Inside the brown wallet.
Okay and now for the winners. I used this random number generator to choose the winners. I like using this one because it's like going to a casino, lol.
The 2 winners are: lucky # 11: Tara won the brown wallet, and lucky # 46: Sherry won the blue wallet. Congratulations ladies. I have already emailed you both. I am so happy that the winners didn't want the same wallet. So it really worked out great! Enjoy your wallets.
  Pin It Now!

Thursday, March 20, 2014

The Great Getaway Bag, Book Review & More...

I wanted to make a large bag to use as a carry on bag when I travel in July. I had recently made the Convertible Cross Body Bag and a matching wallet for myself out of this floral fabric that my mom sent to me. Then while telling my mom about the cross body bag she wanted me to make her one too. How about a wallet to match Mom? Sure she said and she wanted a tissue holder too. So I have a matching set and so does my mom. I mailed her bag off to her a few days ago, so I am sure she has it by now.
Here is the Great Getaway Bag I just finished making for myself~
My Great Getaway Bag. 
A large zipper goes across the top of the bag.
I like the tabs on both sides of the bag that you can grab a hold of when zipping.
Here is the flapped outside pocket. It closes with a magnetic snap and tab. I copied this idea and used it on my Convertible cross body bag I made for myself and my mom (see below).
I made the piped handles as explained in the book. She uses a plastic tubing inside the handles. I had some tubing and after I made them, I didn't like the feel of them. Perhaps my tubing was too narrow? I ended up making a similar handle without the tubing and removed these.
Inside there is one zippered pocket.
There is also a divided slip pocket. I didn't have enough of the fabric that I used for the zip pocket so I used another floral fabric too. 
While you probably can't tell, these are the new handles I made without the tubing. I like the feel of them better. I  also chose not to add the shoulder strap to the bag.
Nice and roomy inside. It's also so soft because I used headliner foam instead of fusible fleece.
The Convertible Bag I made for my mom. It's just like the one I made for myself, except I used a different lining because I didn't have enough of the lining fabric leftover.
Matching wallet, same as mine except the lining fabric is different. The lining fabric was actually a fabric that my mom  sold in her quilt shop in California way back in the mid 1970's!!! I thought it would be fun for her to have a little memory of that fabric too.
Here is the bag, the wallet and the tissue holder I sent to mom.
The lining for mom's bag.
I made The Great Getaway Bag from a book I checked out at the local library. The book is called The Bag Making Bible, by Lisa Lam.
This is the back cover of the book showing The Great Getaway Bag. Below is the cover of the book.
The book shows mostly how to make certain elements for a bag, like a few different straps, pockets, zippers, closures, etc. There are also a few bags that you can make with directions in the book for those bags specifically, like The Great Getaway Bag. 

Lisa Lam designs great looking bags and is quite talented, however I have to honest and tell you there were some things that I found questionable. For instance, with the Great Getaway Bag the fabric that you cut out that you sew the zipper to the instructions say to cut out 2 exterior fabrics and 2 lining fabrics plus 2 interfacing and fusible fleece. These pieces are all cut on the fold. Then the next step tells you to cut flip the pattern piece over and cut the same number out again in mirror image. Huh? Placing these on the fold and cutting already cuts them in mirror image, so why was I instructed to cut the same amounts again? I ended up wasting fabric, interfacing and headliner foam (which I used instead of the fusible fleece). I also wished there were more photos for certain steps or more written information. Like when I was folding the fabric in half and pressing it. No photo was shown and nothing to explain what size the piece would be once folded in half. I could have folded it in half the wrong direction. It's little things like this that can make it easy to follow a pattern or more difficult for the bag maker. 

There is however a lot of great information in this book. If you want to know how to add a magnetic snap or a twist lock closure to your bag, you flip to those pages and she shows you how to do that. If you want to design your own bag and add certain pockets, closures, etc. it's all in the book. Some of the directions are too brief or there's not always a good photo to go with it though. I got the feeling that she had to edit this book down to a certain number of pages and left out a lot. I would rather she left out some of the actual bag patterns and put more emphasis on the techniques making them much clearer than they were. Also printed in a a gray color rather than black, made it hard on the eyes to read. Since I was making the Great Getaway Bag, for nearly every step I was referred to such and such page, like for the handles go to that page and see how to make them. She also included info about purchased handles like she used on her example of the bag. I don't want to know about purchasing handles, anyone can purchase handles. I want to make them to match my bag. I had to figure out the part that is sewn to the bag on my own, since there was no info about that part of the handle. There is a lot of flipping back and forth to see how certain parts of the bag is made and even then some of the instructions weren't clear enough. If you are a beginner at bag making then this book will be hard to follow. Since I have bag making experience, I was able to figure out how to make things work.

I much prefer to use pdf patterns for this reason. Most good bag designers provide a lot of written text and photos to go along with the text. Since you download the pattern to your computer, the text is nice and large and easy to read and you can click to make it even larger if you need to read or see a bit better while it's on your computer. The pdf bag designers can make their patterns as many pages as they want to since they don't need to edit for printed publication purposes. This makes it better for you and the designers. The bag designers have their website or email address or both on their patterns and you can easily contact them with questions. I found most are really good about getting back to you. They want to help you and they want you to have a successful experience making a bag with their design(s). Most of these designers even allow you to sell a bag made from their design as long as you give them credit and aren't mass producing them. I like that. I think people get a bit too carried away with copyright issues these days. We who are creative have minds that think a lot a like and somewhere someone has created something similar, whether it's a quilt, a bag, a painting, etc. even if they never laid eyes on your creation before. So who is to say if someone stole your idea when we think alike in the first place. 

(Note: these are my own personal opinions and I was not reimbursed in any way by anyone. I truly like when others give an honest review of a product, book, etc. If I like something I will tell you and if I don't like it I want to tell you and why. I think honest reviews help us all. Hopefully manufacturers and authors, etc. will pay attention if they read reviews of their products so they can make improvements in the future. Maybe I'm just a dreamer, though.) 
    Pin It Now!
Related Posts Plugin for WordPress, Blogger...