Saturday, April 23, 2022

Sew Powerful Purses #63-71 for 2022

Hello Sweet Purse Makers. I am here to show you 9 more purses that I made for the Sew Powerful Purse Project. For these purses, I used brown fabrics that I had in smaller cuts from a fat quarter to larger scraps. I used brown webbing for all of the straps. 

First, I like to cut the exterior fabrics: the front and back and the top narrow front and back pieces, the front pocket and the gusset. Then if I have enough of that fabric left, I will cut a back slip pocket too. Oftentimes when cutting the gusset, I will not have a long enough piece, so I cut the gusset in 2 pieces (plus I add a seam allowance) and then sew the 2 gusset pieces together. This allows me to use shorter fabric pieces and I automatically know where the center of the gusset is because there is the seam line. I topstitch on each side of the gusset seam too.

Next, I cut the lining main pieces (which I prefer to cut as one piece, rather than cut 2 pieces as the intermediate purse instructions have you do). It saves time not having to cut and then piece the top part on the lining, which is another step to do and it's only seen by the girl who chooses the purse. If I do not have enough fabric to cut the lining pieces, I will cut 2 different fabrics or piece the lining fabric to make it large enough. I will cut the pocket lining and the flap lining pieces next. If they are not the same fabric as the main lining fabrics, that is fine as it adds more interest for the girl to see all the different fabrics that were used in creating the purse and only she will see the lining. Again, if I don't have a large enough piece, I will piece it,

Last, but not not least, I will cut a foundation fabric like muslin or flannel and cut it slightly larger and then create the flap by piecing fabrics to the foundation. The foundation is used instead of interfacing as it is a bit sturdier, especially after I piece the flap. I often just piece the flap in a crumb or string no rules way, rather than piece a specific quilt block. That way it sews quicker and I can use up any scrap I like. Once the piecing is done and pressed, I quilt the piece and finally I like to add a pop of color to the flap by blanket stitching an appliqué like a flower, heart, or something else to the flap. Usually I do not have enough exterior fabric left to cut a flap piece and this way I use up scraps from the current purse I am sewing, but also some scraps from other purses I am making too. I will add a bit of the lining fabric to the purse flap too, whether it is in the same color family or not. By piecing the flaps I am able to use up a lot of scraps that are leftover from the cutting of the rest of the purse. I may take a bit more time to create the flap in this manner, but I get to be creative too, which I love. Once the appliqué has been sewn in place, I give the flap a press and then cut the flap out to the size in the pattern. The last thing I do before sewing the lining to the flap is to add any embellishments such as buttons, lace, trim, rickrack, hand embroidery, etc.
 

Back pocket
I added a back slip pocket to all of these purses, but am only showing you 2. The pocket matches the exterior fabric. By adding a back pocket, there are 2 pockets: one under the flap at the front of the purse and one here on the back. The intermediate purse has no inside pocket, so it makes it quicker to sew.


Back Pocket on purse
Another back pocket.


I used a 5 sided piece of fabric to start the piecing on this flap and liked how it looked, so opted to not add any appliqué, but just keep the crazy quilt look instead. Added buttons was all it needed.

For this flower, I first pieced yellow scraps together to create a larger piece and then used a flower die cut to cut out this flower. Piecing the flower first gave it a different look.

Close up of the scrappy yellow appliqué flower
Closer look at the pieced then appliqué flower. I pieced several yellow blocks like this, so I can cut more scrappy flowers for more flaps.

Most of the appliqué I used above were things I had cut out years ago to use on other things I was making, but I didn't use them for one reason or another, so I put them in a box and thought I might use them for something else. Well, it sure saved time having so many appliqué shapes already fused and cut ahead of time.

We need to include a notecard in the front pocket of each purse we make too, so I created some notecards using some of the fused appliqué I had already too. They make nice notecards with fabric appliqué on the front. I have enough scraps of fabric and with die cuts I can cut up a lot of shapes to be used for the cards as well. I will share the notecards I made on a blog post another day.

Pin It Now!

Friday, April 22, 2022

Gingham Tea & Friends: Tea Cozy Shaped Wall Quilt

It's Gingham week over on the Therm-O-web blog. So I created this tea cozy shaped wall quilt using Crafter's Edge Tea Time die cuts and 1/2 Square Triangle die cut too; along with HeatnBond® Lite for fusing the appliqué pieces and StitchnSew High Loft sew-in fleece (which now comes 60" wide by the yard). 


Products I used to create this wall hanging. I love that cute turquoise Oliso Iron to help me fuse the appliqué shapes in place.


Be sure and check out my tutorial over on the Therm-o-web Blog.


Pin It Now!

Tuesday, April 19, 2022

Batik Quilt in Rectangles

Hello Colorful People! Thanks Joan from Moosestash Quilting for hosting this blog hop. 

When I heard the title of this blog hop, it reminded me of Walt Disney's television program of the same name, The Wonderful World of Color (which ran from 1961-1969) and then the name was later changed to The Wonderful World of Disney. I was a child way back then during the Wonderful World of Color show, but I remember how much I loved that show! It was amazing too that the show was in color! In fact, that was one reason for the name of the show, since most television back then had been in black & white! Gosh, so many things have been discovered or invented during my lifetime, it's amazing when you think about that.

I went to Disneyland a lot as a child. It was back then you bought ticket books and each ride had a certain letter ticket you could use to ride it. The "E" tickets were the best and most expensive tickets for the best rides, like Space Mountain or the Matterhorn Bobsled ride, while the "A" ticket you could ride the Horseless Carriage on Main Street. You could buy more tickets once inside the park and they ranged from 10 cents for the A ticket to a whopping 75 cents (for a child) for an E ticket! Later as a teenager, I worked at Disneyland. Now you could go broke taking a family of four to the Magic Kingdom, as well as the California Adventure Park, etc. Depending on the park and days you go it can cost from $240-$440 per person (child or adult) for one day! Geesh!


Okay, sorry I got carried away on my trip down memory lane, lol!

For this blog hop I used mostly batik and some hand dyed fabric scraps to create my quilt. I used the Rectangle die cut from Crafter's Edge and the 1.5" strip cutter too from Crafter's Edge, so it made quick work cutting out what I needed. I used flannel on the back of this lap quilt that I made for myself, just in time for the weather to warm up, lol!

I quilted it in wavy lines all over the quilt.  

Patchouli Moon Studio~ Batik Quilt in Rectangles

This quilt measures 47 wide" x 60.5" high

The idea that sparked this quilt I saw on another blog that I follow, Rebecca Grace Quilting. She is a long arm quilter that quilted a quilt last year using such a great quilting pattern. I don't have a long arm and I wanted to quilt it myself on my domestic machine, so I did the best I could in trying to achieve a similar quilted look. She made a graduation quilt for her nephew that I just loved! I didn't need a pattern to make it as it was just 2 rectangles, so I chose the rectangle that worked best from the Crafter's Edge rectangle die cut and the 1.5" strip die cut and cut the strips to the length needed to fit the rectangle size I used, which was 3.5" x 6.5". You can see the quilt Rebecca made here. I chose to use batik fabric, but I love the Grunge fabrics that she used too.

Pin It Now!

Saturday, April 16, 2022

The Wonderful World of Color Blog Hop Starts Monday

Next week should be a Colorful & fun blog hop, so be sure to hop along to find some inspiration. You know Joan is bound to have a wild & colorful project to share with us. Thanks Joan for hosting this blog hop! Pin It Now!

Friday, April 15, 2022

9 Fabric Postcards Made for Make a Wish Contest in Sisters, Oregon

Hello my lovely postcard lovers. I mailed off my postcards for the annual Make a Wish fabric postcards contest in conjunction with the annual Sisters Outdoor Quilt Show (SOQS) and sponsored by Andover Fabrics. There were 2 fabrics that had to be used in each postcard that Andover Fabrics donated to the contest. You can request as many sets as you would like and I requested 3 sets. I used a couple of the fabrics received as the background fabrics, but most I used within the postcard. I ended up creating 9 postcards in all. I still had enough fabric leftover to have made at least one more, but I thought this was enough. The deadline to receive the postcards is May 4, 2022. 

If you go here, you can read about this contest as well as the quilt block contest (I have entered that contest several times over the years too). Since I forgot to take photos of the 2 fabrics that had to be used in each postcard, you can see them both by clicking the above link.

The idea of the contest is they frame the winning postcards that are then auctioned off and they also choose other nice postcards to frame to auction as well. It's a silent auction. The money goes to help the Make a Wish foundation and the rest of the postcards that are not framed are sold and that money also helps to support the SOQS, which is free event to the public, but costs a lot of money to run. The local framing shop frames these postcards at their expense. I had a postcard framed a couple of times in the past, even though it wasn't a contest winner; still it was a thrill my postcard was chosen to be framed. And it helps support a good cause and the quilt show.

I used some of my die cuts from Crafter's Edge to create some of these postcards, and I will point out which ones under the photo. So here are the 9 postcards I made and sent in for the contest. Wish me luck!


This silly bee uses the contest fabric on the head and wings.

This mouse uses the contest fabrics on the body and nose.

The background fabric and the little heart uses the contest fabrics, and the rest is made from felt. I handstitched the word, WISH using embroidery floss.

This chicken uses the one contest fabric in the body and the other as the wing, tail feathers and head feathers.

5 more postcards here.

I used felt for the flowers, with a simple French knot to anchor it in place. Some embroidered by hand stems and leaves and a few extra scattered French knots.

This postcard was made using the Balloon die cuts and the Mini Stars (part of the Mini Stars & Hearts) die cuts from Crafter's Edge. I did darken the balloon strings after taking this photo as I thought they were a bit too light. The stars and the background fabric are the contest fabrics used.

This is the Santa die cut (which can be made into a snowman too) from Crafter's Edge. I was trying to use this die cut to make it look a bit more like a Gnome, rather than a Santa. Did you think Santa or Gnome when you first saw this one? The hat, nose and heart are the contest fabrics on this postcard.

I used the smallest Mason Jar die cut to create this postcard. The jar and the lid are the contest fabrics. I added a felt heart from the Mini Hearts & Stars die cut from Crafter's Edge.

This one used the Large Flower die cut. I used 2 of the 3 flowers from the die cut to create this flower. The flower was created using both contest fabrics.

So there you have it, 9 fabric postcards that could help to support 2 causes. I will let you know if any of these are framed for auction or if I am lucky enough to be one of the 3 contest winners (1st, 2nd or 3rd place). Either way, they were fun to create. 

And if you have never been to the SOQS, then you really should attend at least once as it is a fabulous show and I love the town of Sisters, OR. I have been there many times and always enjoy it. It's my favorite quilt show! 

Pin It Now!

Monday, April 11, 2022

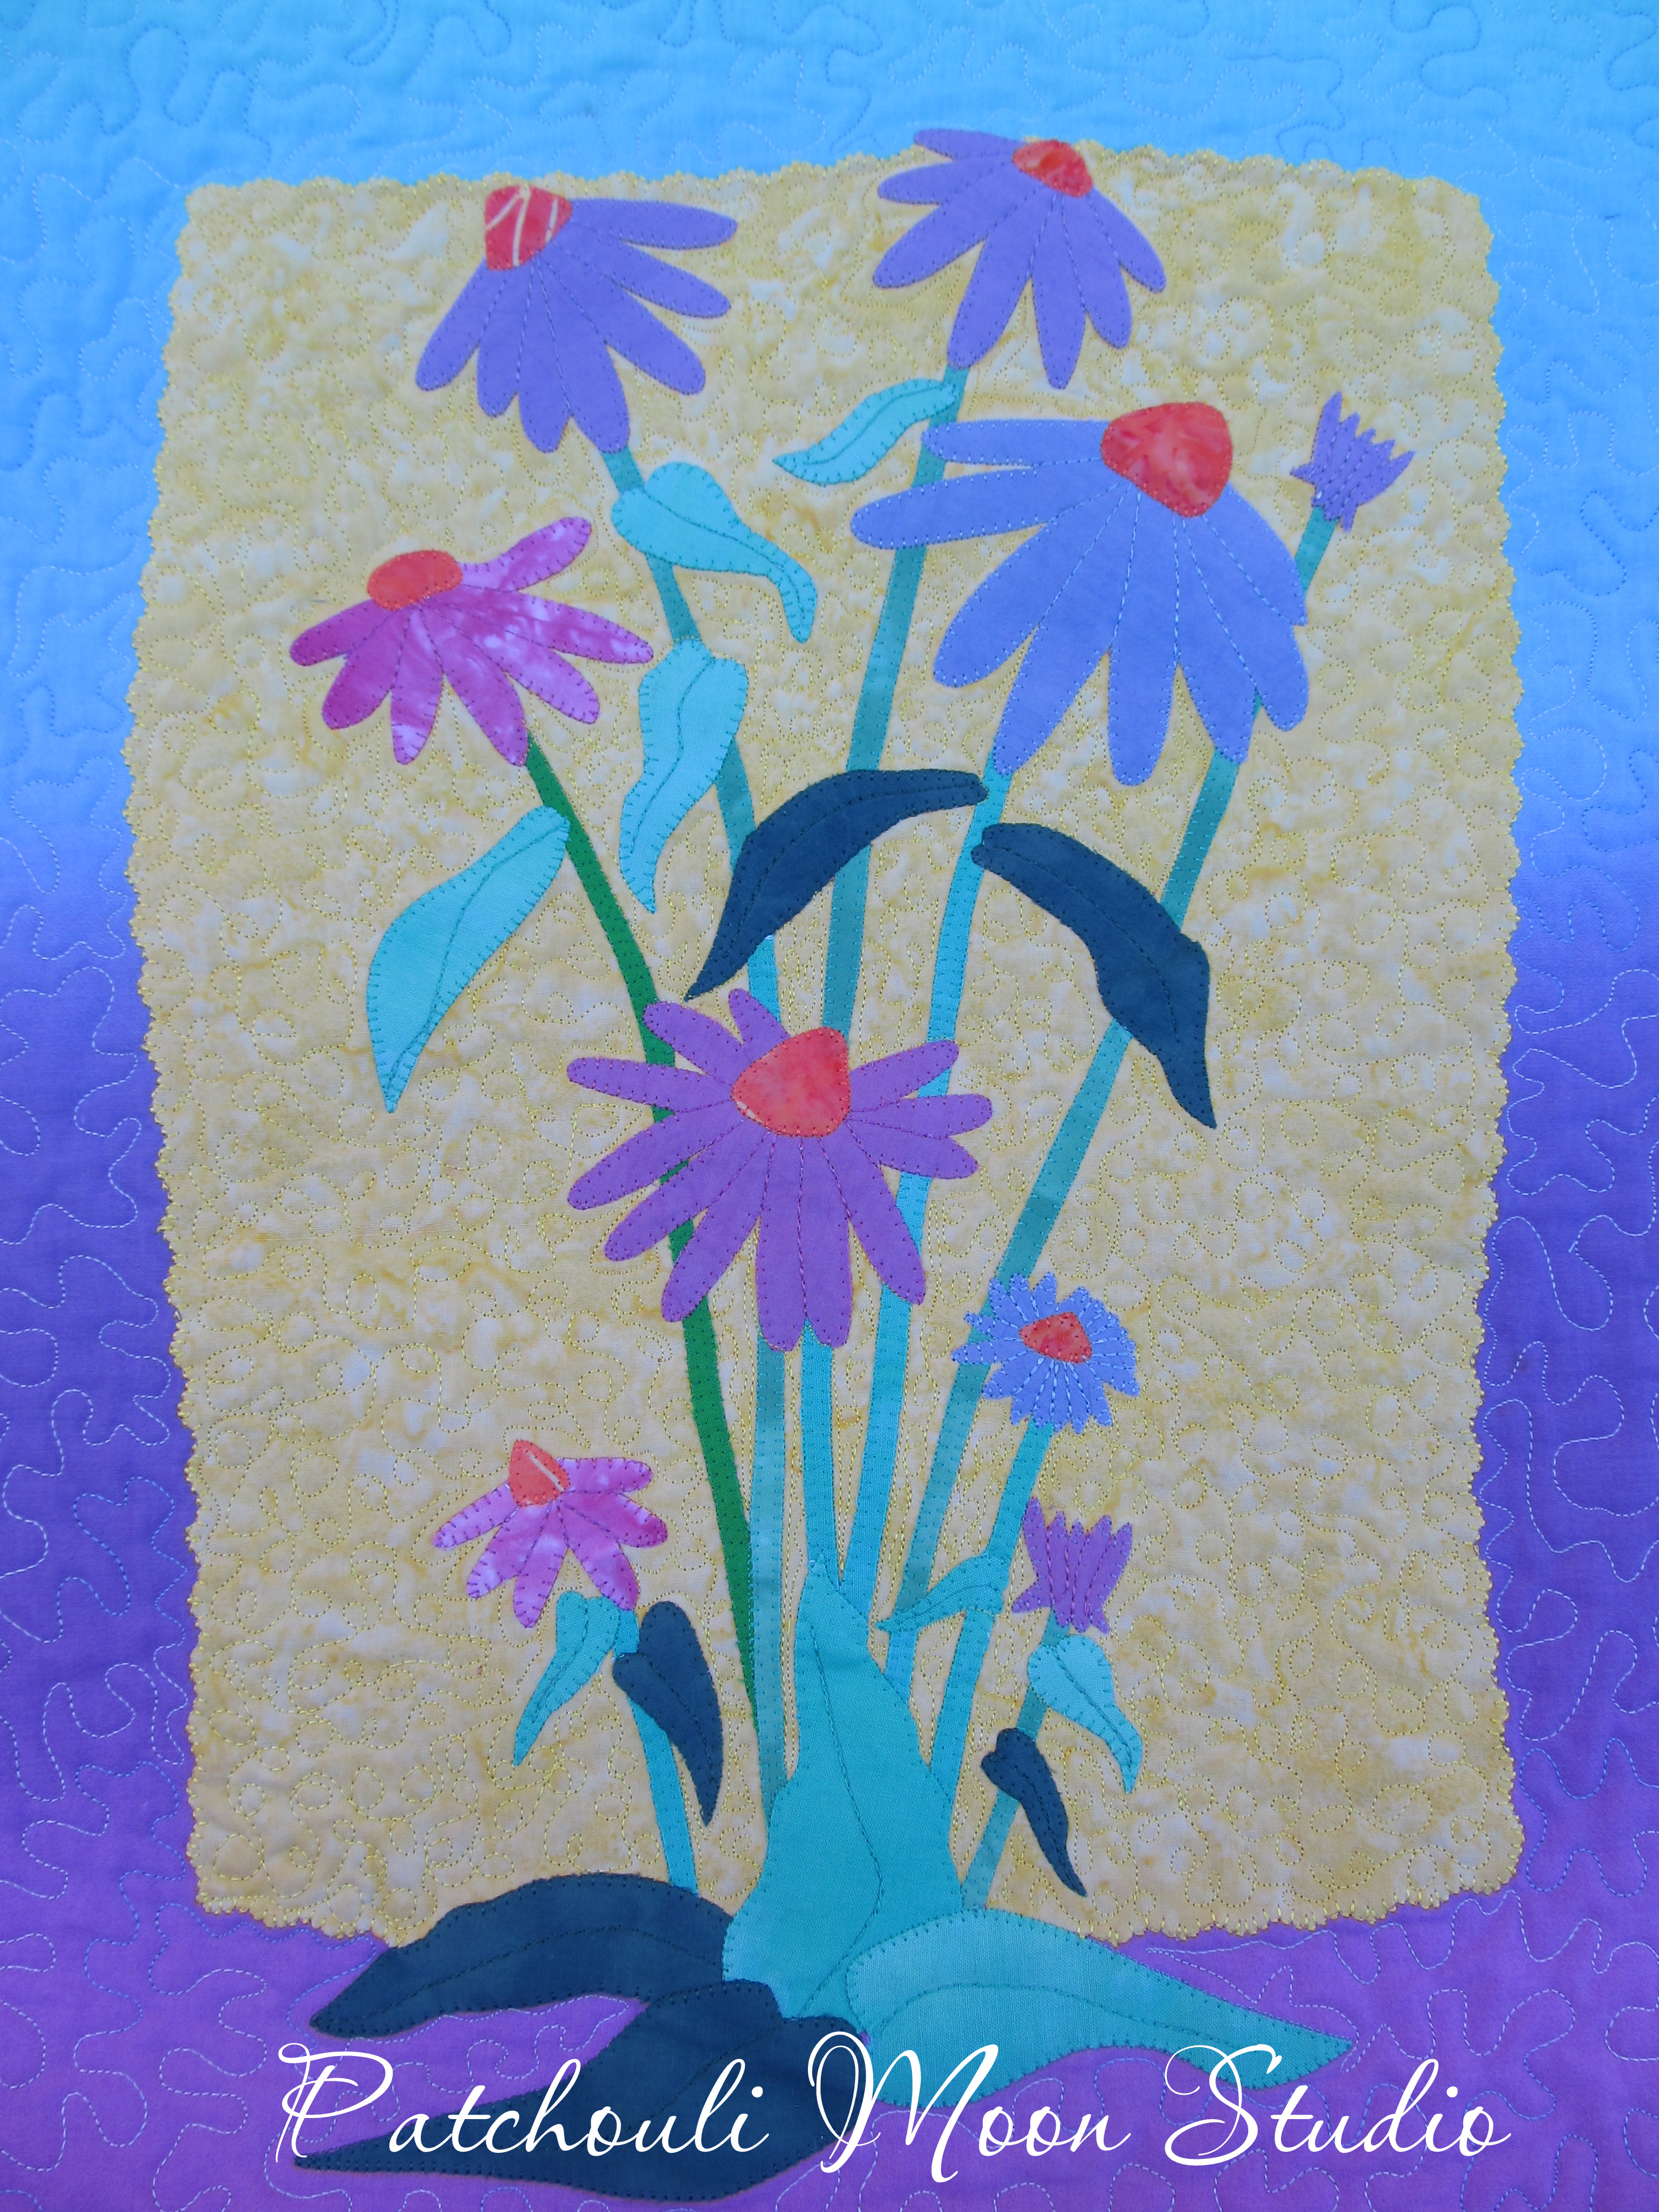
Coneflowers Quilt (Echinacea)

Hello my pretty flowers. This had been a UFO for a few years. I had all the appliqué finished for a couple of years, but need to quilt and bind it. I never know how to quilt some things, so it sat and marinated for a while, a long while, lol! I decided I need to finish a pile of UFO's and grabbed this one and said the time has come to get it quilted. So it's now finished and hanging in the master bathroom. I love how it turned out and it makes me smile when I see it.

I bought the pattern 4 or 5 years ago from Frieda Anderson, called Purple Coneflowers. It is her design and since Echinacea (Coneflowers) are my favorite flower, (along with Sunflowers), I had to make it. I used an ombre fabric in blue/purple, which I thought looked pretty good. The flowers were hand dyed fabrics and some of the orange cones are batik. 

The quilt measures 22.25" wide x 25" high.

Frieda's version has a bright yellow-orange and pink-orange hand dyed fabric where my background fabrics are. Frieda is known for her hand dyed fabrics and art quilts. If you click here you can see her quilt on Pinterest. That seems to be the only place online I could even find a photo of her quilt.

I like to blanket stitch around my appliqué, whereas Frieda fuses and stitches around the shapes onto the background. I just don't want the appliqué shapes to lift off the background so I prefer to stitch them down. I know Frieda Anderson, Laura Wasilowski and Melody Johnson, all just stitch close to the appliqué and they say they never have had the appliqué come up. But they all use their own hand dyed fabric and I use batik, hand dyed and commercial fabrics and no matter what fabric or fusible I have used, it starts coming up from the background as I am handling the piece. So I stitch my appliqué in place so that won't ever happen. Best to be safe.


I tried to find this pattern online, but apparently it is no longer available anywhere. I am really glad I bought the pattern now! But even happier that I made and finished this quilt so I can enjoy it. 

Pin It Now!

Saturday, April 2, 2022

Bella Bag: My Version Made as a Cross Body Bag

Hello my lovely flowers. I wanted to make myself a cross body bag, but which one? I have a lot of patterns from several designers, so I looked through them all and nothing really hit me as to what I wanted to make. So I thought, what is it that I really want in a cross body bag, besides being cross body? There are several style bags I like, such as Hobo, Messenger, Saddle Bag, etc. 

The more I thought about what I like and want and need in a bag, the Original Bella Bag (by ChrisW Designs kept jumping out at me. Bella is a retired pattern.  When Christine designed the updated Bella II bag some years ago, she retired the Original Bella. I know why she wanted to retire Bella, because Christine has so many more updated ways of sewing her bags now, that it seemed a bit too dated. I tested the Bella II for Christine and I love that Bella version too. I made 2 original Bella Bags before Bella II came out.

Both Bella versions are rather large bags. Now I love that they hold a lot of stuff and if I take my large wallet with me, my keys, reader glasses in their case, sunglasses in their case, a pen, a small pad of paper, that really does take up a lot of space and my bag becomes heavy. Carrying all that on my shoulder is starting to be a bit too much. Oftentimes I will take a smaller bag with me and only take my keys, a little wallet with just my ID and license and one credit card and a bit of cash, and wear my sunglasses so that I don't have too much with me, but that depends on where I am going and what I need. 

So as I was looking at the Original Bella, I thought about the changes I could make to make it cross body and add and subtract some of the things on the bag, so here is what I changed:

  • First thing I did was to print the pattern pieces at 90% to make the bag a bit smaller as I didn't want it to be quite as large of a bag.
  • I had to reshape the curve of the bag top so it didn't have 2 straps and stick up so high.
  • I didn't make the side pockets as they would be too small being I made this at 90% and I wanted to add strap connectors on the sides.
  • I added some binding pieces to cover up the raw edge of the side connector straps and placed another one above it and added rivets to the connector straps too.
  • I also wanted to open the bag a bit easier and faster so I didn't want to add that narrow flap closure and instead added the magnetic snap to the upper lining to make it quicker to open the bag.
  • I added some rickrack to the upper front pocket and sewed a line down the center of the pocket to divide the pocket into 2 pockets and added a rivet at the top of the dividing stitch line.
  • The bottom of the bag where the Heavy Weight Stabilizer base is, I quilted it to the bag bottom to make sure it stayed in place.
  • I sewed the back zipper pocket so that I turned the bag through the bottom of the zipper pocket instead of leaving an opening in the lining.
  • Inside I added some rivets to the top corners of the pockets. 
  • I hadn't made the Bella in quite a few years and I forgot about the little gap at the start of the zipper pocket inside. So I sewed a button to cover that gap up, which I didn't do until the bag was finished because I forgot. I made a note on the pattern to sew the zipper differently with zipper tabs at each end instead of bending the zipper back as in the instructions, if I make another Bella in the future. I am sure Christine would have updated this step too. In fact, on Bella II she did sew that inside zipper pocket differently.
Okay so now to see my Bella Bag as a cross body bag:

I had just enough of this Chrysanthemum fabric to make this bag. Chrysanthemums are my birth month flower (November).

There is some text written in gray on the fabric that reads, Chrysanthemums: the Symbol for Long Life & Harmony.

The side connectors I added with binding strips horizontally and added rivets.

One thing I forgot about was that the lining isn't as snug a fit as Christine's newer patterns. Mainly because you cut the lining using the same pattern pieces as the exterior and sew with the same seam allowance. Christine has come a long way baby with her bag designs; because she always has the main lining pieces as separate and smaller pieces to achieve a really nice and snug fit. If I had remembered this, I would have sewed the lining with a larger seam allowance. Oh well, once my stuff is inside it won't show and only I will know (and anyone reading this, lol)!

My after thought button I sewed on to cover up the little gap there next to the zipper pull. I made notes to change how this is sewn by using zipper tabs if I make another Bella.

The back of Bella has a zipper pocket. 

Unzipped the pocket to show my pretty lining.

The divided front pocket I created by sewing it in half.


Pin It Now!
Related Posts Plugin for WordPress, Blogger...