Tuesday, August 27, 2013

Tip of the Morning Tuesday: Quilt Basting Small Quilts My Way

I am thrifty (okay I'm really cheap! There I said it, lol) and a saver of things that I can reuse or find a different use for. One of the things that I save that most people would throw away is tiny scraps of fusible web. I do a lot of fusible applique, so I have lots of fusible web scraps on hand.
I save these large plastic salad containers to keep my fusible web scraps in. I also have another container like this that I save my interfacing scraps in too. Plus the containers are great for fabric scraps...but I have way too many fabric scraps to fit in these. Using these containers is just one of my bonus tips for today, the real tip I am sharing today is coming up, so hang in there.
 I use an address label and print out labels for my containers. I add one to the side of the container so that I know what's inside when they are all stacked on the shelf. I also print one label for the top of the lid as you can see if the photo above. No address labels? You can write directly on the box with a permanent marker or use a piece of masking tape and write on the masking tape and stick it to the box instead of an address label.
You can see all the scraps of paper-backed fusible web I save; even tiny pieces. Here's the reason why...
...I take those small pieces of fusible web and iron them onto the wrong side of the fabric that I am using for the back of my small quilt. I fuse them all over the backing fabric spacing them like you would if you are pin-basting a quilt.
Here are several pieces of fusible web scraps that I fused onto the wrong side of the backing fabric. Sometimes it is hard to see those tiny pieces as they might blend into the fabric, so I take a marker and scribble on the paper so that I can see where the fusible pieces are. It's best to scribble as you go of course. I used a red scribble here thinking that red would show up, but not thinking that the cherries and dots are red and I should have used a blue marker instead. If you look closely you will see the fusible scraps with a squiggle of red. Once they are fused on your fabric, then remove the paper. Make sure you look really well and remove all the paper off the fusible pieces. Then once you have removed the paper, you will lay your batting on top of the fabric with the fusible pieces.
Smooth out your batting. Then roll up the fabric and batting together like in the photo.  
After you rolled up your batting and backing pieces together, then turn it over and carefully unroll so that the fabric is on top and the batting is on the bottom like the photo above. Smooth it out with your hands. Now you will press your fabric with the batting underneath so that the fusible scraps stick to the batting. Be extra careful if you use a polyester batting as polyester batting can melt! 
Next, take the top of your quilt and fuse fusible web scraps to the wrong side of the quilt top, just as you did for the backing fabric. Once the quilt top has been fused and you peeled off the papers, lay the quilt top on top of the batting. Smooth it out and press on the quilt top so that the quilt top now is fused to the other side of the batting.
That's it. You just fuse-basted your quilt together and it is now ready to quilt and there's no pins to deal with. You used scraps of fusible web that you would have normally thrown out.

I recommend using my fuse-basted quilt tip for small quilts like wall quilts and it's really great for bag making too when you are quilting a bag and you don't have fusible fleece on hand. For larger quilts you can use safety pins or fusible batting or those basting sprays. I find that the fusible batting and sprays don't stay fused on  large quilt that you handle a lot. They tend to come apart around the edges, plus I find it hard to iron a large quilt and batting together because of the large size. If you have luck with those products then by all means use them. They just don't work well for me.
Pin It Now!

Thursday, August 22, 2013

Sisters Quilt

I was inspired by Carrie's quilts on her blog Believe Magic , so I decided to make this quilt. I like how she uses text fabrics for the skin of people. Her quilt reminded me of my sister and myself when we were younger. So I took her basic design and added and changed some things to create my quilt. I want to make another similar quilt and I will keep one quilt and give one to my sister. I might change a lot more in the next quilt I make. I am very pleased how this turned out.

Jean of Sew Minty was so sweet and sent me some text fabrics a while back. Now you can see how I am using those text fabrics Jean, so thanks again. I used scraps for the rest of the quilt.
I zigzagged around the applique pieces in this quilt.
I used scraps of yellow and sewed them together to create the background of the quilt.
I love to stack buttons and the buttons were just what this bag needed.
The hat fabric was made by using a stencil and paint sticks. I used paint sticks on the black boots too.
Me and my sister. I am older and my hair is was darker, so that's me on the left, lol.
  Pin It Now!

Tuesday, August 20, 2013

Tip of the Morning Tuesday: More Up-cycled Tins

Welcome back my friends to another Tip of the Morning Tuesday. Last Tuesday I showed you what to do with some small containers, and today I would like to show you what to do with some larger cocoa tins. Now they do not have to be cocoa tins, they could be could be tins that once held tea or coffee or something else. You get the idea.

First, I took 6 tins that are all the same size. I got out my Crop-A-Dile tool. Punched holes where I wanted to attach the tins. Put a brad fastener in the hole and opened the back of the brad to attach it. Now I have a place to put all sorts of tools and supplies. Like pencils and pens, rulers, markers, scissors, seam ripper, etc. Whether you place sewing items in the tins or crafting items, they all stay together instead of having separate tins. You can even add a handle if you want to carry it.
Here are some cocoa tins I had.
See where I attached the tins using a brad fastener.
My brad just happened to be in the shape of a heart.
Open up the back of the brad to keep the tins held together.
More heart brads in different colors here. Notice one of my tins is a different brand. You could paint your tins or decoupage them before you attach them with brad fasteners if you desire.
I store all my marking pens in these containers. I have washable markers, permanent markers and metallic markers in these tins.

Here are the lids. Now what did I do with the lids you might ask? I attached them the same way that I attached the tins.
I used round brads on the lids.

I placed small items in these tin lids. Small screwdrivers, sewing machine feet, etc. This sits in a drawer where I have other sewing machine tools and notions. 
You can purchase the Crop-A-Dile tool wherever they sell scrapbooking supplies. If you live where there is a JoAnn Fabrics, Michaels, Hobby Lobby or other stores that offer discount coupons off one item, you can take advantage of the coupon savings. You can find it online too at scrapbooking supply stores, Amazon.com, Overstock.com, too. Just do an online search. We R Memory Keepers is the name of the company who makes the Crop-A-Dile tool and they offer several tutorials on how to use the tool, as well as tutorials for other items too. If you have some other tool that will also punch through tin, then by all means
use it.

Decorate your tins first if you want to with paint, decoupage, trims, buttons, glitter, etc.
  Pin It Now!

Tuesday, August 13, 2013

Tip of the Morning Tuesday: Recycling (or is it Up-cycling?) Tins & Containers

I am never quite sure about the difference between recycling, up-cycling and re-purposing items. Well whatever you want to call it I have turned some tins and plastic containers into other more useful items instead of throwing them into the landfill.

I also have thought about doing a tip section once in a while. My first thought was to do one on Tuesdays and call it Tip of the Morning Tuesdays.  For some weird reason a little Irish voice popped into my head saying "Top of the morning to you" and I thought about a play on that with Tip of the Morning. But I knew I wouldn't be able to do a tip every morning, so I thought Tuesday sounded better with Tip of the Morning. However, I wondered if I would even be able to keep up with a weekly tip? So I don't want to hold myself to every Tuesday, but when I post a new tip or simple project, I thought I would do it on a Tuesday and call it Tip of the Morning Tuesday. What do you think about that? Please leave me a comment below or email me or use the contact form on the right side bar and let me know what you think about this idea. Okay so here is my first Tip of the morning Tuesday for you~
I had this empty plastic container (actually I have 2 of these containers) and thought this was too nice to just throw away, so I thought of different ways in which I could use it.
The lid flips up like this. You can also unscrew the entire top off as well.
I also have a lot of these and other similar tins.
I like how these have a hinge so the lid is attached.
Another tin, but this one is round.
This one the lid is separate.
This is what I did to the plastic container. I used Mod Podge in a matte finish to glue and seal this decorative paper on the lid. I printed out an address label on the computer using a fun font and added more Mod Podge on top. 
I also added a pretty paper inside the lid. Inside are my assorted hand sewing needles. You could make one for machine sewing needles too.
Here I had a fabric scrap book page that I bought several years ago. It's fabric, but made stiff somehow to act like paper. I did the same method of applying it to the lid as above.
Inside is a mini pincushion I made using a lid from a coconut milk container (another up-cycled project) and some felt. I can add other items to this sewing kit as I need them. (oops I see a bubble in the lid...well to fix that I can prick it with a pin and add some more Mod Podge).
Here are 3 tins I converted to various uses using the same method as above. 
Inside are the items. Another tip here for the pin (or the safety pin) container is to add a magnet to the bottom of the tin. The magnet sticks to the tin and the pins stick to the magnet, so if you happen to accidentally drop it, the pins won't all go flying in a thousand directions. It acts like one of those magnetic pincushions too.
 There are so many things you can choose to put in small (or large) containers besides these I have shown. For example I will up-cycle a few more containers to hold:

  • Bandages (makes a great little first aid kit to keep with you)
  • Knitting stitch markers
  • Knitting stitch holders
  • Pencil refills for mechanical pencils
  • Erasers
  • Buttons
  • Beads
  • Thimbles
  • Tea bags to bring along with me in my bag
  • Sweetener (I use Stevia) packets to take along with me in my bag
  • Hair pins or barrettes
  • Coins 
Also you can add trim, buttons, beads or other embellishments to the outside of your containers if you want to really make them fancy. You could paint them instead of using pretty paper or do both. You can also up-cycle those magazines and catalogs by making collage containers using the Mod Podge too. Maybe a pinch of glitter for some bling. So many creative ideas you can come up with, so have fun!


Pin It Now!

Monday, August 12, 2013

Quilted Refrigerator Topper

Yes you read that right a refrigerator topper, lol. A few years ago my husband decided he wanted a small fridge because we rarely have enough food in a large one and that seemed so energy inefficient. So he found one that is rather deep so it does hold quite a bit, but it's short. Also there's no freezer. We rarely bought frozen food or froze fresh foods. I like fresh better and my only weakness was frozen desserts like coconut, soy or almond frozen ice cream-like products. Much better not to buy those and have them in the house anyhow or I'd eat the whole thing in one sitting! Since it's just the two of us we certainly didn't need a huge refrigerator, like when we were raising our children.

We watch PBS and a lot of shows from the BBC and we noticed that the Brits have small refrigerators like the one we bought. Not sure if they buy much in frozen foods, as those have a tiny freezer on most. I'm not sure if most people in the UK or Europe have small refrigerators now or if that was an older thing to do? Please my European readers (and other countries too) enlighten me about this.

Americans buy big huge refrigerators even if they don't have a large family. I noticed these refrigerators are getting larger and larger (so are some of the people...a coincidence?). While I like the look of the newer freezer-on-the-bottom type of refrigerator, (although this is nothing brand new as my childhood friend's family had one in the 60's) they are rather huge. So here is my little fridge with the veggie and fruit fabric topper:
I used fruit and vegetable fabric for this fridge topper as that seemed appropriate, lol.
I even added a watermelon print fabric for the back.
Here's the topper on the little fridge.
  Don't forget to visit Jane over at Jane's Fabrics and Quilts for Monday's for the Love of Hand Embroidery, with guest Kris.
  Pin It Now!

Thursday, August 8, 2013

Nap Mat for my Grandson

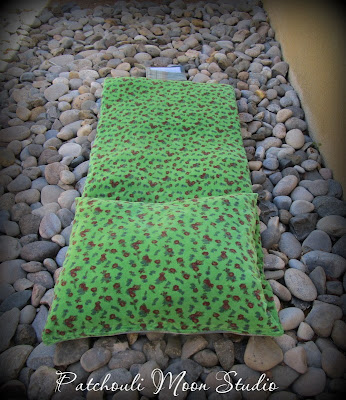
My grandson is starting school in a couple of weeks and needed a nap mat. Since he is a tall boy (already 4' tall), the nap mats my daughter had seen were all rather short. So I said I would make a nap mat for him, making it longer and wider than the ones we saw for sale, plus I added  pillow too.  He loves it and is using it at home until school starts.
Here is the nap mat all rolled up. I appliqued his name using the Alphabet letters from my Alphabet Quilt pattern. The exterior fabric is a canvas-like fabric. I added a handle to carry it too.
I sewed the pillow in place so that the whole thing stayed together. I added a tab with a Velcro closure so that it's easy to roll up and close. The green fabric is a soft velour. I used 4 layers of a thick polyester batting to add some cushioning to the mat. So it's like a thick quilt.
The pillow I made by making a muslin pillow form and stuffing it with fiberfill, then placing the form into the velour pillowcase. I stitched the pillow to the mat and when he gets grows, he can flip the pillow up to allow for more room. 
Partially rolled up here. 
   Pin It Now!

Sunday, August 4, 2013

For the Love of Embroidery Starts Monday August 5th

Jane from Jane's Fabric and Quilts is hosting For the Love of Hand Embroidery. There will be several blogs participating (including me on September 16). For the entire schedule you can click on the icon on the right side bar that looks like the one above. We are all doing our own hand embroidery using Presencia Finca Perle Cotton Size 12, which was provided by JaneAll the blogs participating will be posting on own blogs and also we'll be a guest on Jane's blog too on our scheduled day. I know I am looking forward to seeing all the embroidery creations. 
Pin It Now!
Related Posts Plugin for WordPress, Blogger...