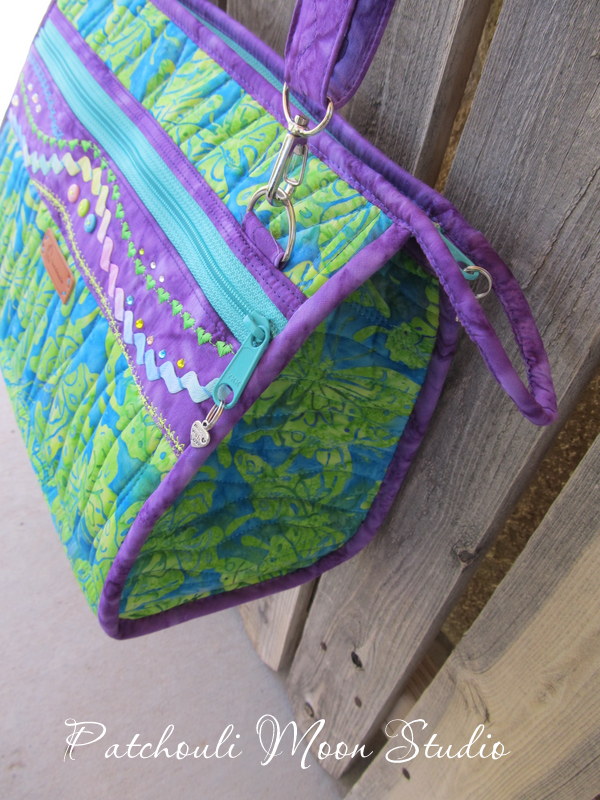
I've been finally getting around to trying some of the patterns that I bought years ago. I posted about a bag I made
here and the problems with that bag itself and the problems with the instructions too. Then I decided to finally try making this Kidney-Shaped Ergonomic Shoulder Bag style bag from
Angel Fire Designs. I purchased a similar style finished bag a few years ago from a local women who sells all kinds of bags. Hers was made using pre-quilted fabrics, so the bag is soft and it's sturdy enough too. The bag I made here is very stiff. The entire bag is made using
Craft Fuse (a medium-weight fusible interfacing) that is fused to nearly every piece of fabric and in a couple of places the bag uses
Wonder Under too (a paper-backed fusible web). This yields in a rather stiff bag. Personally, I'm not that thrilled about having that stiff of a bag, but I understand the reason for using Craft Fuse for adding body where it needs it in a bag. However, I would have preferred making this bag with quilted fabric that I either quilted myself or pre-quilted fabric and maybe some Craft Fuse in the gusset only.
After making the slanted pocket with the Velcro closure, I would have preferred to have this a zippered pocket instead.
I know we all have our own tastes in bags, quilts, etc. but this one just didn't
float my boat. The idea is a good one, but so many things need to be changed for my taste. I see Angel Fire Designs has an updated version of this bag in a pear-shaped bag. But at $14.00 for the pattern (I think I got mine pattern for $12.00), I won't be making another one. There weren't enough clear photos to see what this bag looks like from different angles on the pattern either. The little photo on the back was too small to see and the colors of the bag didn't show up well like the cover photo did. It's only when I went to her website
after I made my bag, that I found more color photos of the bag that would have helped me. So why wasn't that information written on the paper pattern? Something like:
see my website for additional photos would have been oh so helpful to me, but who knew? Plus what about those people who purchase the pattern and don't have a computer? They wouldn't be able to see those photos and so why not include more and better photos on the pattern itself? The pattern is pricey enough, so how much more could it cost to add a few more photos? It's crazy the time we all spend making things, and when they don't turn out like we hope, I sometimes wonder why I don't just buy a ready made bag from a discount store. I could literally buy a nice bag for less than the cost of this pattern alone and when you think of the other costs like the fabric, interfacing, thread, Velcro, I could have bought 2 bags or one nicer more expensive bag from a better store, or called up the woman who made my ergonomic bag and bought another one. Still, I enjoy making my own bags and other things because when you hit upon a good one that's a keeper, you will make several in different colors. With that said, I think I will go and make another of my favorite bag and this time I will enlarge it a bit because I sometimes like a larger bag.
So after making 2 bags recently from patterns that either the instructions had some problems or the bag itself did, it got my head ticking about having a section on my blog where I post
The Good, the Bad & the Ugly about patterns that I and others have used. It would be about
reviewing patterns that can be found in books, magazines, tutorials, paper patterns, online patterns, freebies, or purchased. They can be anything: quilts, bags, clothing, knitting, etc. Would anyone be interested in reading about such reviews? Would anyone like to contribute their opinions about items that they made from a particular pattern? Include photos of your item, and write a review that I can link to your blog from here. If you don't have a blog, please
email me your review and I will post it for you. You can do this like how you would write review for a product purchased from Amazon or other places. Maybe by doing this, writers/designers of patterns will include what we want and write better patterns. I won't buy a pattern from the same designer again if the one I did purchase was poorly written. I would buy a pattern again from a designer who wrote really good detailed instructions and had lots of step-by-step photos or clear sketches. Most of us are visual and when I write patterns or tutorials to sell or for give for free, I include lots of photos and detailed instructions. I think you can tell a lot about a pattern writer by first seeing if they offer a free pattern or tutorial and make it before you purchase from them. If they write well, you will feel more confident in purchasing patterns from them, wouldn't you? I know I would.
If you would like to review something that you made, write a posting about it and include lots of information like:
- What did you like about the finished product and explain why
- Was anything poorly written or mistakes in the pattern?
- What didn't you like about the finished product and please explain why
- Where did you get the pattern from (a magazine, book, online purchase or online freebie, individual pattern, etc.)
- Would you buy again from this pattern writer?
- Did you make changes to the pattern? If so what were they?
If there is enough interest in pattern reviews from other bloggers, I will start a weekly or monthly Linky for it. What do you think? Would you contribute your reviews? Comment below or
email me your thoughts. No one wants to waste their time (let alone money) making something that doesn't turn out well or can't make it correctly because of a poorly written pattern. This will help others avoid the bad patterns and help to find those who produce a really well done pattern.
Okay that said, this is the ergonomic shoulder bag I just made:
 |
| One side of the bag with the Velcro pocket. |
 |
| The other side of the bag with the "sunglasses" pocket. Problem with this pocket is that my sunglasses case doesn't fit. Why? Well for starters this is a flat pocket and my sunglasses case is thick, so wouldn't you think that a pocket that is supposed to hold a dimensional object would have a dimensional pocket? You know a pocket that has a gusset or pleats so that the pocket can expand. I even made this pocket a bit taller, but of course that didn't help much. |
 |
| Another pocket on the gusset. Above is a hook to hold keys. I like that feature for the keys. |
 |
| Lining of the bag. I chose to use some millennium fabric I still had hanging around...hmm 12 years later. The directions do not give you exact placement of the interior pockets, so I ended up with the pencil/pen pocket up way too high. Since there is another pocket below the pencil/pen pocket, I wanted to make sure there would be room to add it above, but I didn't quite know how this would be when the bag was finished. I cannot really fit the pens into the pocket now. Might have been better to instruct placing the pencil/pen pocket below the horizontal pocket instead of the other way around as the instructions tell you. You cannot really see this pocket in the photo. |
 Pin It Now!