Friday, June 7, 2019

Silicone Trivet and Potholder (+ Giveaway)

Recently I tested the Silicone Trivet and Potholder pattern from Around the Bobbin. This is a fun sew and such a useful trivet or potholder. Place it on the counter or table with the silicone side up and your hot pot or dish can sit on top. Flip it over and there is a pocket to use it as a potholder. Or make without the pocket as just a trivet. Add a loop to hang or not. I don't hang mine, so no loop for me. The pattern and silicone come in a small or large version. I made the small one, which finishes 8" square. The large finishes 9 1/2" square. There are two ways to finish these, which is explained in the pattern.

I just happened to have an orphan quilt block handy the right size when I tested this, so I chose to use it. However, I would suggest placing the silicone over your fabric first as you can see on my finished potholder/trivet only the bright colors showed through and the black and purple hardly show. So the next one I will make sure I can see the fabric under the silicone a bit better.

Giveway info at end of post.
I used a pieced orphan block for the front of my potholder.

The finished potholder/trivet. I used traditional binding to finish this one.

I quilted the back and the pocket

Now for the giveaway: Lisa of Around the Bobbin is giving away a kit to make a small potholder/trivet and another one to make a large one. So pop over to enter. Sign up for her newsletter too while you are there to get discount codes on her new pattern releases (hint there is another pattern I tested that will be available soon). Look around at her other patterns while you are there too. Giveaway ends June 9 at midnight!
GIVEAWAY CLOSED. Winners were announced on Around the Bobbin blog.
Pin It Now!

Wednesday, June 5, 2019

The Allure Bag Reduced Size

I made another Allure Bag  (ChrisW Designs pattern), but I reduced the size to 85% and I love smaller size soooo much better!

I made several changes to the bag too. First of all I used all cotton fabric. I didn't like the vinyl in my first Allure and so much prefer to sew with cotton fabric. Can't afford to buy real cork and have no place to store it and besides I need to use up the tons of cotton fabric I already have on hand. I used Uncorked by Windham Fabrics for the accent fabric on this bag and it looks so much like real cork, I bet I fooled you! It's  less costly too than the real thing.

Other changes I made besides the reduced size and using all cotton, was no zipper pocket on the flap. While that zipper looks nice, it's not only an extra few steps and more cost, I just cannot see putting anything inside that pocket unless it's something flat like a grocery list. Anything more dimensional would end up causing the flap to have an unsightly bulge. Perhaps it's more decorative than useful? I am more about being useful, so no zippered pocket on the flap for me, and especially now that I reduced the bag that zippered pocket would have been too small for anything anyhow. Not to mention, since I am using cotton and not real cork or vinyl, I wouldn't be able to add that pretty accent around the zipper. You can click on the link above to see what I mean when you see Christine's bag and the other tester bags.

I also did not add any Decovil interfacing to my bag. I did add a base of Peltex (pattern calls for regular Decovil for the base, but I still have Peltex to use up). But I didn't think I needed to add Decovil to the flap or body, since I used woven interfacing and foam. I like the feel of this Allure better without the Peltex that I used for the full sized Allure I made.

In order to use the uncorked fabric, I fused fusible web to the back of the flap and body accents and fused in place and then sewed a blanket stitch where it would show (not in the seams). I added a seam allowance to the uncorked flap accent on the outer edges. I had thought about doing this as I was testing the first Allure, but knew I would do it on the next Allure I made. Since the test bag was rather large, I knew I wanted to reduce the size and I just love this reduced size much better for me to use and to make more to sell too.

The hardest part now of making this bag is adding the rivets through the strap tabs and the thickness of the body of the bag at the sides. Love the look, but may experiment on the next Allure and make strap tabs that don't attach to the sides outside. I am going to cut out my next Allure this morning. Another one using uncorked fabric in black and a different main fabric.
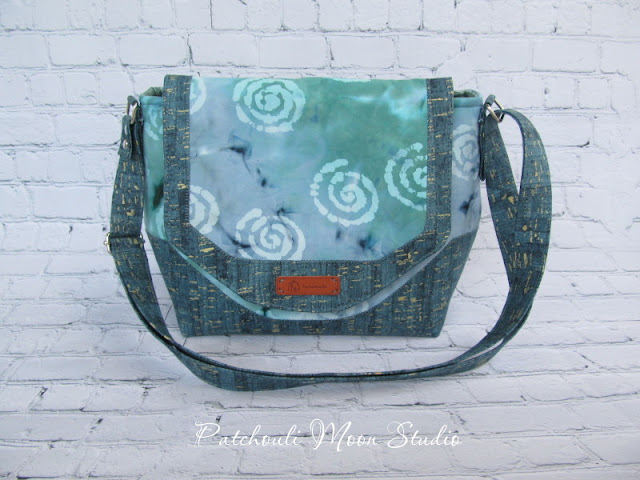
Batik fabric paired with Uncorked fabric.

Purse feet added to the bottom of the bag. See how that looks like real cork?

The back of the bag,

Christine's signature phone pocket on the upper back of the bag. Since I have no phone, it's great for my keys.

I blanket stitched the uncorked fabric to the main fabric here.

Inside has a zippered pocket and I added a slip pocket across from the zippered pocket.

Here is my slip pocket with a pen pocket. I experimented and sewed some fold over elastic to the side edges. I only had bright elastic colors. It worked well, just wish I had a better color to match.

An adjustable strap to wear on your shoulder or across your body.

Strap tab with 3 rivets. You can see The Allure's pretty side too.

I also used a magnetic snap closure, rather than a twist lock or flip lock closure. While I love the look of those closures, for me personally it's more about function and ease of being able to open my bag fast and easy without fiddling with those other closures with moving parts. Besides, since those other closures do have moving parts, it make me wonder if they ever break? Had one twist lock break on me, but might have been my own fault as I was not untwisting it to open it and reached in the side of a bag and the spring part broke. So yes they can break, but also you shouldn't get into a bag without untwisting the lock first! After that happened, I knew I preferred magnetic snaps or zippers as closures. It keeps it simple for me not to have so many different kinds of hardware closures on hand too.

Allure's pretty backside.

And here they both are for a side-to-side comparison. The original size Allure on the left with vinyl accents and the reduced to 85% Allure on the right with Uncorked cotton accents. See the size difference? The original Allure is a large bag and the smaller version I would say is a medium sized bag. 
 I measured my Allure Bags and the original bag is nearly 10 3/4" tall x 16" wide at the widest point measuring from side seam to side seam x 6" deep x 10 3/4:" across the base.

The reduced Allure measures 9" tall x 13" wide at the widest point measuring from side seam to side seam x 5" deep x nearly 9" across the base.

Both of these bags have SOLD.
Pin It Now!

Tuesday, June 4, 2019

Emma Bag made with Selvages

I made this Emma Bag using fabric selvages for the exterior of the bag. It's a cross body bag with a flap and inside pocket and a zipper pocket. It's a small bag and perfect for someone who doesn't want to carry a lot with them or even for a young girl or teenager.

Emma is a ChrisW Design pattern. Easy to make and you can make with a flap or without a flap. The bag without a flap shows a ruffle instead. I find it fun to use my selvages in creative ways and making bags and baskets are my 2 favorite ways to use up selvages.


Inside slip pocket

Inside zipper pocket I added on the other side.

Half of Fanny (lol!!!) to show the size of the bag. I made this bag when we had a bit of snow! I am behind in some of my postings!


I love the dog paw selvage! It's so fun that a lot of companies are using shapes other than dots to show the colors on the selvages edges.


I riveted the strap tabs to the sides of the bag.

Back of Emma.

There is another selvage with a swirl instead of dots.
This was the bag my friend saw in selvages, but asked me to make the Serendipity Hip (with a straight across top) in selvages for her.
Pin It Now!

Sunday, June 2, 2019

The Allure Bag

The Allure bag pdf and also a video version has been released and is currently available on ChrisW Designs website. I tested this bag and it is a great bag style and a large bag. I plan on making another one at a reduced size to see how it turns out. The accents on this bag really add a nice touch. There is a phone pocket, inside pockets and an adjustable strap to wear on your shoulder or across your body. This bag is sturdy and really stand up on it's own too.

I made the mistake of using Peltex instead of Decovil light, not knowing there was such a huge difference in the products. Apparently Peltex is thicker. No wonder I had a devil of a time wrestling the final sewing step and turning the bag! But it worked out in the end and turned out to be a beautiful bag. Next bag will be made with no Peltex and since I am going to reduce the size, I will use foam only, but with Peltex only at the base and not other places in the bag.

The Allure has a zippered angled pocket on the flap, but because of the fabric I chose, I didn't add the zippered pocket. There are still plenty of pockets in this bag, including Christine's signature phone pocket at the back top of the bag. Inside is a zippered pocket and you can add slip pockets if you want to.

To see all the tester's versions go here. Scroll through the tester versions underneath the main photo.


Nice and roomy bag.
The back of the bag.

All my stuff fits inside nicely with room to spare. 

See how roomy it is and all those pockets give you more space for things too. The pocket supplement for the slip pockets can be purchased separately and can be made for nearly any bag. You get a pleated pocket with a pen pocket and  pocket beside the pleated pocket and a smaller pocket behind.

This bag has SOLD.
Pin It Now!

Friday, May 31, 2019

Bags Made with Rip-Stop Hot Air Balloon Material

A lot of large scraps of rip-stop nylon material (the material hot air balloons are made out of ) was donated to my quilt group. The woman donating the material hated seeing all this end up in the landfill and she was encouraging us to make bags using the scraps of nylon material. She herself made several bags and donated the bags to the local food banks for the people to have something to carry their food home in. Plastic bags will be banned from all stores starting in January 2020, so people need to start bringing their own bags.

I have been bringing my own bags for over 35 years now when I shop. I earned 5 cents to 10 cents every time I brought my bag to the store; so in 35+ years I actually paid for the bags a few times. I guess rewarding people to bring bags wasn't working, so now if you don't have a bag now you can purchase a cloth or a paper bag. They should have charged people for the bags all along and that would have encouraged people to bring their own.

Back to the bags I made with the scraps from hot air balloon making. I made a couple styles of bags. The first is the Stowaway Tote (a free pattern from Moments). I used Velcro instead of a snap to close the bag and added decorative button on top.

In order to make any of these bags, I needed to first sew some pieces of material together in order to create the size fabric I needed for the bag(s). I sewed seams and then pressed seams open and topstitched on both sides of the seams. The side seams of the bags I sewed a French seam, encasing the raw edges.

Here is the Stowaway Tote~

The Stowaway Tote here all folded up into a wallet size that fits nicely into a purse. (This has Sold)
Open up the tote and you have a bag with a pocket. The rip-stop nylon holds the creases in the bag, making it easy to refold the bag after use.
This is the other side of the tote in different colors. That lime green was a different kind of nylon as it was stiffer and sounds like someone wrestling with a bag of potato chips when you handle it, LOL! There were a couple of colors like that and the others felt softer and some were a bit limper feeling too. I wonder if they mix the different kinds of nylon into one hot air balloon? 
To fold to bag,  you place the handles down first and then fold in the sides. then fold this into thirds and close with the Velcro.
Here is another Stowaway Tote~
I had to piece the pocket to make this one. (This one has Sold)
Opened up with the pocket.

Back side of bag.

Next is the Winslow Market Tote~ (from a Quilting Arts magazine years ago).

This bag needed a center, sides, pockets, handles, and a bottom. This bag is larger and has boxed bottom. Since the material is light, it could be folded up. The original pattern for this bag is made in cotton and lined, so I had to adlib when making this out of the nylon material.

This is the other side of the bag. As you can see with both bags, I had to piece several pieces together to form the handles of the bags, since I didn't have long enough pieces.

Room inside for carrying all kinds of stuff.

Side view.

Here is another Winslow Market Tote I made~

Bag empty.

I filled it up so it would stand nicely.

Side view.

Full of stuff this bag stands up nicely.


Sewing the material wasn't difficult, but cutting it was a bit tricky as this material can slide a bit. You could press the nylon with an iron because after all this material does get a lot of heat from the burners of the hot air balloon in order to get lift for the balloon when flying them. It was rewarding making something out of scraps and keeping large pieces of this material out of the landfill, as I am sure this stuff won't decompose at all.

Pin It Now!
Related Posts Plugin for WordPress, Blogger...