Wednesday, June 8, 2016

Tutorial for Making a Zipper Pull With Beads & a Charm

I have had some requests for a tutorial on how I make my zipper pulls, so I will show you how through a series of photos. I was going to try and learn how to do a video tutorial, but I haven't had the time to even learn how to use the video yet.

The pdf version of this tutorial is on Makerist and if  you click on the Makerist logo on the right side of my blog, you will be taken to all of my patterns at Makerist and will see this one there to click on.

These zipper pulls add a nice touch for any bag that you make and are really useful too, especially for those zippers that do not have a large enough metal pull on them already.

Please go to Makerist for the pdf. Thank you.

Here is an example of my beaded zipper pull with a charm.


Pin It Now!

Monday, June 6, 2016

One Ringy Dingy, Two Ringy Dingies (Call Me Maybe)

I was lucky enough to win a copy of Lara Buccella's new book, Crafted Applique...New Possibilities  and wanted to try something small to test out Lara's method. Lara Blogs at Buzz in Bumble. Lara did a free tutorial of her Call me Maybe telephone appliqué for this cute rotary dial telephone as a guest blogger on Sew Mama Sew last month*. Of course Lily Tomlin's character, Ernestine the telephone operator came to mind as I was working on this appliqué. (See update at end of this post).

I love both Lara's appliqué method and this cute telephone!


I used some tiny rickrack instead of cutting out fabric for the cord. I fused the rickrack down using the same method as the fabrics and it worked great! I think the rickrack looks more like those curly phone cords. Remember how the cord would twist up and you had to drop the receiver to let the cord untangle?

I ended up hand stitching around the dials because my straight stitching on applique just isn't too neat! These were too tiny to machine stitch straight.

I am so pleased how this cute telephone came out. Thanks Lara for writing a wonderful book! There are definitely some new possibilities to explore using your appliqué method. You will be seeing a lot more appliqué from me.

*Update: Unfortunately, Sew Mama Sew site appears it is no longer active (as so many bloggers have left their blogs 😢). I am afraid the tutorial where this appliqué telephone was given as a free tutorial is no longer there either. You can try contacting Lara Buccella to see if she will give or sell you the pattern? Also, the Call Me Maybe telephone appliqué is not in her book.
Pin It Now!

Sunday, June 5, 2016

Quilted Notebook for Rulers

I wanted to make a notebook to hold my small rulers for quilting. I decided to use an applique I made from a free pattern online from Hissy Fitz Designs for the cover of the notebook and then to use batiks scraps and sew around the applique. I have more rulers that don't fit into this notebook, so I will be making another notebook cover to hold the rest of the small rulers too.

I added applique "rulers" on the spine of the notebook.


I put my rulers into zippered pencil pouches and the instructions to go with them stay in the pouch too so I can easily locate them.


This is the back of the notebook cover.


Pin It Now!

Thursday, June 2, 2016

Bountiful Baskets Quilt Blocks

I made 16 (of the 50) Bountiful Baskets applique blocks. I didn't want to make a really large quilt, so I chose the flowers from the five states I have lived in and the other eleven blocks I chose to make because I liked the flowers. I am not sure how I will put them together yet. I enjoyed making them.


Pin It Now!

Wednesday, June 1, 2016

The Lunar Collection Travel Bags by ChrisW Designs

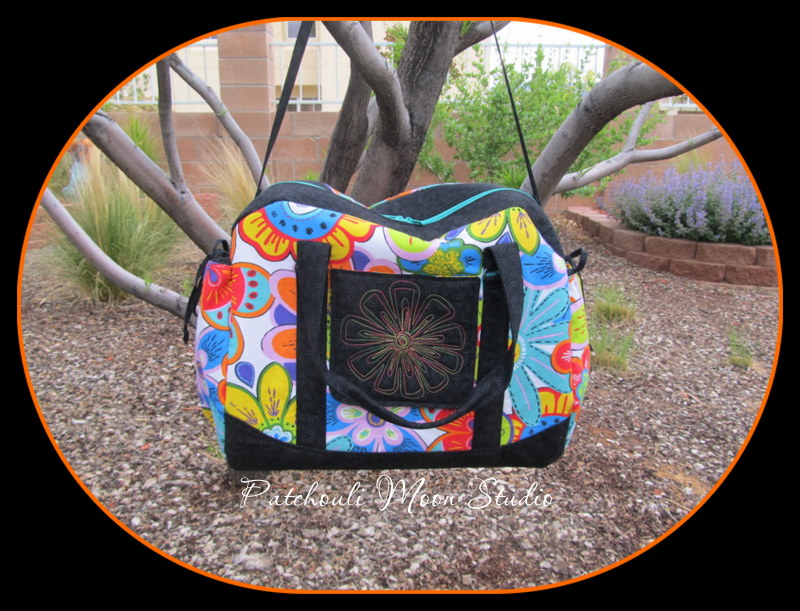
The Lunar Collection of Travel Bags is the last bag in the Bag-of-the-Month Club for 2016; designed by Christine of ChrisW Designs. I was one of several testers for this bag collection and I chose to test the large version or Full Moon. Don't you love the name (he he)? The Full Moon is not only large, it's huge! After I made the bag, you know what Christine did? She added a third size! So with this pattern you get the large (Full Moon), medium (Half Moon) and small (Quarter Moon) size all in one pattern! Wow that's a great deal. Christine designed this for the Bag-of-the-Month Club (BOM) which runs from January-June each year. So if you want this pattern now you can purchase the BOM now and you will receive all 6 bag patterns from 6 different designers, or you if you can wait, this pattern will be released for individual sale starting July as will all the bag patterns from each designer in the BOM club. Christine also added another pocket supplement for the inside (after I had made my bag) so you will have even more pockets, if you want to add more pockets inside, which some of the testers did.

The pattern is designed with a luggage sleeve on the back to slide over your rolling suitcases. I decided not to add the luggage sleeve to mine as I do not have rolling suitcases and I don't travel much anymore. So I sewed that sleeve inside my bag and turned it into a pocket instead. I love the large drawstring side pockets and the front pocket too. I made my flap larger so that I could quilt a flower design on the flap. You can use the carry handles or clip on the strap for wearing on your shoulder or across your body. I made my strap narrower because I only had a narrow swivel hook. I probably wouldn't use the long strap anyhow.

Some of the testers used faux leather as the accent on the bottom and for their straps, which is a nice touch too. You need to see all the testers bags to see how great they look in the different sizes and fabrics they chose too.

Here's my bag and I just love it!

I quilted a free-motion flower on my flap that I made larger.

I forgot to put on the cord stops when I took this photo. I have since put the cords stops on the drawstrings, which makes it easier than tying a bow, lol!

This is the back of the bag where the luggage sleeve would go if I added it. But I wanted my pretty floral print to show more and I wouldn't use the luggage sleeve so I left it off.


Zippered inside pocket with the floral fabric as the lining.

I turned the luggage sleeve into a slip pocket, which is the black pocket across from the zippered pocket.

Since I have small hands, I folded my handles in half and stitched them in the center where I grab the handles. It fits my hand so much better that way.


Pin It Now!

Tuesday, May 31, 2016

Let it Snow Blocks 4 & 5

I finished 2 of the Let it Snow blocks. Block 4 & 5. I am using flannel fabrics that look like wool and hand stitching them in place.

This is a spacer block between the word "let" and the next word "it".


Pin It Now!
Related Posts Plugin for WordPress, Blogger...