Monday, July 31, 2023

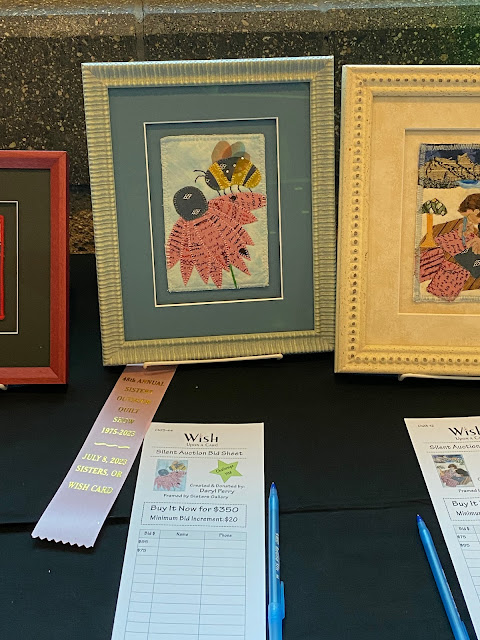
My Honorable Mention Framed Postcard from Wish Contest for the Sisters Outdoor Quilt Show (2023)

I made eleven postcards this year using the 2 challenge fabrics for the Wish postcard contest for the Sisters Outdoor Quilt Show. I posted the postcards a few months ago here on my blog. Later I was told I won an Honorable Mention for one card. Yay!!! Since I wasn't attending the show this year, I asked the woman in charge of the contest if she could send me a photo of my Honorable Mention and any others that might have been framed too. She didn't think others had been framed, but did email me a couple of photos.

It looks even better framed! What a beautiful frame they chose!

Challenge fabrics were the pink text fabric and the charcoal gray print.

She snapped a pic before any bids were placed. These framed postcards have a Buy it Now of $350 ($500 BIN if it was made by a teacher who was teaching during Quilter's Affaire, the classes the week before the quilt show), or $20 increment bidding ($50 I believe for the teacher framed postcards). The woman who emailed me the photos said as she could best recall, this postcard sold for $180. Yay!!! It helps the show and such a thrill for me to have won and honorable mention and to see my postcard framed too! 

I have had postcards framed before, but never won even an Honorable Mention before for my postcard. I have won a few times, including Best of Show for the Quilt Block Challenge, which is making a quilt block in the challenge fabrics (usually about 5 fabrics) and then the teachers cast their top 5 favorite votes and the winners are chosen from the top picks. The top block winners get more blocks (from the remaining blocks that were made) so you can make a quilt with the blocks. I just don't need any more quilts or UFO's, so prefer making the postcards now. 

Sisters Quilt Show will take any postcards made (4"x 6") and they sell them or some do get chosen to get framed too. No prizes for those, but it is a thrill if your card is framed, however you won't know anything about that unless you have a friend or someone who sees and takes a photo for you, if you aren't attending the show itself. If you use the challenge fabrics, there is 1st-3rd and Honorable Mention ribbon awarded and some prize for the top winners. Not sure what? They usually post about the challenge around February on their website showing the 2 fabrics and filling out a request form for fabric to make a postcard or more. You can request more than one set of fabric pieces if you plan on making more than one postcard. The money from sales of postcards (framed or unframed) all goes to support the FREE quilt show and for art scholarships to high school students. I am happy to help out even if I don't get to the show as often as I would like to.

If you want to start making postcards now using your own fabric, you can do that anytime. If you want to enter the challenge, then wait until they show the challenge fabrics on their website for next year and you see that you can request a set of the fabrics. Postcards for the contest need to be mailed in by a certain date, and other postcards can be sent in anytime up to a later date, which is all listed on their site.

Happy Creating!

Pin It Now!

Friday, July 28, 2023

2 Bags I Made to Hold Thin LED Lightbox & Cord

When I was at The Dollar Tree a couple of months or so ago, I saw they had those thin LED lightboxes for $5, so I bought one to try it. I have a really nice large lightbox that I use at home and have had for about 25+ years, but I wanted something lightweight that I could take to me sewing get togethers if I was going to trace appliqué shapes onto fusible web. 

Then I thought I need to protect the lightbox in a bag and have a pocket for the cord and cord adaptor for plugging in. So I searched through my laptop/iPad/tablet patterns on the computer to see what might work as far as style, as I knew I would have to alter the measurements. Meanwhile, I showed my friend, Tara the lightbox I bought and she went and bought herself one too.

So I decided to make us each a carry bag for it. I found a tutorial for a tablet that looked like it would be what I needed, but I made changes and size adjustments. I started with making Tara's bag and when I placed the lightbox in(or tried to), I found it was just a tiny bit too narrow at the sides and needed more space height wise too. So, I had to do some ripping out. I added a strip to the bottom of the bag to give more height and then covered the seam with the orange rickrack, which actually added a bit more pop of color too. Happy fix there. I should have written down what I did to fix the sides, I made these a couple of months ago. I must have added to the side, but cannot remember exactly, lol! Whatever I did it worked. 

I gave the bag to Tara for her lightbox. She loves typewriters, so I did a typewriter appliqué on the front and used a batik typewriter key fabric and faux cork fabric.


I also have stamps that look like typewriter keys, so I created her name using that and fused them on and then lightly coated the letters to make waterproof and prevent unraveling around the edges.

I added 2 magnetic snaps for the closure, since this is a wide flap.

Bright orange lining.

The back side.

I quilted to sew-in fleece.

Since I had cut out a couple of the bees appliqué in making the water bottle bag for Tara, I thought I would use the bee on mine with a large flower too. Those bees were growing on me.

Batik fabric for the bag and flower.

The lightbox plugs into a USB port or use an adaptor to be able to use in a standard a wall plug. These fit into the front pocket with plenty of extra space to toss in some pens or pencils too.


Here is the view into the zipper pocket.

Quilted to sew-in fleece to add a bit of cushioning.


The lightbox on top. I added some bee duct tape to the top edge where the USB cord attaches, as the black strip at the top was pulling away when I would remove the cord. So I thought the duct tape would hold it more securely in place. 

View into the main lining.

I am pleased with how the bags turned out, although it took me a while to get the size just right. I thought enlarging it a certain percentage large would work, but not quite. I made so many other changes too, but I always do that, lol!

Happy tracing (with a lightbox).


Pin It Now!

Sunday, July 23, 2023

H2O to Go Water Bottle Sling Cross Body Bag with a Honey Bee Appliqué (enlarged)

I made another H2O to Go, but this time I enlarged it to 115%, upcycled some denim pants for the body, and waterproofed the exterior by using Heat-n-Bond's Liquid Vinyl. 

My friend, Tara had worn out the regular sized H2O bag I made her a few years ago. She said she loves this style bag and mainly uses it as any cross body bag to hold her things and to have super easy access to the items she places into the open space meant for a water bottle. (No, she doesn't carry a HUGE water bottle around with her, lol). 

So, I thought I would try enlarging one for her and since she is a backyard beekeeper, I added the honey bee appliqué to the front zipper pocket. The bee helped to jazz up the plain denim. Before I started to sew the bag, I cut the pieces slightly oversized and applied the Liquid Vinyl (LV) according to the directions and let it dry and applied a second coat. Tara's first H2O was made out of quilting cotton and after a lot of use, it was showing signs of wear with some fraying at the base and was getting dirty. I thought the LV would really help with both and that denim was a tougher material too. This one will be a good test to see how much better and longer this version will hold up with the changes I made in the bag. I also decided to use gray webbing for the adjustable cross body strap because it would show less dirt and if it started to wear out, it could be easily replaced. 

This bag at 15% larger is approximately 12.5" High x almost 7" oval base x just over 4.5" deep.


Enlarging the bag allowed me to add a nice large bee appliqué to the front. 

I quilt the bottom bases of all the H2O to Go Bags. It helps to really hold the stabilizer in place.


I didn't have a large enough piece of yellow waterproof canvas for the lining here, which I was going to use, so used this lime green instead. I like the added pop of color the lime adds to the bag.


I used yellow paisley print for the lining inside the zipper pocket. I like to make 2 slip pockets, one with a pen pocket and then make a matching card wallet that can slip into a slip pocket. One pocket is for a phone. I used a bee print fabric inside too.


I used an iridescent fabric for the wings.

Here is the matching little card wallet I made to put into one of the slip pockets. I used the bee print and the gray denim. 

There are 3 pockets. Two for cards and the back one is deeper to put folded cash or more cards. I didn't use LV on the wallet.

I think enlarging it this to 115% for Tara was just right. It allowed it to be large enough without being too huge for her. I surprised her with this bag and she loved it, which made it all worthwhile.

I have 2 more custom H2O to Go bags that I made in June to share with you next another time. 


Pin It Now!

Friday, July 21, 2023

H2O to Go Water Bottle Bag in Purple & Turquoise Batik Prints

Hello lovelies, are you surviving the heat wave? I have been staying cool indoors and sewing up a storm! I have so many things to share that I have finished, but haven't posted yet. Been too busy sewing to post I guess.

I was commissioned to make another H20 to Go Water Bottle cross body sling bag. A woman in my Project Linus group saw the one I had worn that day and asked about it. She thought it would be great to take to a quilt show that she will be attending in September. Of course these water bottle bags are great all summer long no matter where you might go.

Her favorite colors are turquoise & purple and batiks (ah, a person after my own heart with those colors and in batik too)! So This is what I made for her and she loved it.

The bag measures 11" high at the sides x 6" oval base x 4" deep. A 32 Yeti will fit inside, so plenty of room!

I didn't have enough of either fabric for the strap, so I used both! I love doing a 2-fabric strap.

handmade charm added to the zipper pull I made with beads.


Inside the front curved zipper pocket is a couple of slip pockets with room for a phone, passport or small wallet (I made a matching card wallet too) and a pen pocket.

This is the matching little card wallet.

Back of bag.

Looking down into the bag where the water bottle goes. This can hold really large bottles. The lining is waterproof canvas.

Front view showing the curved zipper pocket.

Inside the zipper pocket with the little card wallet in one slip pocket.

Card wallet opened. It has 3 slots. The first two can hold a few cards and the last one is deeper and holds folded cash or more cards.

I put my water bottle inside to show you. My bottle is tall and narrow. You can see there is plenty of space to hold a wider bottle.

Some people use a hack when making this bag. There is a hack for boxing the corners instead of adding the oval bottom and they also hack the zipper pocket by sewing a vertical or horizontal flat (not dimensional) front pocket. I think it's because some of them are afraid of sewing the oval bottom and zipper. Maybe they tried it once and didn't have success? Or they also just want a super fast sew? 

The reason I bought this pattern is that I loved the look and function of the bag. I love that front zipper pocket and that there is room for phone, passport, small wallet, pen and space between the pockets for keys. The pattern has instructions for card slots or the additional slip pocket, and I prefer making a removeable little card wallet most of the time to place into the extra slip pocket. It's more versatile that way.

I have another H2O to Go bag to share with you next time that I made a couple of slight changes to, so watch for that posting soon. Stay cool my friends!

Pin It Now!

Wednesday, July 5, 2023

Sew Powerful Purses #33-41 (2023)

9 more purses finished! Yay! I made these from a panel (like some others I already shared here before). The panel was about half flowers half quotes and some were repeated, but most had only one of each. I sewed strips around the quote part to make it large enough for the purse flap. I added buttons and crystals on some. I think this panel was just made to make these purses for the sweet girls in Zambia! Need to work on finishing the flower ones soon too.

Some of the words on these flaps are written in a cursive font, and the girls do not know how to read cursive, so on the notecard that I include in each purse (cards are required, but can be made by someone else), I write what the flap says all in block print letters so they will know. Even if they could read the cursive word(s), some fonts could be difficult for them.

I had to add some crystal bling on this one!

This one can be read by the girls as it is all in block letters.


Buttons and crystals added.

Fraternal twins. Same panel, but sewed the strips in different fabrics as well as the body is different fabrics.

Added small buttons and crystals to both flaps.

The flap lining on the left is all done in cursive writing. Maybe a clever girl who receives this purse can teach herself cursive?

I love this one! I used a star print fabric for the body and star buttons and of course some crystals that twinkle like stars.

Too bad the crystals do not sparkle in the photo like they really do when the light hits it. 


Added buttons and crystals in the centers of some of the print flowers.


This purse and the one below are fraternal twins. Different fabrics strips surround the flap and different body fabrics. Both I added heart buttons and crystals on.


Pin It Now!
Related Posts Plugin for WordPress, Blogger...