Monday, October 29, 2018

3 Serendipity Hip Bags with Changes

I wanted to experiment a little with making the Serendipity Hip bag (by ChrisW Designs), so I changed some things and made 3 separate bags with different changes to see how they would look.

The first Serendipity Hip I wanted to make into a dog walking bag with a pocket for pulling out a plastic doodle bag. That worked out nicely. (I don't even have a dog though, lol). This bag has SOLD.


I had a small piece of this fabric with women walking dogs and so this was the perfect choice for this version of the Serendipity Hip bag.

The back of the bag.

Pretty floral for the lining. There are credit card slots sewn into this bag and a zippered pocket.

From the outside looking down there is a slip pocket with a phone pocket inside.

In front of the slip/phone pocket is a zippered pocket on the bag front too. This is the pocket where you would put the plastic doggie doodle bags and then pull one at a time out of the grommet hole I created as my change.

The large grommet is where you would pull out the doggie doodle bags from. You can see the floral lining.

I used a clear grommet.

Zipper pulls for the zippered pocket and the main zipper closure on top.

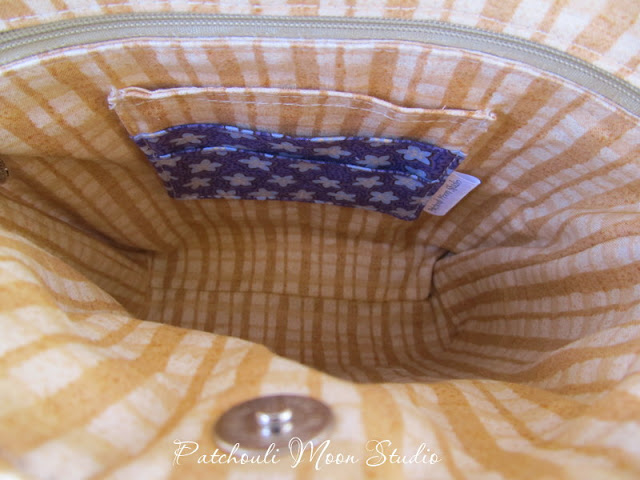
Next I made another Serendipity Hip with a magnetic snap closure instead of a zippered closure. While I like this with a snap closure, I am not sure it looks as neat as I would like it to. Maybe it was my sewing that made the curved top a bit wonky? Still it came out cute. This bag has SOLD.


The credit card slots inside the bag with a zippered pocket above.

The slip pocket with the phone pocket.

Back of the bag.

The last one I decided to make a straight top instead of the curved top. There are a lot of similar looking bags out there with straight tops, but I like all the pocket features inside and out of the Serendipity Hip much better than others I have seen. This bag has SOLD.


Back of bag.

Inside credit card slots and zippered pocket.

Slip pocket and phone pocket.
So there you have it. Three looks from the same bag pattern. Do you have a favorite? I definitely know the curved top is what makes this bag more appealing visually, but the straight one is a bit easier to sew, although the curved top is really not all that difficult to sew.

(All three of these bags have sold).
Pin It Now!

Tuesday, October 16, 2018

Sunflowers in a Vase Applique Wall Quilt

This is one of the applique designs from a series called Fiesta Vases, an applique designed by Susan R. DuLaney. I bought this pattern well over 10 years ago, so this was what I wanted to work on at my small applique group a few months ago.

I had the applique done for a long time and decided to sew a scrappy border. I sewed a scrappy background for a few quilts I have made before and my friend took my scrappy background idea and sewed a scrappy border like this one in black fabrics, only she add a tiny scrap of color in the center of her border blocks, which really pops on her black fabrics. Well I loved her scrappy border, so I used that idea and made my border in whites with an orange or yellow square in the center. Funny how I inspired her and she inspired me so between the two of us we got some great ideas, lol!!!


I did fusible applique with a blanket stitch on my quilt. I added an inner border of blue to define the sunflower in a vase and separate the white background from the white scrappy border. I love how it came out and so glad I finally go this one made!


The fabrics for the sunflowers and vase are batik or hand dyed fabrics.


Mostly batik fabric with the lighter green a hand dyed fabric and the yellow is hand dyed with a bit of orange paint and the profile orange sunflower is hand dyed fabric too.


The scrappy border is made in the same way as my Patchwork Scrappy Background tutorial, only start with a colored fabric square. My square is 1-inch.
Pin It Now!

Monday, October 15, 2018

Convertible Tote with Dog Applique

I made this Convertible Tote (Sew Can She tutorial) with several changes. I have made a few of these bags before and I wanted to make this one with an applique on the front of the bag.  I also made even more changes than I usually do. This is a simple basic bag, but by making changes you can give it a different look.

So first I fused the applique pieces to the front and stitched them down with a blanket stitch. The salmon colored fabric is a fabric that I tie dyed myself a few years ago.

Since I used a dog applique, what goes better with a dog applique than a fabric with "dog" wording. I added the back zippered pocket, but instead of placing the zipper in the center of the top fabric band, I placed it in the main fabric instead.

I never liked how the strap tabs were sewn to the bag in the directions (no offense Caroline!), so I riveted a longer strap tab to each exterior side of the bag. I made a regular adjustable strap with a slider, which I find works better too. 

I also used foam instead of fleece on this bag and love the foam too! I love how this bag turned out!


A dog and bird applique on hand dyed fabric. The top band is dog words. The applique is a Bonnie Sullivan design meant for using wool, but I used cotton, from her series called You Lucky Dog Best Friends.

The strap tabs are riveted to the bag sides.

I added the zipper pocket to the main back fabric instead of the top accent panel.

Cute dog sayings.

Inside the bag is roomy for a smallish bag. I didn't have enough blue fabric for the entire lining, so I repeated the top accent inside and used the same fabric for the pockets. I actually like how that looks. I have made other bags that do this, so I may do the accent fabric inside again.

I made a divided slip pocket, the center is divided to hold a pen, with larger pocket spaces on either side of the pen pocket.
SOLD!

Lovingly made in my Smoke Free, Perfume Free, Pet Free New Mexico home.
All sales final. No refunds or returns. Thank you.
Pin It Now!

Tuesday, October 9, 2018

Spinning Star Quilted Table Topper

My blog friend, Vicki (of Vicki's Crafts and Quilting blog) has been busy making table runners and toppers and other things to sell at some craft shows. When she showed one called the Swirling Star Card Trick on her blog last month, I thought I wanted to try making one. Hers had 4 fabrics and I wanted to use more fabrics and narrower strips (mine has 7 fabrics) and so while I was looking around online I found a similar one. I used mostly scraps from my batik scraps and cut a few other strips. The sewing wasn't hard. I didn't want to have to add binding all around this, so opted to do the pillow/birthing method instead. That wasn't hard to do, but when I turned the whole thing, I did notice my points weren't perfect. Since I couldn't see what I was doing with the batting and backing, I guess I forgot about those points! Learning experience!! Oh well that's how it goes sometimes.

I like how it has an interesting look, but not wild about the Swastika look it creates when they all come together! Hmmm. Well I don't think I will be making any more of these toppers. I prefer to do an applique topper anyhow. But it was a good learning experience and glad I gave it a try. I will leave these kind of toppers to the experts like Vicki! LOL!!!


This is the backing fabric. My friend Tara gave me this fabric I think last year for my birthday.


Pin It Now!

Sunday, October 7, 2018

Gracie Bag @ 80% with Hot Air Balloons

I wanted to try making another Gracie Bag (by Shamballa Bags), but reduce it in size. I reduced this Gracie Bag to 80%, which is still a nice size without being too large. I also thought it would look great with some hot air balloon fabric. 

I paired this Gracie with a multi-colored batik fabric and some green fabric I hand dyed years ago. Just barely had enough of the hand dyed fabric I needed for this bag.

The Albuquerque International Balloon Fiesta started yesterday and I wish I could have taken all my hot air balloon bags with me to sell at the show, but the cost to sell in the huge arts and crafts tent there is way out of my price range. So this and the other bags will go to the shows in November, where I hope they will go to good homes and be loved.

I love how real these balloons look.


Okay this is funny. Now that I am looking at these photos, I realized I forgot to add the rivets to the straps! LOL! I will go and add them now, but I will have to add the updated photos to this posting when I get the photos later. Sometimes you see things differently in a photo than in person, lol! 

Back of the bag. I added a slip pocket that is really needed to have outside the bag and the back was the perfect place for a pocket.

Here is a closer look at the slip pocket on the back of the bag.

Still a lot of room for a smaller bag.

One zippered pocket inside the bag. I forgot to add my zipper pull before taking the photo.

Here is the zipper pull in this photo.
Got the rivets added to the straps, whew! Now it looks a bit better and more balanced, lol! Glad I caught that before I took it to sell at the craft show next month!

Back of Gracie with added rivets on straps.

Pin It Now!
Related Posts Plugin for WordPress, Blogger...