Welcome to the Queen of Gadgets Blog Hop hosted by Carol of Just Let Me Quilt (thanks Carol!). Instead of creating a project using a gadget or two or three, I am sharing some of my favorite gadgets with you here today.
Hello all you gadget lovers, I love gadgets, don't you? If a gadget helps me in making my project better, quicker, more precise, etc. then I LOVE it! I love to try new gadgets and come up with my own gadgets too. Some work great and some not so much, but it is always worth giving it a go to see if it will help to make my work or project better or faster or more precise.
 |
| This is a gathering of some of my most used gadgets (besides the rotary cutter of course). |
I have a long list of gadgets and tools that I use a lot! Here are just a few of them and what I love about them. (Believe me, I could have listed waaay more gadgets than these, lol).
Listed in no particular order:
1.
Wonder Clips by Clover Brand (or copycat clips as they work the same). These clips are great for holding fabric together instead of pins, especially if you cannot pin because it could cause holes, such as when using a vinyl material. I use my clips daily! I have the narrow tips clips, the original clips, the long clips and the wider clips. The wider clips seem to be sturdier, whereas the original clips are now breaking a lot after years of use. The other two sizes I use less often.
 |
| Wonder Clips & generic clips mixed together. I like to use a ramekin to hold my small clips like these. I made a fabric bowl to hold the wider clips (not shown). |
2. A
die cutting machine (I use
Crafter's Edge Brand) is great as nothing cuts as precisely as using a die cut. It's great for appliqué, piecing, fabric and paper crafting. I get a lot of use out of my die cuts and the Crossover II cutting machine.
 |
| I love using my die cutting machine, especially with appliqué die cuts like the one shown below. |
 |
| I love appliqué die cuts from Crafter's Edge they sure make life easier being able to cut out appliqué die cuts or pieced die cuts quickly and accurately. |
3. Of course the rotary cutter, cutting mat and rulers changed the world of quilting for me. I learned to piece all by hand using cardboard templates and tracing around them, since rotary cutters, and rulers hadn't been invented yet. When my children were young I happened upon a VHS video from the local library by Eleanor Burns who was showing using a rotary cutter, mat and ruler. OMG!!! I ordered them all from her and it opened up a whole new way to piece and quilt for me. So much faster and more precise and now I could try sewing on my sewing machine too! Thanks Eleanor!
4.
Hot Ruler by Clover Brand. I love this ruler for when I need to press a 1/4" seam and it's so easy to press it over the ruler. The ruler won't get hot at all or melt either! I use this ruler a lot!
5.
Elmer's Washable Glue Stick that is purple and dries clear. I often use glue and the hot ruler together by pressing my narrow seam and then running the glue and pressing it again to keep the seam flat without the need of pins or clips. I use glue sticks for many other things too and I stock up on glue sticks at back-to-school sales as they are the cheapest then and I buy the largest glue stick I can get so it lasts the longest.
 |
| First I press under 1/4" using the Hot Ruler to press. |
 |
| Next I run some Elmer's glue along the fabric where I pressed. |
 |
| Then give it a press with my hot iron and it sticks and stays flat. If you goof, pull it up and try again. The glue is washable and less messy than liquid forms of glue. I stock up on the glue at back to school sales as it's always cheaper then. |
6.
Corner Ruler is great and useful, especially when making the purses I donate to
Sew Powerful as I can cut the flap and pockets, etc. with my rotary cutter and ruler and then round the corner curves using the corner ruler rotary cutter. Saves me time and is easy to use.
 |
| Looks a bit dirty here after so many years of use, lol! The tape on the backside of the ruler is the textured medical tape. (See 7 below). |
7. To keep rulers from slipping on my cutting mat, I use a
clear textured medical or surgical tape. I can still see through the ruler because it's clear, but the texture helps grip the fabric and prevents slipping. I bought mine at Amazon in 1/2-inch width. It comes in lots of widths.
8.
Knitting needle point protectors are also great for protecting the tips of scissors, seam rippers, stilettos and other small pointy sharp stuff. The point protectors come in small, medium and large sizes (2 to a set), so I use them on several pairs of scissors, especially helpful when I take scissors with me so they do not poke a hole in my bag. They are usually made of silicon. Here is another gadget tip: try using long tweezers instead of a stiletto, it works great!
 |
| Knitting point protectors come in a few sizes to fit your knitting needles, but work great to protect sharp pointy things like seam rippers, small scissors, stiletto and more. |
9.
A
Clapper is a great tool to use after you press with your iron as it will hold the heat in longer making a nice flat seam. I lucked out and got this clapper from a thrift store years ago.
 |
| Top view of clapper. |
 |
| Side view of clapper. |
10. Spray Mist Bottle is what I use instead of adding water to my iron. I learned decades ago that putting water into your iron to create steam not only shortens the life of your iron, but causes spitting, leaking and brown rust spots to ruin your fabric or clothes. Plus if you read the instructions of irons carefully, they tell you to empty the water out after you are done using it each time. Well you can never get all of the water out of an iron, so it still will cause problems anyhow.
A mist bottle like the kind you can get at a beauty supply store is the best! It sprays a mist of water and really gently wets what you want to press. Unlike regular spray water bottles, it doesn't dribble or leak all over. The mist bottle actually has in inside bladder where the water goes. I have used the one I have for many years without any issues. I got mine at Amazon (because the local beauty supply said they couldn't keep them in stock as they fly out of there).
11.
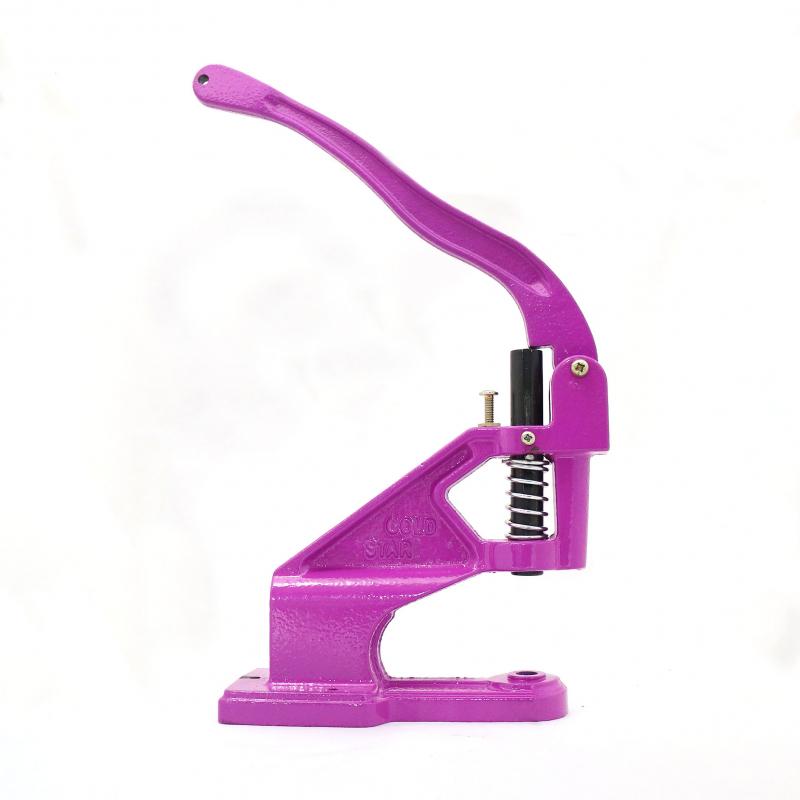
Rivet Press is a must if you sew stuff like purses and bags and use a lot of rivets like I do! It is easy to use and works easier than a hand held press. I got mine years ago at
Goldstar Tools Oh and of course a hole punch is also needed to punch your hole for the rivet. You can buy the hole die that fits the rivet press (I did, but it wouldn't punch a clear hole) or get the leather punch and punch by hand that comes with lots of hole sizes.
 |
| I got a purple color Rivet Press from Goldstar Tools. |
 |
| Hand held hole punch. From Amazon. |
12. Double-Sided Tape for fabric/sewing is useful for a lot of sewing where you cannot use pins or clips; like sewing faux leather, zipper installation, and more. (You can see a roll of it in the first photo I took above with all my gadgets).
13.
Tilt Table: I bought one of these about 35-40 years ago or close to that long ago at a quilt show. I love using this when I take a sewing machine to class or retreat as you can tilt the table at a few different angled heights, making it easier to see what you are sewing. My machines at home now all live in a table that are inset making them flat. So the tilt table is for people who don't have an inset table or cabinet for their sewing machines. Hint: you can also buy a couple of jumbo sized angled door stoppers to place at the back of your sewing machine to angle it too for a lot less $, as the tilt tables aren't cheap (they sure went up in price since I got mine). I saw that
Amazon sells a wooden style that you can angle in a couple of ways and it has a storage lift up section which is cool, to access your tools. Pic below:
 |
| This wooden version has a lift up storage place and you can angle your machine like above of the reverse. |
15. A
Slotted Ruler is great for cutting strips of various sizes. I use the Creative Grids brand Stripology slotted ruler the most of any ruler I own. I also have the June Tailor versions as well, but the Creative Grids seems sturdier to me. The JT version cracked near the corner edges on both the 12" and 18" size rulers. The CG seems to hold up better and already comes with the textured dots to hold it in place.
16. Check out my blog posting about
The Quilt Keeper here. It is an over-the-door quilt display hanger. I just posted about The Quilt Keeper last Saturday, so check it out. It is a fabulous gadget too!
There is one last thing I wanted to share with you. I had never heard of doing this before until a couple of weeks ago, but I tried it and it's really great! Do you condition your thread? On this video, the Sewing Doc shows you how to condition your thread using mineral oil. It's cheaper and will last longer than using Sewer's Aid Lubricant for your thread. She says this works on ALL kinds of thread, but since I live in the high desert climate of the Southwest, I decided to try it on just my cotton thread for now. Man oh man was that cotton thread thirsty! It soaked up that mineral oil quickly! I am sewing with the lubricated thread now and it is really nice I have to say. So watch the video and read the questions that people asked her. She answers the first time the question was asked, so best to scroll to the bottom of the questions and work up to the top so you can read her answers too.
Well are you gadgeted out yet? LOL! There is a lot more to see on this blog hop, so start hopping. Here are all of the participants:

Pin It Now!


.JPG)
.JPG)
.JPG)
.JPG)
.JPG)
.JPG)