Sunday, June 30, 2013

Stamp On It Blog Hop

Madame Samm of Sew We Quilt came up with this blog hop about creating a postage stamp depicting things that we like. What would you put on a postage stamp if you were designing one about you? My mind was racing with all kinds of ideas and I could have made several different stamps showing the things I like, but of course there is never enough time to do them all. I did manage to create 2 things though. So here they are~
I love flowers so I used a flower stencil and Shiva Paintstiks to create this Postage Stamp Quilt. 
I hand embroidered the lettering on this small quilt. The button and rickrack represents the cancellation mark.  I chose 13 cents because I was born on the 13th day (of November) and this is 2013.
I added some hand embroidery and a few buttons as well as a little hand quilting.

The border and binding fabric is one of the fat quarter fabrics I won from the Shake Your Pom-Pom Blog Hop. The stamp perforation was a scrapbook plastic template that I traced and cut.
I also love paisley. This piece is made using mostly wool or wool blend felt. The black background was from an old wool suit, the green border was from an old wool garment and the paisley motif bases are wool felt I hand dyed. The tops of each paisley is a different material. I added lots of sequins for some bling too.
Again I used a button and rickrack to represent the cancellation mark. I chose 8 cents because I like the number 8.
I had this pin with the American flag so I used the pin to represent the country where I live.
The large rickrack all around represents the stamp perforations. I added some sequins to  the rickrack.
I like the moon and it's part of my blog name too. I also like stars, so I sewed this netting fabric to the paisley felt.
I added a satin fabric on this paisley. I added a lot of sequins and wool circles and embroidery to the piece.
To this paisley I stitched on a piece of star punchinella (also called sequin waste)
This was a happy accident. I was stitching down this sequin when afterward  I felt it was actually 2 sequins that were stuck together. So I pulled the top sequin up like a flower.
Another satin-like fabric I stitched to the felt paisley.
Both stamps together so you can see the size difference.
Today's Schedule~ 
and a big THANK YOU to Thearica from Pigtales and Quilts for being the cheerleader for us all.
July 1

Quilt Matters

Scrapbook-ChickADoodle 

Patchouli Moon {me}

The Slow Quilter

A Loose Thread

Janes Fabrics and Quilts

Selina Quilts

Debby Kratovil Quilts

Dancing Thru Threads

  Pin It Now!

Saturday, June 29, 2013

Knit Scarf...Well Almost...

I finished knitting the scarf I was working on. It's a blue and purple variegated yarn I bought last year when I went on the Farm and Fiber Tour in Edgewood, NM. It's a fingering/sock weight yarn. I knit a diagonal lace pattern. It needed to be blocked, so I put it in the bathroom sink to soak in some hair conditioner. I love to use hair conditioner to wash/soak my knit items in before blocking. Not only does the conditioner make it feel soft, but it really conditions the wool fibers too. I only use natural conditioners that have really good ingredients and essential oils instead of artificial fragrances because the chemical fragrances make me feel sick. I have chemical sensitivities so I do not use mainstream products. I buy my health and beauty products from natural food stores, food co-ops, Whole Foods and places like that.
Here is my knit scarf soaking in the hair conditioner.
A little of the blue dye has been released into the water.
Looks kind of pretty soaking in the water that turned blue.
If you didn't already know this was a knit scarf soaking in a sink of water, what would you think it looked like? It looks a bit like an aerial view of an island and the pretty blue ocean and the white to the right looks like a cloud. I'm always looking at things with an artistic eye. I see patterns, shapes, colors, textures in everything.
I'll be posting the finished blocked scarf as soon as it is dry and I get a photo of it. So check back soon.

   Pin It Now!

Friday, June 28, 2013

Kumihimo or Japanese Braiding

I bought a Kumihimo (Japanese Braiding) kit when I went to the Fiber Arts Fiesta in Albuquerque in this past May. I have only done the simplest braid so far. I checked out a few library books and they show how to make several different braid combinations similar to knitting different stitches. What these books do not explain is how to make the braided cording into something. They have ideas to use it for making necklaces, bracelets, drapery ties, belts, etc. But they do not show how to do any of those. So I am playing around with how and what to do with the cording I make. Also, I am guessing how much ribbon or yarn to use as I have no idea how much I might need to wind around the bobbins.
This is the Kumihimo disk and the yarn bobbins. I have a chenille yarn I am braiding right now. I thought these would make wonderful bag handles.
I asked my 5-year old grandson to be a hand model for me so I could take a photo of the  bracelet I just made. His wrist is the same size as mine!
I used a variegated ribbon yarn to create this braided bracelet.
Not quite sure how or what size crimps to use because of all the ribbon thickness, I decided to just make a loop on one end and a few knots on the other end. This way the loop goes over the knot to hold it in place on the wrist. It worked perfectly. I then wove the ribbon ends into the knot and snipped the excess ribbon. I gave this bracelet to my daughter because she chose this ribbon color and asked me to make her one.
Pin It Now!

Thursday, June 27, 2013

Bear Paw Quilt

I made this twin size Bear Paw quilt when my daughter was a teenager in high school.  I saw it in her bedroom the other day while I was babysitting my grandson. She had it folded up in fourths on the floor for my grandson to lie down on!! I told her no, no, no quilts are NOT meant to be sat upon. Quilts are meant to cover your body for warmth. My son had done something similar and the quilting came out of his quilt. So after a lecture from me about the care of quilts I told him and now my daughter, I will not make anymore quilts for them if they are not cared for properly. Geesh, you would think they would know better.
I didn't have a digital camera then, so I am taking a photo of it now, even though it was made about 13-14 years ago. I spent about a year collecting various purple and green fabrics to make this quilt. I even found about 8 of these blocks I had leftover that I didn't use. I think I had figured the wrong amount to make because I forgot about the border. I might just make a mini version of this quilt using those blocks I found.
My daughter's favorite colors back then were green and purple. She now likes brown and blue or green.
I hand quilted flowers in the batik green squares.
Pin It Now!

Monday, June 24, 2013

Pillow Cases

My daughter was given 2 queen-sized pillows recently, so naturally I would make her 2 pillowcases. I looked through my fabrics to see what I had and what I thought my daughter would like. I needed enough fabric for 2 pillowcases too. I came across this fabric that my good friend Tara had given me when she was getting rid of some stuff she no longer wanted. It was perfect for my daughter because she loves these colors and she loves designs from India. Thank you Tara!!!
I took one pillow home with me to make the pillowcase and make sure it fit properly.


Because this fabric had a border print already, I didn't need to add a contrasting fabric at the opening side.

   Pin It Now!

Sunday, June 16, 2013

Century Plant

I was out walking one morning when I saw this Agave or more commonly known as a Century Plant, in bloom. These cactus send up a tall stalk that looks rather like a giant asparagus, and then they bloom. Once an agave blooms, the plant dies. They actually only live 10-30 years, so calling it a century plant is not exactly right.
This is what the agave looks like before it sends up a giant stalk. This was an agave that was growing along side the  agave that was in bloom.
It's so large I had to take several photos showing each section. These always remind me of the trees in Dr. Seuss' book, The Lorax.

Here is the agave at the base .
You can see the thorns and how succulent the leaves are.
The large thick stalk.

I had to stand back far enough to get the entire plant in the photo. You can see how tall it is compared to the house next door. The agave can average 26 feet in height.
Pin It Now!

Tuesday, June 11, 2013

Tammy Bag Blog Hop: My Day

 The Tammy Bag Blog Hop starts today, which is another Madame Samm Blog Hop of  Sew We Quilt. Thanks Madame Samm for creating and being our cheerleader for this hop. I love this bag!
Patchouli Moon Studio
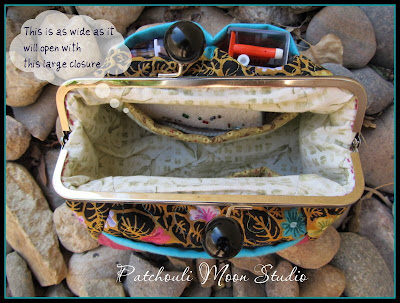
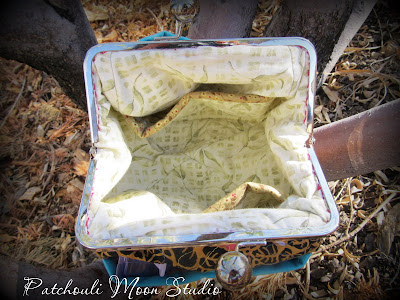
I had this large metal purse closure on hand and so I used it without really thinking. I sewed it on by hand, which took a long time to do. Then I realized the closure was too large.
Patchouli Moon Studio
As you can see this is as wide as it will open, making it hard to get at the pockets inside the bag. I thought I should take photos of my mistake so that perhaps others might learn from this and so I won't repeat this mistake in the future either.
Patchouli Moon Studio
Here I sewed on the proper size metal closure for this bag. See how she sits up taller than the  first photo, which looks short and fat.
Patchouli Moon Studio
Now she opens up wide so that I can get to the items I place in her pockets.  Please don't look at my pink thread stitching that shows on the inside. That's the only thing I have trouble with is hiding those stitches.
Patchouli Moon Studio
I quilted my bag and added contrasting pockets and faux piping.
Patchouli Moon Studio
I quilted the inside pockets too and also added a contrasting faux piping.
Patchouli Moon Studio
I didn't have another metal hardware closure, but thought I would make this bag without it. I added a braided handle to carry her. I also added a hook.
Patchouli Moon Studio
This is the other side, which looks a bit different. I quilted the tie dyed fabric.
Patchouli Moon Studio
The hook is so that I can hook a pair of scissors or keys. The fabric tab then can be placed inside the bag pocket to keep them safe and so I don't lose my scissors.
Patchouli Moon Studio
I tucked in the sides here to see how it would look. I am thinking of adding a snap on each side  so that the sides stay like this when I am not using it. what do you think? Do you like the sides snapped in or not?
Patchouli Moon Studio
The other side of the bag with the sides tucked in.
Patchouli Moon Studio
The lining inside. I quilted the turquoise pockets and added the faux piping. To keep the bag closed I added a magnetic snap.

I also wanted to show you what I do to protect my scissors and seam ripper points: I use knitting needle point protectors. These silicone ones are made by Clover brand. The smallest ones are green and they fit perfectly over these small scissors. The purple ones are the next size up and work on my seam ripper and Fiskar scissors. I made a beaded leash for one pair of scissors so that I don't lose the point protector. 

The point protectors come in a set of 4 for these smaller sizes. They make large and extra large protectors too, but those come in packs of 2 and they are a rubber material and not silicone. There are other brands out there, but I don't know if they work as well as these. I am not affiliated with Clover in any way, I just like a lot of their products.

Patchouli Moon Studio

                                                                                    Here's the Full Schedule: 
June 12th  (Wednesday)
Inga 
                                     
June 13th (Thursday)


June 14th (Friday)


 June 17th (Monday)


June 18th (Tuesday)


Pin It Now!
Related Posts Plugin for WordPress, Blogger...